Django Facebook user integration with whitelisting
It's recently become quite popular for web sites to abandon the tasks of user authentication and account management, and to instead shoulder off this burden to a third-party service. One of the big services available for this purpose is Facebook. You may have noticed "Sign in with Facebook" buttons appearing ever more frequently around the 'Web.
The common workflow for Facebook user integration is: user is redirected to the Facebook login page (or is shown this page in a popup); user enters credentials; user is asked to authorise the sharing of Facebook account data with the non-Facebook source; a local account is automatically created for the user on the non-Facebook site; user is redirected to, and is automatically logged in to, the non-Facebook site. Also quite common is for the user's Facebook profile picture to be queried, and to be shown as the user's avatar on the non-Facebook site.
This article demonstrates how to achieve this common workflow in Django, with some added sugary sweetness: maintaning a whitelist of Facebook user IDs in your local database, and only authenticating and auto-registering users who exist on this whitelist.
Install dependencies
I'm assuming that you've already got an environment set up, that's equipped for Django development. I.e. you've already installed Python (my examples here are tested on Python 2.6 and 2.7), a database engine (preferably SQLite on your local environment), pip (recommended), and virtualenv (recommended). If you want to implement these examples fully, then as well as a dev environment with these basics set up, you'll also need a server to which you can deploy a Django site, and on which you can set up a proper public domain or subdomain DNS (because the Facebook API won't actually talk to or redirect back to your localhost, it refuses to do that).
You'll also need a Facebook account, with which you will be registering a new "Facebook app". We won't actually be developing a Facebook app in this article (at least, not in the usual sense, i.e. we won't be deploying anything to facebook.com), we just need an app key in order to talk to the Facebook API.
Here are the Python dependencies for our Django project. I've copy-pasted this straight out of my requirements.txt file, which I install on a virtualenv using pip install -E . -r requirements.txt (I recommend you do the same):
Django==1.3.0
-e git+http://github.com/Jaza/django-allauth.git#egg=django-allauth
-e git+http://github.com/facebook/python-sdk.git#egg=facebook-python-sdk
-e git+http://github.com/ericflo/django-avatar.git#egg=django-avatar
The first requirement, Django itself, is pretty self-explanatory. The next one, django-allauth, is the foundation upon which this demonstration is built. This app provides authentication and account management services for Facebook (plus Twitter and OAuth currently supported), as well as auto-registration, and profile pic to avatar auto-copying. The version we're using here, is my GitHub fork of the main project, which I've hacked a little bit in order to integrate with our whitelisting functionality.
The Facebook Python SDK is the base integration library provided by the Facebook team, and allauth depends on it for certain bits of functionality. Plus, we've installed django-avatar so that we get local user profile images.
Once you've got those dependencies installed, let's get a new Django project set up with the standard command:
django-admin.py startproject myproject
This will get the Django foundations installed for you. The basic configuration of the Django settings file, I leave up to you. If you have some experience already with Django (and if you've got this far, then I assume that you do), you no doubt have a standard settings template already in your toolkit (or at least a standard set of settings tweaks), so feel free to use it. I'll be going over the settings you'll need specifically for this app, in just a moment.
Fire up ye 'ol runserver, open your browser at http://localhost:8000/, and confirm that the "It worked!" page appears for you. At this point, you might also like to enable the Django admin (add 'admin' to INSTALLED_APPS, un-comment the admin callback in urls.py, and run syncdb; then confirm that you can access the admin). And that's the basics set up!
Register the Facebook app
Now, we're going to jump over to the Facebook side of the setup, in order to register our site as a Facebook app, and to then receive our Facebook app credentials. To get started, go to the Apps section of the Facebook Developers site. You'll probably be prompted to log in with your Facebook account, so go ahead and do that (if asked).
On this page, click the button labelled "Create New App". In the form that pops up, in the "App Display Name" field, enter a unique name for your app (e.g. the name of the site you're using this on — for the example app that I registered, I used the name "FB Whitelist"). Then, tick "I Agree" and click "Continue".
Once this is done, your Facebook app is registered, and you'll be taken to a form that lets you edit the basic settings of the app. The first setting that you'll want to configure is "App Domain": set this to the domain or subdomain URL of your site (without an http:// prefix or a trailing slash). A bit further down, in "Website — Site URL", enter this URL again (this time, with the http:// prefix and a trailing slash). Be sure to save your configuration changes on this page.
Next is a little annoying setting that must be configured. In the "Auth Dialog" section, for "Privacy Policy URL", once again enter the domain or subdomain URL of your site. Enter your actual privacy policy URL if you have one; if not, don't worry — Facebook's authentication API refuses to function if you don't enter something for this, so the URL of your site's front page is better than nothing.
Note: at some point, you'll also need to go to the "Advanced" section, and set "Sandbox Mode" to "Disabled". This is very important! If your app is set to Sandbox mode, then nobody will be able to log in to your Django site via Facebook auth, apart from those listed in the Facebook app config as "developers". It's up to you when you want to disable Sandbox mode, but make sure you do it before non-dev users start trying to log in to your site.
On the main "Settings — Basic" page for your newly-registered Facebook app, take note of the "App ID" and "App Secret" values. We'll be needing these shortly.
Configure Django settings
I'm not too fussed about what else you have in your Django settings file (or in how your Django settings are structured or loaded, for that matter); but if you want to follow along, then you should have certain settings configured per the following guidelines:
- Your
INSTALLED_APPSis to include:
[
    'avatar',
    'uni_form',

    'allauth',
    'allauth.account',
    'allauth.socialaccount',
    'allauth.facebook',
]
(You'll need to re-run
syncdbafter enabling these apps).(Note: django-allauth also expects the database schema for the email confirmation app to exist; however, you don't actually need this app enabled. So, what you can do, is add
'emailconfirmation'to yourINSTALLED_APPS, thensyncdb, then immediately remove it). - Your
TEMPLATE_CONTEXT_PROCESSORSis to include:
[
    'allauth.context_processors.allauth',
    'allauth.account.context_processors.account',
]
(See the TEMPLATE_CONTEXT_PROCESSORS documentation for the default value of this setting, to paste into your settings file).
- Your
AUTHENTICATION_BACKENDSis to include:
[
    'allauth.account.auth_backends.AuthenticationBackend',
]
(See the AUTHENTICATION_BACKENDS documentation for the default value of this setting, to paste into your settings file).
- Set a value for the
AVATAR_STORAGE_DIRsetting, for example:
AVATAR_STORAGE_DIR = 'uploads/avatars' - Set a value for the
LOGIN_REDIRECT_URLsetting, for example:
LOGIN_REDIRECT_URL = '/' - Set this:
ACCOUNT_EMAIL_REQUIRED = True
Additionally, you'll need to create a new Facebook App record in your Django database. To do this, log in to your shiny new Django admin, and under "Facebook — Facebook apps", add a new record:
- For "Name", copy the "App Display Name" from the Facebook page.
- For both "Application id" and "Api key", copy the "App ID" from the Facebook page.
- For "Application secret", copy the "App Secret" from the Facebook page.
Once you've entered everything on this form (set "Site" as well), save the record.
Implement standard Facebook authentication
By "standard", I mean "without whitelisting". Here's how you do it:
- Add these imports to your
urls.py:
from allauth.account.views import logout
from allauth.socialaccount.views import login_cancelled, login_error
from allauth.facebook.views import login as facebook_login
And (in the same file), add these to your
urlpatternsvariable:[ url(r"^logout/$", logout, name="account_logout"), url('^login/cancelled/$', login_cancelled, name='socialaccount_login_cancelled'), url('^login/error/$', login_error, name='socialaccount_login_error'), url('^login/facebook/$', facebook_login, name="facebook_login"), ] - Add this to your front page template file:
<div class="socialaccount_ballot"> <ul class="socialaccount_providers"> </ul> </div>(Note: I'm assuming that by this point, you've set up the necessary URL callbacks, views, templates, etc. to get a working front page on your site; I'm not going to hold your hand and go through all that).
- If you'd like, you can customise the default authentication templates provided by django-allauth. For example, I overrode the
socialaccount/snippets/provider_list.htmlandsocialaccount/authentication_error.htmltemplates in my test implementation.
That should be all you need, in order to get a working "Login with Facebook" link on your site. So, deploy everything that's been done so far to your online server, navigate to your front page, and click the "Login" link. If all goes well, then a popup will appear prompting you to log in to Facebook (unless you already have an active Facebook session in your browser), followed by a prompt to authorise your Django site to access your Facebook account credentials (to which you and your users will have to agree), and finishing with you being successfully authenticated.
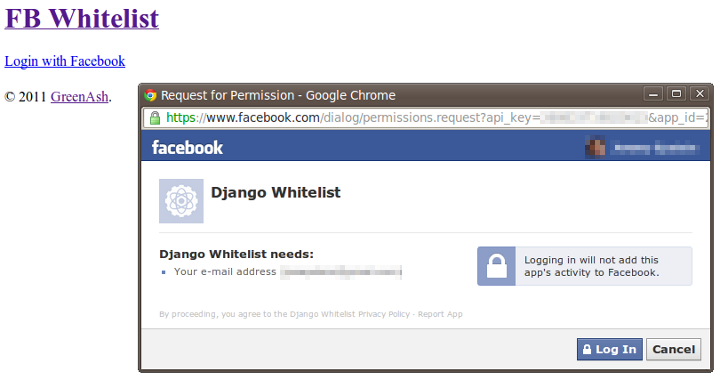
You should be able to confirm authentication success, by noting that the link on your front page has changed to "Logout".
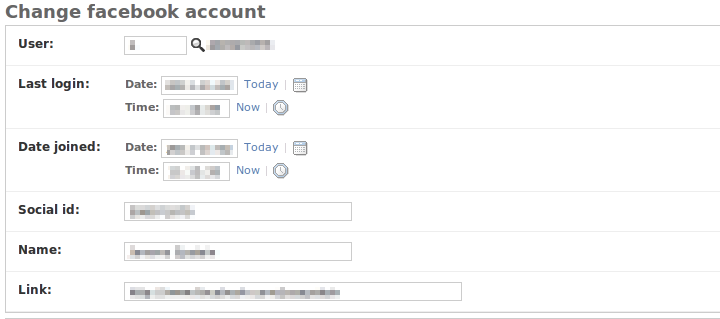
Additionally, if you go into the Django admin (you may first need to log out of your Facebook user's Django session, and then log in to the admin using your superuser credentials), you should be able to confirm that a new Django user was automatically created in response to the Facebook auth procedure. Additionally, you should find that an avatar record has been created, containing a copy of your Facebook profile picture; and, if you look in the "Facebook accounts" section, you should find that a record has been created here, complete with your Facebook user ID and profile page URL.
Great! Now, on to the really fun stuff.
Build a whitelisting app
So far, we've got a Django site that anyone can log into, using their Facebook credentials. That works fine for many sites, where registration is open to anyone in the general public, and where the idea is that the more user accounts get registered, the better. But what about a site where the general public cannot register, and where authentication should be restricted to only a select few individuals who have been pre-registered by site admins? For that, we need to go beyond the base capabilities of django-allauth.
Create a new app in your Django project, called fbwhitelist. The app should have the following files (file contents provided below):
models.py :
from django.contrib.auth.models import User
from django.db import models


class FBWhiteListUser(models.Model):
    name            = models.CharField(max_length=100)
    email           = models.EmailField(unique=True)
    social_id       = models.CharField(verbose_name='Facebook user ID',
                                       blank=True, max_length=100)
    active          = models.BooleanField(default=False)

    def __unicode__(self):
        return self.name

    class Meta:
        verbose_name = 'facebook whitelist user'
        verbose_name_plural = 'facebook whitelist users'
        ordering = ('name', 'email')

    def save(self, *args, **kwargs):
        try:
            old_instance = FBWhiteListUser.objects.get(pk=self.pk)
            if not self.active:
                if old_instance.active:
                    self.deactivate_user()
            else:
                if not old_instance.active:
                    self.activate_user()
        except FBWhiteListUser.DoesNotExist:
            pass

        super(FBWhiteListUser, self).save(*args, **kwargs)

    def delete(self):
        self.deactivate_user()

        super(FBWhiteListUser, self).delete()

    def deactivate_user(self):
        try:
            u = User.objects.get(email=self.email)
            if u.is_active and not u.is_superuser and not u.is_staff:
                u.is_active = False
                u.save()
        except User.DoesNotExist:
            pass

    def activate_user(self):
        try:
            u = User.objects.get(email=self.email)
            if not u.is_active:
                u.is_active = True
                u.save()
        except User.DoesNotExist:
            pass
utils.py :
Copy this slugify code snippet as the full contents of the utils.py file.
admin.py :
import re
import urllib2

from django import forms
from django.contrib import admin
from django.contrib.auth.models import User

from allauth.facebook.models import FacebookAccount
from allauth.socialaccount import app_settings
from allauth.socialaccount.helpers import _copy_avatar

from utils import slugify

from models import FBWhiteListUser


class FBWhiteListUserAdminForm(forms.ModelForm):
    class Meta:
        model = FBWhiteListUser

    def __init__(self, *args, **kwargs):
        super(FBWhiteListUserAdminForm, self).__init__(*args, **kwargs)

    def save(self, *args, **kwargs):
        m = super(FBWhiteListUserAdminForm, self).save(*args, **kwargs)

        try:
            u = User.objects.get(email=self.cleaned_data['email'])
        except User.DoesNotExist:
            u = self.create_django_user()

            if self.cleaned_data['social_id']:
                self.create_facebook_account(u)

        return m

    def create_django_user(self):
        name = self.cleaned_data['name']
        email = self.cleaned_data['email']
        active = self.cleaned_data['active']
        m = re.search(r'^(?P<first_name>[^ ]+) (?P<last_name>.+)$', name)
        name_slugified = slugify(name)
        first_name = ''
        last_name = ''

        if m:
            d = m.groupdict()
            first_name = d['first_name']
            last_name = d['last_name']

        u = User(username=name_slugified,
                 email=email,
                 last_name=last_name,
                 first_name=first_name)

        u.set_unusable_password()
        u.is_active = active
        u.save()

        return u

    def create_facebook_account(self, u):
        social_id = self.cleaned_data['social_id']
        name = self.cleaned_data['name']
        try:
            account = FacebookAccount.objects.get(social_id=social_id)
        except FacebookAccount.DoesNotExist:
            account = FacebookAccount(social_id=social_id)

        account.link = 'http://www.facebook.com/profile.php?id=%s' % social_id

        req = urllib2.Request(account.link)
        res = urllib2.urlopen(req)

        new_link = res.geturl()
        if not '/people/' in new_link and not 'profile.php' in new_link:
            account.link = new_link

        account.name = name

        request = None
        if app_settings.AVATAR_SUPPORT:
            _copy_avatar(request, u, account)

        account.user = u
        account.save()


class FBWhiteListUserAdmin(admin.ModelAdmin):
    list_display = ('name', 'email', 'active')
    list_filter = ('active',)
    search_fields = ('name', 'email')
    fields = ('name', 'email', 'social_id', 'active')

    def __init__(self, *args, **kwargs):
        super(FBWhiteListUserAdmin, self).__init__(*args, **kwargs)

    form = FBWhiteListUserAdminForm


admin.site.register(FBWhiteListUser, FBWhiteListUserAdmin)
(Note: also ensure that you have an empty __init__.py file in your app's directory, as you do with most all Django apps).
Also, of course, you'll need to add 'fbwhitelist' to your INSTALLED_APPS setting (and after doing that, a syncdb will be necessary).
Most of the code above is pretty basic, it just defines a Django model for the whitelist, and provides a basic admin view for that model. In implementing this code, feel free to modify the model and the admin definitions liberally — in particular, you may want to add additional fields to the model, per your own custom project needs. What this code also does, is automatically create both a corresponding Django user, and a corresponding socialaccount Facebook account record (including Facebook profile picture to django-avatar handling), whenever a new Facebook whitelist user instance is created.
Integrate it with django-allauth
In order to let django-allauth know about the new fbwhitelist app and its FBWhiteListUser model, all you need to do, is to add this to your Django settings file:
SOCIALACCOUNT_WHITELIST_MODEL = 'fbwhitelist.models.FBWhiteListUser'If you're interested in the dodgy little hacks I made to django-allauth, in order to make it magically integrate with a specified whitelist app, here's the main code snippet responsible, just for your viewing pleasure (from _process_signup in socialaccount/helpers.py):
# Extra stuff hacked in here to integrate with
# the account whitelist app.
# Will be ignored if the whitelist app can't be
# imported, thus making this slightly less hacky.
whitelist_model_setting = getattr(
    settings,
    'SOCIALACCOUNT_WHITELIST_MODEL',
    None
)
if whitelist_model_setting:
    whitelist_model_path = whitelist_model_setting.split(r'.')
    whitelist_model_str = whitelist_model_path[-1]
    whitelist_path_str = r'.'.join(whitelist_model_path[:-1])
    try:
        whitelist_app = __import__(whitelist_path_str, fromlist=[whitelist_path_str])
        whitelist_model = getattr(whitelist_app, whitelist_model_str, None)
        if whitelist_model:
            try:
                guest = whitelist_model.objects.get(email=email)
                if not guest.active:
                    auto_signup = False
            except whitelist_model.DoesNotExist:
                auto_signup = False
    except ImportError:
        pass
Basically, the hack attempts to find and to query our whitelist model; and if it doesn't find a whitelist instance whose email matches that provided by the Facebook auth API, or if the found whitelist instance is not set to 'active', then it halts auto-creation and auto-login of the user into the Django site. What can I say… it does the trick!
Build a Facebook ID lookup utility
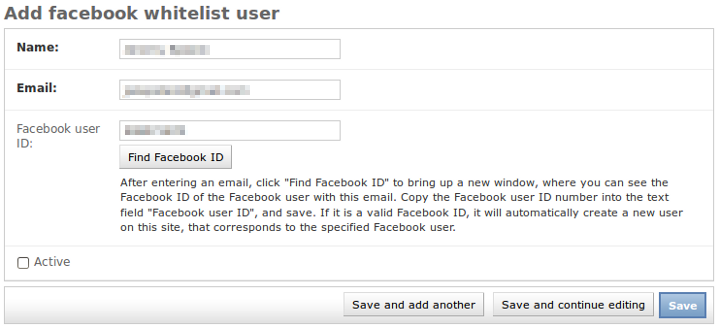
The Django admin interface so far for managing the whitelist is good, but it does have one glaring problem: it requires administrators to know the Facebook account ID of the person they're whitelisting. And, as it turns out, Facebook doesn't make it that easy for regular non-techies to find account IDs these days. It used to be straightforward enough, as profile page URLs all had the account ID in them; but now, most profile page URLs on Facebook are aliased, and the account ID is pretty well obliterated from the Facebook front-end.
So, let's build a quick little utility that looks up Facebook account IDs, based on a specified email. Add these files to your 'fbwhitelist' app to implement it:
facebook.py :
import urllib


class FacebookSearchUser(object):
    @staticmethod
    def get_query_email_request_url(email, access_token):
        """Queries a Facebook user based on a given email address. A valid Facebook Graph API access token must also be provided."""

        args = {
            'q': email,
            'type': 'user',
            'access_token': access_token,
        }
        return 'https://graph.facebook.com/search?' + \
               urllib.urlencode(args)
views.py :
from django.utils.simplejson import loads
import urllib2

from django.conf import settings
from django.contrib.admin.views.decorators import staff_member_required
from django.http import HttpResponse, HttpResponseBadRequest

from fbwhitelist.facebook import FacebookSearchUser


class FacebookSearchUserView(object):
    @staticmethod
    @staff_member_required
    def query_email(request, email):
        """Queries a Facebook user based on the given email address. This view cannot be accessed directly."""

        access_token = getattr(settings, 'FBWHITELIST_FACEBOOK_ACCESS_TOKEN', None)

        if access_token:
            url = FacebookSearchUser.get_query_email_request_url(email, access_token)
            response = urllib2.urlopen(url)
            fb_data = loads(response.read())
            if fb_data['data'] and fb_data['data'][0] and fb_data['data'][0]['id']:
                return HttpResponse('Facebook ID: %s' % fb_data['data'][0]['id'])
            else:
                return HttpResponse('No Facebook credentials found for the specified email.')

        return HttpResponseBadRequest('Error: no access token specified in Django settings.')
urls.py :
from django.conf.urls.defaults import *

from views import FacebookSearchUserView


urlpatterns = patterns('',
    url(r'^facebook_search_user/query_email/(?P<email>[^\/]+)/$',
        FacebookSearchUserView.query_email,
        name='fbwhitelist_search_user_query_email'),
)
Plus, add this to the urlpatterns variable in your project's main urls.py file:
[
    (r'^fbwhitelist/', include('fbwhitelist.urls')),
]
In your MEDIA_ROOT directory, create a file js/fbwhitelistadmin.js, with this content:
(function($) {
    var fbwhitelistadmin = function() {

        function init_social_id_from_email() {
            $('.social_id').append('<input type="submit" value="Find Facebook ID" id="social_id_get_from_email" /><p>After entering an email, click "Find Facebook ID" to bring up a new window, where you can see the Facebook ID of the Facebook user with this email. Copy the Facebook user ID number into the text field "Facebook user ID", and save. If it is a valid Facebook ID, it will automatically create a new user on this site, that corresponds to the specified Facebook user.</p>');
            $('#social_id_get_from_email').live('click', function() {
                var email_val = $('#id_email').val();
                if (email_val) {
                    var url = 'http://fbwhitelist.greenash.net.au/fbwhitelist/facebook_search_user/query_email/' + email_val + '/';
                    window.open(url);
                }

                return false;
            });
        }

        return {
            init: function() {
                if ($('#content h1').text() == 'Change facebook whitelist user') {
                    $('#id_name, #id_email, #id_social_id').attr('disabled', 'disabled');
                }
                else {
                    init_social_id_from_email();
                }
            }
        }
    }();

    $(document).ready(function() {
        fbwhitelistadmin.init();
    });
})(django.jQuery);
And to load this file on the correct Django admin page, add this code to the FBWhiteListUserAdmin class in the fbwhitelist/admin.py file:
    class Media:
        js = ("js/fbwhitelistadmin.js",)
Additionally, you're going to need a Facebook Graph API access token. To obtain one, go to a URL like this:
https://graph.facebook.com/oauth/authorize?client_id=APP_ID&scope=offline_access&redirect_uri=SITE_URLReplacing the APP_ID and SITE_URL bits with your relevant Facebook App credentials. You should then be redirected to a URL like this:
SITE_URL?code=TEMP_CODEThen, taking note of the TEMP_CODE part, go to a URL like this:
https://graph.facebook.com/oauth/access_token?client_id=APP_ID&redirect_uri=SITE_URL&client_secret=APP_SECRET&code=TEMP_CODEReplacing the APP_ID, SITE_URL, and APP_SECRET bits with your relevant Facebook credentials, and replacing TEMP_CODE with the code from the URL above. You should then see a plain-text page response in this form:
access_token=ACCESS_TOKENAnd the ACCESS_TOKEN bit is what you need to take note of. Add this value to your settings file:
FBWHITELIST_FACEBOOK_ACCESS_TOKEN = 'ACCESS_TOKEN'Of very important note, is the fact that what you've just saved in your settings is a long-life offline access Facebook access token. We requested that the access token be long-life, with the scope=offline_access parameter in the first URL request that we made to Facebook (above). This means that the access token won't expire for a very long time, so you can safely keep it in your settings file without having to worry about constantly needing to change it.
Exactly how long these tokens last, I'm not sure — so far, I've been using mine for about six weeks with no problems. You should be notified if and when your access token expires, because if you provide an invalid access token to the Graph API call, then Facebook will return an HTTP 400 response (bad request), and this will trigger urllib2.urlopen to raise an HTTPError exception. How you get notified, will depend on how you've configured Django to respond to uncaught exceptions; in my case, Django emails me an error report, which is sufficient notification for me.
Your Django admin should now have a nice enough little addition for Facebook account ID lookup:
I say "nice enough", because it would also be great to change this from showing the ID in a popup, to actually populating the form field with the ID value via JavaScript (and showing an error, on fail, also via JavaScript). But honestly, I just haven't got around to doing this. Anyway, the basic popup display works as is — only drawback is that it requires copy-pasting the ID into the form field.
Finished product
And that's everything — your Django-Facebook auth integration with whitelisting should now be fully functional! Give it a try: attempt to log in to your Django site via Facebook, and it should fail; then add your Facebook account to the whitelist, attempt to log in again, and there should be no errors in sight. It's a fair bit of work, but this setup is possible once all the pieces are in place.
I should also mention that it's quite ironic, my publishing this long and detailed article about developing with the Facebook API, when barely a month ago I wrote a scathing article on the evils of Facebook. So, just to clarify: yes, I do still loathe Facebook, my opinion has not taken a somersault since publishing that rant.
However— what can I say, sometimes you get clients that want Facebook integration. And hey, them clients do pay the bills. Also, even I cannot deny that Facebook's enormous user base makes it an extremely attractive authentication source. And I must also concede that since the introduction of the Graph API, Facebook has become a much friendlier and a much more stable platform for developers to work with.