python - GreenAshPoignant wit and hippie ramblings that are pertinent to python
https://greenash.net.au/thoughts/topics/python/
2024-06-09T00:00:00ZIntroducing: Floyd-Warshall CSV Generator2024-06-09T00:00:00Z2024-06-09T00:00:00ZJazahttps://greenash.net.au/thoughts/2024/06/introducing-floyd-warshall-csv-generator/
I built a little Python script called the Floyd-Warshall CSV Generator. It takes a CSV of graph edges as input, and generates a CSV of the edges that are the shortest paths between all pairs of vertices.
That is, it generates all the possible (indirect) paths from one point to all other points, based on the (direct) paths that are already known, with duplicate (undirected) paths filtered out, and with paths whose cost is more than max-weight filtered out.
I wrote this script in order to generate the "all edges" data that's shown in the World Locality Transit Graph, which I'll also be blogging about real soon. Let me know if you put this script to any other interesting uses!
]]>
On FastAPI2024-04-28T00:00:00Z2024-04-28T00:00:00ZJazahttps://greenash.net.au/thoughts/2024/04/on-fastapi/
Over the past year or two, I've been heavily using FastAPI in my day job. I've been around the Python web framework block, and I gotta say, FastAPI really succeeds in its mission of building on the strengths of its predecessors (particularly Django and Flask), while feeling more modern and adhering to certain opinionated principles. In my opinion, it's pretty much exactly what the best-in-breed of the next logical generation of web frameworks should look like.
¡Ándale, ándale, arriba! Image source: The Guardian
Let me start by lauding FastAPI's excellent documentation. Having a track record of rock-solid documentation, was (and still is!) – in my opinion – Django's most impressive achievement, and I'm pleased to see that it's also becoming Django's most enduring legacy. FastAPI, like Django, includes docs changes together with code changes in a single (these days called) pull request; it clearly documents that certain features are deprecated; and its docs often go beyond what is strictly required, by including end-to-end instructions for integrating with various third-party tools and services.
FastAPI's docs raise the bar further still, with more than a dash of humour in many sections, and with a frequent sprinkling of emojis as standard fare. That latter convention I have some reservations about – call me old-fashioned, but you could say that emoji-filled docs is unprofessional and is a distraction. However, they seem to enhance rather than detract from overall quality; and, you know what, they put a non-emoji real-life smile on my face. So, they get my tick of approval.
FastAPI more-or-less sits in the Flask camp of being a "microframework", in that it doesn't include an ORM, a template engine, or various other things that Django has always advertised as being part of its "batteries included" philosophy. But, on the other hand, it's more in the Django camp of being highly opinionated, and of consciously including things with which it wants a hassle-free experience. Most notably, it includes Swagger UI and Redoc out-of-the-box. I personally had quite a painful experience generating Swagger docs in Flask, back in the day; and I've been tremendously pleased with how API doc generation Just Works™ in FastAPI.
Much like with Flask, being a microframework means that FastAPI very much stands on the shoulders of giants. Just as Flask is a thin wrapper on top of Werkzeug, with the latter providing all things WSGI; so too is FastAPI a thin wrapper on top of Starlette, with the latter providing all things ASGI. FastAPI also heavily depends on Pydantic for data schemas / validation, for strongly-typed superpowers, for settings handling, and for all things JSON. I think it's fair to say that Pydantic is FastAPI's secret sauce.
My use of FastAPI so far has been rather unusual, in that I've been building apps that primarily talk to an Oracle database (and, indeed, this is unusual for Python dev more generally). I started out by depending on the (now-deprecated) cx_Oracle library, and I've recently switched to its successor python-oracledb. I was pleased to see that the finefolks at Oracle recently released full async support for python-oracledb, which I'm now taking full advantage of in the context of FastAPI. I wrote a little library called fastapi-oracle which I'm using as a bit of glue code, and I hope it's of use to anyone else out there who needs to marry those two particular bits of tech together.
There has been a not-insignificant amount of chit-chat on the interwebz lately, voicing concern that FastAPI is a one-man show (with its BDFL@tiangolo showing no intention of that changing anytime soon), and that the FastAPI issue and pull request queues receive insufficient TLC. Based on my experience so far, I'm not too concerned about this. It is, generally speaking, not ideal if a project has a bus factor of 1, and if support requests and bug fixes are left to rot.
However, in my opinion, the code and the documentation of FastAPI are both high-quality and highly-consistent, and I appreciate that this is largely thanks to @tiangolo continuing to personally oversee every small change, and that loosening the reins would mean a high risk of that deteriorating. And, speaking of quality, I personally have yet to uncover any bugs either in FastAPI or its core dependencies (which I'm pleasantly surprised by, considering how heavily I've been using it) – it would appear that the items languishing in the queue are lower priority, and it would appear that @tiangolo is on top of critical bugs as they arise.
In summary, I'm enjoying coding with FastAPI, I feel like it's a great fit for building Python web apps in 2024, and it will continue to be my Python framework of choice for the foreseeable future.
]]>
A lightweight per-transaction Python function queue for Flask2017-12-04T00:00:00Z2017-12-04T00:00:00ZJazahttps://greenash.net.au/thoughts/2017/12/a-lightweight-per-transaction-python-function-queue-for-flask/
The premise: each time a certain API method is called within a Flask / SQLAlchemy app (a method that primarily involves saving something to the database), send various notifications, e.g. log to the standard logger, and send an email to site admins. However, the way the API works, is that several different methods can be forced to run in a single DB transaction, by specifying that SQLAlchemy only perform a commit when the last method is called. Ideally, no notifications should actually get triggered until the DB transaction has been successfully committed; and when the commit has finished, the notifications should trigger in the order that the API methods were called.
There are various possible solutions that can accomplish this, for example: a celery task queue, an event scheduler, and a synchronised / threaded queue. However, those are all fairly heavy solutions to this problem, because we only need a queue that runs inside one thread, and that lives for the duration of a single DB transaction (and therefore also only for a single request).
To solve this problem, I implemented a very lightweight function queue, where each queue is a deque instance, that lives inside flask.g, and that is therefore available for the duration of a given request context (or app context).
The code
The whole implementation really just consists of this one function:
from collections import deque

from flask import g


def queue_and_delayed_execute(
        queue_key, session_hash, func_to_enqueue,
        func_to_enqueue_ctx=None, is_time_to_execute_funcs=False):
    """Add a function to a queue, then execute the funcs now or later.

    Creates a unique deque() queue for each queue_key / session_hash
    combination, and stores the queue in flask.g. The idea is that
    queue_key is some meaningful identifier for the functions in the
    queue (e.g. 'banana_masher_queue'), and that session_hash is some
    identifier that's guaranteed to be unique, in the case of there
    being multiple queues for the same queue_key at the same time (e.g.
    if there's a one-to-one mapping between a queue and a SQLAlchemy
    transaction, then hash(db.session) is a suitable value to pass in
    for session_hash).

    Since flask.g only stores data for the lifetime of the current
    request (or for the lifetime of the current app context, if not
    running in a request context), this function should only be used for
    a queue of functions that's guaranteed to only be built up and
    executed within a single request (e.g. within a single DB
    transaction).

    Adds func_to_enqueue to the queue (and passes func_to_enqueue_ctx as
    kwargs if it has been provided). If is_time_to_execute_funcs is
    True (e.g. if a DB transaction has just been committed), then takes
    each function out of the queue in FIFO order, and executes the
    function.
    """
    # Initialise the set of queues for queue_key
    if queue_key not in g:
        setattr(g, queue_key, {})

    # Initialise the unique queue for the specified session_hash
    func_queues = getattr(g, queue_key)
    if session_hash not in func_queues:
        func_queues[session_hash] = deque()

    func_queue = func_queues[session_hash]

    # Add the passed-in function and its context values to the queue
    func_queue.append((func_to_enqueue, func_to_enqueue_ctx))

    if is_time_to_execute_funcs:
        # Take each function out of the queue and execute it
        while func_queue:
            func_to_execute, func_to_execute_ctx = (
                func_queue.popleft())
            func_ctx = (
                func_to_execute_ctx
                if func_to_execute_ctx is not None
                else {})
            func_to_execute(**func_ctx)

        # The queue is now empty, so clean up by deleting the queue
        # object from flask.g
        del func_queues[session_hash]
To use the function queue, calling code should look something like this:
from flask import current_app as app
from flask_mail import Message
from sqlalchemy.exc import SQLAlchemyError

from myapp.extensions import db, mail


def do_api_log_msg(log_msg):
    """Log the specified message to the app logger."""
    app.logger.info(log_msg)


def do_api_notify_email(mail_subject, mail_body):
    """Send the specified notification email to site admins."""
    msg = Message(
        mail_subject,
        sender=app.config['MAIL_DEFAULT_SENDER'],
        recipients=app.config['CONTACT_EMAIL_RECIPIENTS'])
    msg.body = mail_body

    mail.send(msg)

    # Added for demonstration purposes, not really needed in production
    app.logger.info('Sent email: {0}'.format(mail_subject))


def finalise_api_op(
        log_msg=None, mail_subject=None, mail_body=None,
        is_db_session_commit=False, is_app_logger=False,
        is_send_notify_email=False):
    """Finalise an API operation by committing and logging."""
    # Get a unique identifier for this DB transaction
    session_hash = hash(db.session)

    if is_db_session_commit:
        try:
            db.session.commit()

            # Added for demonstration purposes, not really needed in
            # production
            app.logger.info('Committed DB transaction')
        except SQLAlchemyError as exc:
            db.session.rollback()
            return {'error': 'error finalising api op'}

    if is_app_logger:
        queue_key = 'api_log_msg_queue'

        func_to_enqueue_ctx = dict(log_msg=log_msg)

        queue_and_delayed_execute(
            queue_key=queue_key, session_hash=session_hash,
            func_to_enqueue=do_api_log_msg,
            func_to_enqueue_ctx=func_to_enqueue_ctx,
            is_time_to_execute_funcs=is_db_session_commit)

    if is_send_notify_email:
        queue_key = 'api_notify_email_queue'

        func_to_enqueue_ctx = dict(
            mail_subject=mail_subject, mail_body=mail_body)

        queue_and_delayed_execute(
            queue_key=queue_key, session_hash=session_hash,
            func_to_enqueue=do_api_notify_email,
            func_to_enqueue_ctx=func_to_enqueue_ctx,
            is_time_to_execute_funcs=is_db_session_commit)

    return {'message': 'api op finalised ok'}
And that code can be called from a bunch of API methods like so:
If make_froggy_brightpink_and_highjump() is called from within a Flask app context, the app's log should include output that looks something like this:
INFO [2017-12-01 09:00:00] Committed DB transaction
INFO [2017-12-01 09:00:00] Froggy colour updated: 123; new value: bright_pink
INFO [2017-12-01 09:00:00] Made froggy jump: 123; jump height: 50 metres
INFO [2017-12-01 09:00:00] Sent email: Made froggy jump
The log output demonstrates that the desired behaviour has been achieved: first, the DB transaction finishes (i.e. the froggy actually gets set to bright pink, and made to jump high, in one atomic write operation); then, the API actions are logged in the order that they were called (first the colour was updated, then the froggy was made to jump); then, email notifications are sent in order (in this case, we only want an email notification sent for when the froggy jumps high – but if we had also asked for an email notification for when the froggy's colour was changed, that would have been the first email sent).
In summary
That's about all there is to this "task queue" implementation – as I said, it's very lightweight, because it only needs to be simple and short-lived. I'm sharing this solution, mainly to serve as a reminder that you shouldn't just use your standard hammer, because sometimes the hammer is disproportionately big compared to the nail. In this case, the solution doesn't need an asynchronous queue, it doesn't need a scheduled queue, and it doesn't need a threaded queue. (Although moving the email sending off to a celery task is a good idea in production; and moving the logging to celery would be warranted too, if it was logging to a third-party service rather than just to a local file.) It just needs a queue that builds up and that then gets processed, for a single DB transaction.
]]>
Using Python's namedtuple for mock objects in tests2017-08-13T00:00:00Z2017-08-13T00:00:00ZJazahttps://greenash.net.au/thoughts/2017/08/using-pythons-namedtuple-for-mock-objects-in-tests/
I have become quite a fan of Python's built-in namedtuple collection lately. As others have already written, despite having been available in Python 2.x and 3.x for a long time now, namedtuple continues to be under-appreciated and under-utilised by many programmers.
# The ol'fashioned tuple way
fruits = [
    ('banana', 'medium', 'yellow'),
    ('watermelon', 'large', 'pink')]

for fruit in fruits:
    print('A {0} is coloured {1} and is {2} sized'.format(
        fruit[0], fruit[2], fruit[1]))

# The nicer namedtuple way
from collections import namedtuple

Fruit = namedtuple('Fruit', 'name size colour')

fruits = [
    Fruit(name='banana', size='medium', colour='yellow'),
    Fruit(name='watermelon', size='large', colour='pink')]

for fruit in fruits:
    print('A {0} is coloured {1} and is {2} sized'.format(
        fruit.name, fruit.colour, fruit.size))
namedtuples can be used in a few obvious situations in Python. I'd like to present a new and less obvious situation, that I haven't seen any examples of elsewhere: using a namedtuple instead of MagicMock or flexmock, for creating fake objects in unit tests.
namedtuple vs the competition
namedtuples have a number of advantages over regular tuples and dicts in Python. First and foremost, a namedtuple is (by defintion) more semantic than a tuple, because you can define and access elements by name rather than by index. A namedtuple is also more semantic than a dict, because its structure is strictly defined, so you can be guaranteed of exactly which elements are to be found in a given namedtuple instance. And, similarly, a namedtuple is often more useful than a custom class, because it gives more of a guarantee about its structure than a regular Python class does.
A namedtuple can craft an object similarly to the way that MagicMock or flexmock can. The namedtuple object is more limited, in terms of what attributes it can represent, and in terms of how it can be swapped in to work in a test environment. But it's also simpler, and that makes it easier to define and easier to debug.
Compared with all the alternatives listed here (dict, a custom class, MagicMock, and flexmock – all except tuple), namedtuple has the advantage of being immutable. This is generally not such an important feature, for the purposes of mocking and running tests, but nevertheless, immutability always provides advantages – such as elimination of side-effects via parameters, and more thread-safe code.
Really, for me, the biggest "quick win" that you get from using namedtuple over any of its alternatives, is the lovely built-in string representation that the former provides. Chuck any namedtuple in a debug statement or a logging call, and you'll see everything you need (all the fields and their values) and nothing you don't (other internal attributes), right there on the screen.
# Printing a tuple
f1 = ('banana', 'medium', 'yellow')

# Shows all attributes ordered nicely, but no field names
print(f1)
# ('banana', 'medium', 'yellow')


# Printing a dict
f1 = {'name': 'banana', 'size': 'medium', 'colour': 'yellow'}

# Shows all attributes with field names, but ordering is wrong
print(f1)
# {'colour': 'yellow', 'size': 'medium', 'name': 'banana'}


# Printing a custom class instance
class Fruit(object):
    """It's a fruit, yo"""

f1 = Fruit()
f1.name = 'banana'
f1.size = 'medium'
f1.colour = 'yellow'

# Shows nothing useful by default! (Needs a __repr__() method for that)
print(f1)
# <__main__.Fruit object at 0x7f1d55400e48>

# But, to be fair, can print its attributes as a dict quite easily
print(f1.__dict__)
# {'size': 'medium', 'name': 'banana', 'colour': 'yellow'}


# Printing a MagicMock
from mock import MagicMock

class Fruit(object):
    name = None
    size = None
    colour = None

f1 = MagicMock(spec=Fruit)
f1.name = 'banana'
f1.size = 'medium'
f1.colour = 'yellow'

# Shows nothing useful by default! (and f1.__dict__ is full of a tonne
# of internal cruft, with the fields we care about buried somewhere
# amongst it all)
print(f1)
# <MagicMock spec='Fruit' id='140682346494552'>


# Printing a flexmock
from flexmock import flexmock

f1 = flexmock(name='banana', size='medium', colour='yellow')

# Shows nothing useful by default!
print(f1)
# <flexmock.MockClass object at 0x7f691ecefda0>

# But, to be fair, printing f1.__dict__ shows minimal cruft
print(f1.__dict__)
# {
#     'name': 'banana',
#     '_object': <flexmock.MockClass object at 0x7f691ecefda0>,
#     'colour': 'yellow', 'size': 'medium'}


# Printing a namedtuple
from collections import namedtuple

Fruit = namedtuple('Fruit', 'name size colour')
f1 = Fruit(name='banana', size='medium', colour='yellow')

# Shows exactly what we need: what it is, and what all of its
# attributes' values are. Sweeeet.
print(f1)
# Fruit(name='banana', size='medium', colour='yellow')
As the above examples show, without any special configuration, namedtuple's string configuration Just Works™.
namedtuple and fake objects
Let's say you have a simple function that you need to test. The function gets passed in a superhero, which it expects is a SQLAlchemy model instance. It queries all the items of clothing that the superhero uses, and it returns a list of clothing names. The function might look something like this:
# myproject/superhero.py


def get_clothing_names_for_superhero(superhero):
    """List the clothing for the specified superhero"""
    clothing_names = []

    clothing_list = superhero.clothing_items.all()

    for clothing_item in clothing_list:
        clothing_names.append(clothing_item.name)

    return clothing_names
Since this function does all its database querying via the superhero object that's passed in as a parameter, there's no need to mock anything via funky mock.patch magic or similar. You can simply follow Python's preferred pattern of duck typing, and pass in something – anything – that looks like a superhero (and, unless he takes his cape off, nobody need be any the wiser).
You could write a test for that function, using namedtuple-based fake objects, like so:
# myproject/superhero_test.py


from collections import namedtuple

from myproject.superhero import get_clothing_names_for_superhero


FakeSuperhero = namedtuple('FakeSuperhero', 'clothing_items name')
FakeClothingItem = namedtuple('FakeClothingItem', 'name')
FakeModelQuery = namedtuple('FakeModelQuery', 'all first')


def get_fake_superhero_and_clothing():
    """Get a fake superhero and clothing for test purposes"""
    superhero = FakeSuperhero(
        name='Batman',
        clothing_items=FakeModelQuery(
            first=lambda: None,
            all=lambda: [
                FakeClothingItem(name='cape'),
                FakeClothingItem(name='mask'),
                FakeClothingItem(name='boots')]))

    return superhero


def test_get_clothing_for_superhero():
    """Test listing the clothing for a superhero"""
    superhero = get_fake_superhero_and_clothing()

    clothing_names = set(get_clothing_names_for_superhero(superhero))

    # Verify that list of clothing names is as expected
    assert clothing_names == {'cape', 'mask', 'boots'}
The same setup could be achieved using one of the alternatives to namedtuple. In particular, a FakeSuperhero custom class would have done the trick. Using MagicMock or flexmock would have been fine too, although they're really overkill in this situation. In my opinion, for a case like this, using namedtuple is really the simplest and the most painless way to test the logic of the code in question.
In summary
I believe that namedtuple is a great choice for fake test objects, when it fits the bill, and I don't know why it isn't used or recommended for this in general. It's a choice that has some limitations: most notably, you can't have any attribute that starts with an underscore (the "_" character) in a namedtuple. It's also not particularly nice (although it's perfectly valid) to chuck functions into namedtuple fields, especially lambda functions.
Personally, I have used namedtuples in this way quite a bit recently, however I'm still ambivalent about it being the best approach. If you find yourself starting to craft very complicated FakeFoonamedtuples, then perhaps that's a sign that you're doing it wrong. As with everything, I think that this is an approach that can really be of value, if it's used with a degree of moderation. At the least, I hope you consider adding it to your tool belt.
]]>
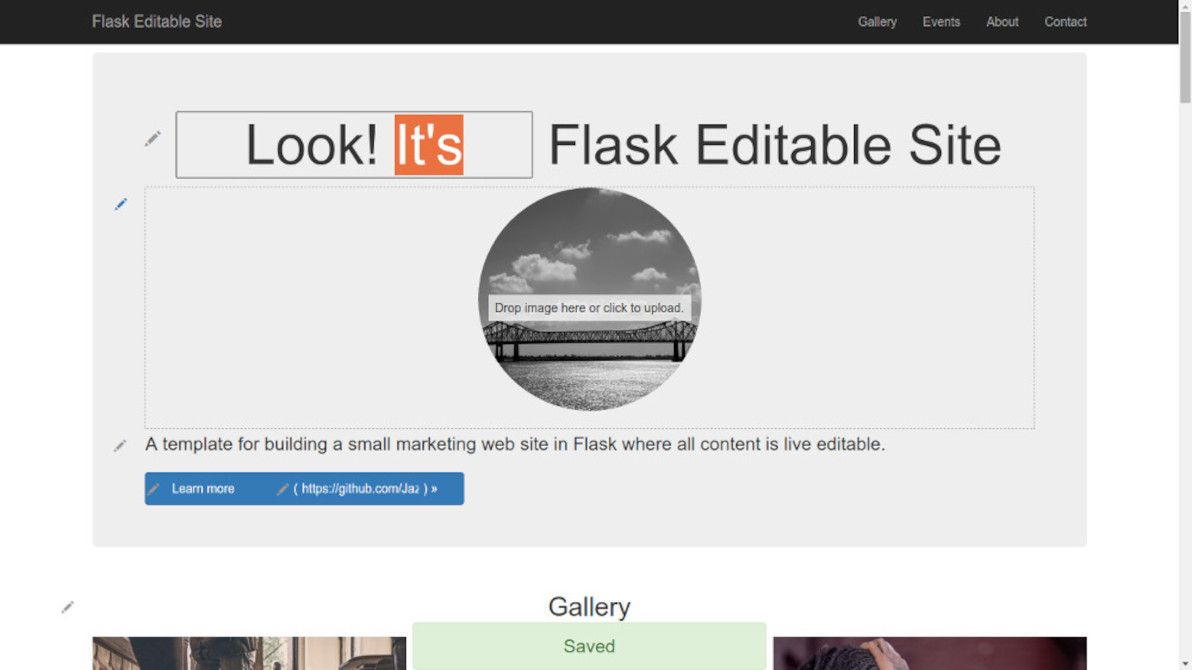
Introducing Flask Editable Site2015-10-27T00:00:00Z2015-10-27T00:00:00ZJazahttps://greenash.net.au/thoughts/2015/10/introducing-flask-editable-site/
I'd like to humbly present Flask Editable Site, a template for building a small marketing web site in Flask where all content is live editable. Here's a demo of the app in action.
Text and image block editing with Flask Editable Site.
The aim of this app is to demonstrate that, with the help of modern JS libraries, and with some well-thought-out server-side snippets, it's now perfectly possible to "bake in" live in-place editing for virtually every content element in a typical brochureware site.
This app is not a CMS. On the contrary, think of it as a proof-of-concept alternative to a CMS. An alternative where there's no "admin area", there's no "editing mode", and there's no "preview button". There's only direct manipulation.
"Template" means that this is a sample app. It comes with a bunch of models that work out-of-the-box (e.g. text content block, image content block, gallery item, event). However, these are just a starting point: you can and should define your own models when building a real site. Same with the front-end templates: the home page layout and the CSS styles are just examples.
About that "template" idea
I can't stress enough that this is not a CMS. There are of course plenty of CMSes out there already, in Python and in every other language under the sun. Several of those CMSes I have used extensively. I've even been paid to build web sites with them, for most of my professional life so far. I desire neither to add to that list, nor to take on the heavy maintenance burden that doing so would entail.
What I have discovered as a web developer, and what I'm sure that all web developers discover sooner or later, is that there's no such thing as the perfect CMS. Possibly, there isn't even such thing as a good CMS! If you want to build a web site with a content management experience that's highly tailored to the project in question, then really, you have to build a unique custom CMS just for that site. Deride me as a perfectionist if you want, but that's my opinion.
There is such a thing as a good framework. Flask Editable Site, as its name suggests, uses the Flask framework, which has the glorious honour of being my favourite framework these days. And there is definitely such a thing as a good library. Flask Editable Site uses a number of both front-end and back-end libraries. The best libraries can be easily mashed up together in different configurations, on top of different frameworks, to help power a variety of different apps.
Flask Editable Site is not a CMS. It's a sample app, which is a template for building a unique CMS-like app tailor-made for a given project. If you're doing it right, then no two projects based on Flask Editable Site will be the same app. Every project has at least slightly different data models, users / permissions, custom forms, front-end widgets, and so on.
So, there's the practical aim of demonstrating direct manipulation / live editing. However, Flask Editable Site has a philosophical aim, too. The traditional "building a super one-size-fits-all app to power 90% of sites" approach isn't necessarily a good one. You inevitably end up fighting the super-app, and hacking around things to make it work for you. Instead, how about "building and sharing a template for making each site its own tailored app"? How about accepting that "every site is a hack", and embracing that instead of fighting it?
Thanks and acknowledgements
Thanks to all the libraries that Flask Editable Site uses; in each case, I tried to choose the best library available at the present time, for achieving a given purpose:
Dantecontenteditable WYSIWYG editor, a Medium editor clone. I had previously used MediumEditor, and I recommend it too, but I feel that Dante gives a more polished out-of-the-box experience for now. I think the folks at Medium have done a great job in setting the bar high for beautiful rich-text editing, which is an important part of the admin experience for many web sites / apps.
Dropzone.js image upload widget. C'mon, people, it's 2015. Death to HTML file fields for uploads. Drag and drop with image preview, bring it on. From my limited research, Dropzone.js seems to be the clear leader of this pack at the moment.
Bootstrap 3 for pretty CSS styles and grid layouts. I admit I've become a bit of a Bootstrap addict lately. For developers with non-existent artistic ability, like myself, it's impossible to resist. Font Awesome is rather nice, too.
Markovify for random text generation. I discovered this one (and several alternative implementations of it) while building Flask Editable Site, and I'm hooked. Adios, Lorem Ipsum, and don't hit the door on your way out.
Bootstrap Freelancer theme by Start Bootstrap. Although Flask Editable Site uses vanilla Bootstrap, I borrowed various snippets of CSS / JS from this theme, as well as the overall layout.
cookiecutter-flask, a Flask app template. I highly recommend this as a guide to best-practice directory layout, configuration management, and use of patterns in a Flask app. Thanks to these best practices, Flask Editable Site is also reasonably Twelve-Factor compliant, especially in terms of config and backing services.
Flask Editable Site began as the codebase for The Daydream Believers Performers web site, which I built pro-bono as a side project recently. So, acknowledgements to that group for helping to make Flask Editable Site happen.
For the live editing UX, I acknowledge that I drew inspiration from several examples. First and foremost, from Mezzanine, a CMS (based on Django) which I've used on occasion. Mezzanine puts "edit" buttons in-place next to most text fields on a site, and pops up a traditional (i.e. non contenteditable) WYSIWYG editor when these are clicked.
I also had a peek at Create.js, which takes care of the front-end side of live content editing quite similarly to the way I've cobbled it together. In Flask Editable Site, the combo of Dante editor and my custom "autosave" JS could easily be replaced with Create.js (particularly when using Hallo editor, which is quite minimalist like Dante); I guess it's just a question of personal taste.
Sir Trevor JS is an interesting new kid on the block. I'm quite impressed with Sir Trevor, but its philosophy of "adding blocks of anything down the page" isn't such a great fit for Flask Editable Site, where the idea is that site admins can only add / edit content within specific constraints for each block on the page. However, for sites with no structured content models, where it's OK for each page to be a free canvas (or for a "free canvas" within, say, each blog post on a site), I can see Sir Trevor being a real game-changer.
There's also X-editable, which is the only JS solution that I've come across for nice live editing of list-type content (i.e. checkoxes, radio buttons, tag fields, autocomplete boxes, etc). I haven't used X-editable in Flask Editable Site, because I'm mainly dealing with text and image fields (and for date / time fields, I prefer a proper calendar widget). But if I needed live editing of list fields, X-editable would be my first choice.
Final thoughts
I must stress that, as I said above, Flask Editable site is a proof-of-concept. It doesn't have all the features you're going to need for your project foo. In particular, it doesn't support very many field types: only text ("short text" and "rich text"), date, time, and image. It should also support inline images and (YouTube / Vimeo) videos out-of-the-box, as this is included with Dante, but I haven't tested it. For other field types, forks / pull requests / sister projects are welcome.
If you look at the code (particularly the settings.py file and the home view), you should be able to add live editing of new content models quite easily, with just a bit of copy-pasting and tweaking. The idea is that the editable.views code is generic enough, that you won't need to change it at all when adding new models / fields in your back-end. At least, that's the idea.
Quite a lot of the code in Flask Editable Site is more complex than it strictly needs to be, in order to support "session store mode", where all content is saved to the current user's session instead of to the database (preferably using something like Memcached or temp files, rather than cookies, although that depends on what settings you use). I developed "session store mode" in order to make the demo site work without requiring any hackery such as a scheduled DB refresh (which is the usual solution in such cases). However, I can see it also being useful for sandbox environments, for UAT, and for reviewing design / functionality changes without "real" content getting in the way.
The app also includes a fair bit of code for random generation and selection of sample text and image content. This was also done primarily for the purposes of the demo site. But, upon reflection, I think that a robust solution for randomly populating a site's content is really something that all CMS-like apps should consider more seriously. The exact algorithms and sample content pools for this, of course, are a matter of taste. But the point is that it's not just about pretty pictures and amusing Dickensian text. It's about the mindset of treating content dynamically, and of recognising the bounds and the parameters of each placeholder area on the page. And what better way to enforce that mindset, than by seeing a different random set of content every time you restart the app?
I decided to make this project a good opportunity for getting my hands dirty with thorough unit / functional testing. As such, Flask Editable Site is my first open-source effort that features automated testing via Travis CI, as well as test coverage reporting via Coveralls. As you can see on the GitHub page, tests are passing and coverage is pretty good. The tests are written in pytest, with significant help from webtest, too. I hope that the tests also serve as a template for other projects; all too often, with small brochureware sites, formal testing is done sparingly if at all.
Regarding the "no admin area" principle, Flask Editable Site has taken quite a purist approach to this. Personally, I think that radically reducing the role of "admin areas" in web site administration will lead to better UX. Anything that's publicly visible on the site, should be editable first and foremost via direct manipulation. However, in reality there will always be things that aren't publicly visible, and that admins still need to edit. For example, sites will always need user / role CRUD pages (unless you're happy to only manage users via shell commands). So, if you do add admin pages to a project based on Flask Editable Site, please don't feel as though you're breaking some golden rule.
Hope you enjoy playing around with the app. Who knows, maybe you'll even build something useful based on it. Feedback, bug reports, pull requests, all welcome.
]]>
Cookies can't be more than 4KiB in size2015-10-15T00:00:00Z2015-10-15T00:00:00ZJazahttps://greenash.net.au/thoughts/2015/10/cookies-cant-be-more-than-4kib-in-size/
Did you know: you can't reliably store more than 4KiB (4096 bytes) of data in a single browser cookie? I didn't until this week.
What, I can't have my giant cookie and eat it too? Outrageous! Image source:Giant Chocolate chip cookie recipe.
I'd never before stopped to think about whether or not there was a limit to how much you can put in a cookie. Usually, cookies only store very small string values, such as a session ID, a tracking code, or a browsing preference (e.g. "tile" or "list" for search results). So, usually, there's no need to consider its size limits.
However, while working on a new side project of mine that heavily uses session storage, I discovered this limit the hard (to debug) way. Anyway, now I've got one more adage to add to my developer's phrasebook: if you're trying to store more than 4KiB in a cookie, you're doing it wrong.
In my case – working with Flask, which depends on Werkzeug – trying to store an oversized cookie doesn't throw any errors, it simply fails silently. I've submitted a patch to Werkzeug, to make oversized cookies raise an exception, so hopefully it will be more obvious in future when this problem occurs.
Also, as several others have pointed out, trying to store too much data in cookies is a bad idea anyway, because that data travels with every HTTP request and response, so it should be as small as possible. As I learned, if you find that you're dealing with non-trivial amounts of session data, then ditch client-side storage for the app in question, and switch to server-side session data storage (preferably using something like Memcached or Redis).
]]>
Splitting a Python codebase into dependencies for fun and profit2015-06-30T00:00:00Z2015-06-30T00:00:00ZJazahttps://greenash.net.au/thoughts/2015/06/splitting-a-python-codebase-into-dependencies-for-fun-and-profit/
When the Python codebase for a project (let's call the project LasagnaFest) starts getting big, and when you feel the urge to re-use a chunk of code (let's call that chunk foodutils) in multiple places, there are a variety of steps at your disposal. The most obvious step is to move that foodutils code into its own file (thus making it a Python module), and to then import that module wherever else you want in the codebase.
Most of the time, doing that is enough. The Python module importing system is powerful, yet simple and elegant.
But… what happens a few months down the track, when you're working on two new codebases (let's call them TortelliniFest and GnocchiFest – perhaps they're for new clients too), that could also benefit from re-using foodutils from your old project? What happens when you make some changes to foodutils, for the new projects, but those changes would break compatibility with the old LasagnaFest codebase?
What happens when you want to give a super-charged boost to your open source karma, by contributing foodutils to the public domain, but separated from the cruft that ties it to LasagnaFest and Co? And what do you do with secretfoodutils, which for licensing reasons (it contains super-yummy but super-secret sauce) can't be made public, but which should ideally also be separated from the LasagnaFest codebase for easier re-use?
Or – not to be forgotten – what happens when, on one abysmally rainy day, you take a step back and audit the LasagnaFest codebase, and realise that it's got no less than 38 different *utils chunks of code strewn around the place, and you ponder whether surely keeping all those utils within the LasagnaFest codebase is really the best way forward?
Moving foodutils to its own module file was a great first step; but it's clear that in this case, a more drastic measure is needed. In this case, it's time to split off foodutils into a separate, independent codebase, and to make it an external dependency of the LasagnaFest project, rather than an internal component of it.
This article is an introduction to the how and the why of cutting up parts of a Python codebase into dependencies. I've just explained a fair bit of the why. As for the how: in a nutshell, pip (for installing dependencies), the public PyPI repo (for hosting open-sourced dependencies), and a private PyPI repo (for hosting proprietary dependencies). Read on for more details.
Levels of modularity
One of the (many) joys of coding in Python is the way that it encourages modularity. For example, let's start with this snippet of completely non-modular code:
There are, in my opinion, three different levels of re-factoring that you can apply, in order to make it more modular. You can think of these levels like the layers of a lasagna, if you want. Or not.
Each successive level of re-factoring involves a bit more work in the short-term, but results in more convenient re-use in the long-term. So, which level is appropriate, depends on the likelihood that you (or others) will want to re-use a given chunk of code in the future.
First, you can split the logic out of the procedural blurg, and into a function in the same file:
And, finally, you can move that file out of your codebase, upload it to a Python package repository (the most common such repository being PyPI), and then declare it as a dependency of your codebase using pip:
As I said, achieving this last level of modularity isn't always necessary or appropriate, due to the overhead involved. For a given chunk of code, there are always going to be trade-offs to consider, and as a developer it's always going to be your judgement call.
Splitting out code
For the times when it is appropriate to go that "last mile" and split code out as an external dependency, there are (in my opinion) insufficient resources regarding how to go about it. I hope, therefore, that this section serves as a decent guide on the matter.
Factor out coupling
The first step in making until-now "project code" an external dependency, is removing any coupling that the chunk of code may have to the rest of the codebase. For example, the foodutils code shown above is nice and de-coupled; but what if it instead looked like so:
foodutils.py:
from mysettings import NUM_QUESTION_MARKS

def greet_dude_with_food(dude_name, food_today):
    return "Hey {dude_name}! Want a {food_today} today{q_marks}".format(
        dude_name=dude_name,
        food_today=food_today,
        q_marks='?'*NUM_QUESTION_MARKS)
This would be problematic, because this code relies on the assumption that it lives in a codebase containing a mysettings module, and that the configuration value NUM_QUESTION_MARKS is defined within that module.
We can remove this coupling by changing NUM_QUESTION_MARKS to be a parameter passed to greet_dude_with_food, like so:
The dependent code in this project could then pass in the required config value when it calls greet_dude_with_food, like so:
foodgreeter.py:
from foodutils import greet_dude_with_food
from mysettings import NUM_QUESTION_MARKS

dude_name = 'Johnny'
food_today = 'lasagna'
print(greet_dude_with_food(
    dude_name=dude_name,
    food_today=food_today,
    num_question_marks=NUM_QUESTION_MARKS))
Once the code we're re-factoring no longer depends on anything elsewhere in the codebase, it's ready to be made an external dependency.
New repo for dependency
Next comes the step of physically moving the given chunk of code out of the project's codebase. In most cases, this means deleting the given file(s) from the project's version control repository (you are using version control, right?), and creating a new repo for those file(s) to live in.
For example, if you're using Git, the steps would be something like this:
The given chunk of code now has its own dedicated repo. But it's not yet a project, in its own right, and it can't yet be referenced as a dependency. To do that, we'll need to add some more files to the new repo, mainly consisting of metadata describing "who" this project is, and what it does.
Next, add a version number to the code. The best way to do this, is to add it at the top of the main Python file, e.g. by adding this to the top of foodutils.py:
__version__ = '0.1.0'
After that, we're going to add the standard metadata files that almost all open-source Python projects have. Most importantly, a setup.py file that looks something like this:
import os

import setuptools

module_path = os.path.join(os.path.dirname(__file__), 'foodutils.py')
version_line = [line for line in open(module_path)
                if line.startswith('__version__')][0]

__version__ = version_line.split('__version__ = ')[-1][1:][:-2]

setuptools.setup(
    name="foodutils",
    version=__version__,
    url="https://github.com/misterfoo/foodutils",

    author="Mister foo",
    author_email="mister@foo.com",

    description="Utils for handling food.",
    long_description=open('README.rst').read(),

    py_modules=['foodutils'],
    zip_safe=False,
    platforms='any',

    install_requires=[],

    classifiers=[
        'Development Status :: 2 - Pre-Alpha',
        'Environment :: Web Environment',
        'Intended Audience :: Developers',
        'Operating System :: OS Independent',
        'Programming Language :: Python',
        'Programming Language :: Python :: 2',
        'Programming Language :: Python :: 2.7',
        'Programming Language :: Python :: 3',
        'Programming Language :: Python :: 3.3',
    ],
)
And also, a README.rst file:
foodutils
=========

Utils for handling food.
Once you've created those files, commit them to the new repo.
Push the repo
Great – the chunk of code now lives in its own repo, and it contains enough metadata for other projects to see what its name is, what version(s) of it there are, and what function(s) it performs. All that needs to be done now, is to decide where this repo will be hosted. But to do this, you first need to answer an important non-technical question: to open-source the code, or to keep it proprietary?
In general, you should open-source your dependencies whenever possible. You get more eyeballs (for free). Famous hairy people like Richard Stallman will send you flowers. If nothing else, you'll at least be able to always easily find your code, guaranteed (if you can't remember where it is, just Google it!). You get the drift. If open-sourcing the code, then the most obvious choice for where to host the repo is GitHub. (However, I'm not evangelising GitHub here, remember there are other options, kids).
Open source is kool, but sometimes you can't or you don't want to go down that route. That's fine, too – I'm not here to judge anyone, and I can't possibly be aware of anyone else's business / ownership / philosophical situation. So, if you want to keep the code all to your little self (or all to your little / big company's self), you're still going to have to host it somewhere. And no, "on my laptop" does not count as your code being hosted somewhere (well, technically you could just keep the repo on your own PC, and still reference it as a dependency, but that's a Bad Idea™). There are a number of hosting options: for example, on a VPS that you control; or using a managed service such as GitHub private, Bitbucket, or Assembla (note: once again, not promoting any specific service provider, just listing the main players as options).
So, once you've decided whether or not to open-source the code, and once you've settled on a hosting option, push the new repo to its hosted location.
Upload to PyPI
Nearly there now. The chunk of code has been de-coupled from its dependent project; it's been put in a new repo with the necessary metadata; and that repo is now hosted at a permanent location somewhere online. All that's left, is to make it known to the universe of Python projects, so that it can be easily listed as a dependency of other Python projects.
If you've developed with Python before (and if you've read this far, then I assume you have), then no doubt you've heard of pip. Being the Python package manager of choice these days, pip is the tool used to manage Python dependencies. pip can find dependencies from a variety of locations, but the place it looks first and foremost (by default) is on the Python Package Index (PyPI).
If your dependency is public and open-source, then you should add it to PyPI. Each time you release a new version, then (along with committing and tagging that new version in the repo) you should also upload it to PyPI. I won't go into the details in this article; please refer to the official docs for registering and uploading packages on PyPI. When following the instructions there, you'll generally want to package your code as a "universal wheel", you'll generally use the PyPI website form to register a new package, and you'll generally use twine to upload the package.
If your dependency is private and proprietary, then PyPI is not an option. The easiest way to deal with private dependencies (also the easiest way to deal with public dependencies, for that matter), is to not worry about proper Python packaging at all, and simply to use pip's ability to directly reference a source repo (including a specific commit / tag), e.g:
However, that has a number of disadvantages, the most visible disadvantage being that pip install will run much slower, because it has to do a git pull every time you ask it to check that foodutils is installed (even if you specify the same commit / tag each time).
A better way to deal with private dependencies, is to create your own "private PyPI". Same as with public packages: each time you release a new version, then (along with committing and tagging that new version in the repo) you should also upload it to your private PyPI. For instructions regarding this, please refer to my guide for how to set up and use a private PyPI repo. Also, note that my guide is for quite a minimal setup, although it contains links to some alternative setup options, including more advanced and full-featured options. (And if using a private PyPI, then take note of my guide's instructions for what to put in your local ~/.pip/pip.conf file).
Reference the dependency
The chunk of code is now ready to be used as an external dependency, by any project. To do this, you simply list the package in your project's requirements.txt file; whether the package is on the public PyPI, or on a private PyPI of your own, the syntax is the same:
foodutils==0.1.0 # From pypi.myserver.com
Then, just run your dependencies through pip as usual:
pip install -r requirements.txt
And there you have it: foodutils is now an external dependency. You can list it as a requirement for LasagnaFest, TortelliniFest, GnocchiFest, and as many other projects as you need.
Final thoughts
This article was born out of a series of projects that I've been working on over the past few months (and that I'm still working on), written mainly in Flask (these apps are still in alpha; ergo, sorry, can't talk about their details yet). The size of the projects' codebases grew to be rather unwieldy, and the projects have quite a lot of shared functionality.
I started out by re-using chunks of code between the different projects, with the hacky solution of sym-linking from one codebase to another. This quickly became unmanageable. Once I could stand the symlinks no longer (and once I had some time for clean-up), I moved these shared chunks of code into separate repos, and referenced them as dependencies (with some being open-sourced and put on the public PyPI). Only in the last week or so, after losing patience with slow pip installs, and after getting sick of seeing far too many -e git+http://git… strings in my requirements.txt files, did I finally get around to setting up a private PyPI, for better dealing with the proprietary dependencies of these codebases.
I hope that this article provides some clear guidance regarding what can be quite a confusing task, i.e. that of creating and maintaining a private Python package index. Aside from being a technical guide, though, my aim in penning this piece is to explain how you can split off component parts of a monolithic codebase into re-usable, independent separate codebases; and to convey the advantages of doing so, in terms of code quality and maintainability.
Flask, my framework of choice these days, strives to consist of a series of independent projects (Flask, Werkzeug, Jinja, WTForms, and the myriad Flask-* add-ons), which are compatible with each other, but which are also useful stand-alone or with other systems. I think that this is a great example for everyone to follow, even humble "custom web-app" developers like myself. Bearing that in mind, devoting some time to splitting code out of a big bad client-project codebase, and creating more atomic packages (even if not open-source) upon whose shoulders a client-project can stand, is a worthwhile endeavour.
]]>
Generating a Postgres DB dump of a filtered relational set2015-06-22T00:00:00Z2015-06-22T00:00:00ZJazahttps://greenash.net.au/thoughts/2015/06/generating-a-postgres-db-dump-of-a-filtered-relational-set/PostgreSQL is my favourite RDBMS, and it's the fave of many others too. And rightly so: it's a good database! Nevertheless, nobody's perfect.
When it comes to exporting Postgres data (as SQL INSERT statements, at least), the tool of choice is the standard pg_dump utility. Good ol' pg_dump is rock solid but, unfortunately, it doesn't allow for any row-level filtering. Turns out that, for a recent project of mine, a filtered SQL dump is exactly what the client ordered.
On account of this shortcoming, I spent some time whipping up a lil' Python script to take care of this functionality. I've converted the original code (written for a client-specific data set) to a more generic example script, which I've put up on GitHub under the name "PG Dump Filtered". If you're just after the code, then feel free to head over to the repo without further ado. If you'd like to stick around for the tour, then read on.
Worlds apart
For the example script, I've set up a simple schema of four entities: worlds, countries, cities, and people. This schema happens to be purely hierarchical (i.e. each world has zero or more countries, each country has zero or more cities, and each city has zero or more people), for the sake of simplicity; but the script could be adapted to any valid set of foreign-key based relationships.
CREATE TABLE world (
    name character varying(255) NOT NULL,
    created_at timestamp without time zone,
    updated_at timestamp without time zone,
    active boolean NOT NULL,
    uuid bytea,
    id integer NOT NULL
);

ALTER TABLE ONLY world
    ADD CONSTRAINT world_pkey PRIMARY KEY (id);

CREATE TABLE country (
    name character varying(255) NOT NULL,
    created_at timestamp without time zone,
    updated_at timestamp without time zone,
    active boolean NOT NULL,
    uuid bytea,
    id integer NOT NULL,
    world_id integer,
    bigness numeric(10,2)
);

ALTER TABLE ONLY country
    ADD CONSTRAINT country_pkey PRIMARY KEY (id);
ALTER TABLE ONLY country
    ADD CONSTRAINT country_world_id_fkey FOREIGN KEY (world_id)
    REFERENCES world(id);

CREATE TABLE city (
    name character varying(255) NOT NULL,
    created_at timestamp without time zone,
    updated_at timestamp without time zone,
    active boolean NOT NULL,
    uuid bytea,
    id integer NOT NULL,
    country_id integer,
    weight integer,
    is_big boolean DEFAULT false NOT NULL,
    pseudonym character varying(255) DEFAULT ''::character varying
        NOT NULL,
    description text DEFAULT ''::text NOT NULL
);

ALTER TABLE ONLY city
    ADD CONSTRAINT city_pkey PRIMARY KEY (id);
ALTER TABLE ONLY city
    ADD CONSTRAINT city_country_id_fkey FOREIGN KEY (country_id)
    REFERENCES country(id);

CREATE TABLE person (
    name character varying(255) NOT NULL,
    created_at timestamp without time zone,
    updated_at timestamp without time zone,
    active boolean NOT NULL,
    uuid bytea,
    id integer NOT NULL,
    city_id integer,
    person_type character varying(255) NOT NULL
);

ALTER TABLE ONLY person
    ADD CONSTRAINT person_pkey PRIMARY KEY (id);
ALTER TABLE ONLY person
    ADD CONSTRAINT person_city_id_fkey FOREIGN KEY (city_id)
    REFERENCES city(id);
Using this schema, data belonging to two different worlds can co-exist in the same database. For example, we can have data for the world "Krypton" co-exist with data for the world "Romulus":
INSERT INTO world (name, created_at, updated_at, active, uuid, id)
VALUES ('Krypton', '2015-06-01 09:00:00.000000',
        '2015-06-06 09:00:00.000000', true,
        '\x478a43577ebe4b07ba8631ca228ee42a', 1);
INSERT INTO world (name, created_at, updated_at, active, uuid, id)
VALUES ('Romulus', '2015-06-01 10:00:00.000000',
        '2015-06-05 13:00:00.000000', true,
        '\x82e2c0ac3ba84a34a1ad3bbbb2063547', 2);

INSERT INTO country (name, created_at, updated_at, active, uuid, id,
                     world_id, bigness)
VALUES ('Crystalland', '2015-06-02 09:00:00.000000',
        '2015-06-08 09:00:00.000000', true,
        '\xcd0338cf2e3b40c3a3751b556a237152', 1, 1, 3.86);
INSERT INTO country (name, created_at, updated_at, active, uuid, id,
                     world_id, bigness)
VALUES ('Greenbloodland', '2015-06-03 11:00:00.000000',
        '2015-06-07 13:00:00.000000', true,
        '\x17591321d1634bcf986d0966a539c970', 2, 2, NULL);

INSERT INTO city (name, created_at, updated_at, active, uuid, id,
                  country_id, weight, is_big, pseudonym, description)
VALUES ('Kryptonopolis', '2015-06-05 09:00:00.000000',
        '2015-06-11 09:00:00.000000', true,
        '\x13659f9301d24ea4ae9c534d70285edc', 1, 1, 100, true,
        'Pointyville',
        'Nice place, once you get used to the pointiness.');

INSERT INTO city (name, created_at, updated_at, active, uuid, id,
                  country_id, weight, is_big, pseudonym, description)
VALUES ('Rom City', '2015-06-04 09:00:00.000000',
        '2015-06-13 09:00:00.000000', true,
        '\xc45a9fb0a92a43df91791b11d65f5096', 2, 2, 200, false,
        '',
        'Gakkkhhhh!');

INSERT INTO person (name, created_at, updated_at, active, uuid,
                    city_id, person_type)
VALUES ('Superman', '2015-06-14 09:00:00.000000',
        '2015-06-15 22:00:00.000000', true,
        '\xbadd1ca153994deca0f78a5158215cf6', 1,
        'Awesome Heroic Champ');
INSERT INTO person (name, created_at, updated_at, active, uuid,
                    city_id, person_type)
VALUES ('General Zod', '2015-06-14 10:00:00.000000',
        '2015-06-15 23:00:00.000000', true,
        '\x796031428b0a46c2a9391eb5dc45008a', 1,
        'Bad Bloke');

INSERT INTO person (name, created_at, updated_at, active, uuid,
                    city_id, person_type)
VALUES ('Mister Funnyears', '2015-06-14 11:00:00.000000',
        '2015-06-15 22:30:00.000000', false,
        '\x22380f6dc82d47f488a58153215864cb', 2,
        'Mediocre Dude');
INSERT INTO person (name, created_at, updated_at, active, uuid,
                    city_id, person_type)
VALUES ('Captain Greeny', '2015-06-15 05:00:00.000000',
        '2015-06-16 08:30:00.000000', true,
        '\x485e31758528425dbabc598caaf86fa4', 2,
        'Weirdo');
In this case, our two key stakeholders – the Kryptonians and the Romulans – have been good enough to agree to their respective data records being stored in the same physical database. After all, they're both storing the same type of data, and they accept the benefits of a shared schema in terms of cost-effectiveness, maintainability, and scalability.
However, these two stakeholders aren't exactly the best of friends. In fact, they're not even on speaking terms (have you even seen them both feature in the same franchise, let alone the same movie?). Plus, for legal reasons (and in the interests of intergalactic peace), there can be no possibility of Kryptonian records falling into Romulan hands, or vice versa. So, it really is critical that, as far as these two groups are concerned, the data appears to be completely partitioned.
(It's also lucky that we're using Postgres and Python, which all parties appear to be cool with – the Klingons are mad about Node.js and MongoDB these days, so the Romulans would never have come on board if we'd gone down that path…).
Fortunately, thanks to the wondrous script that's now been written, these unlikely DB room-mates can have their dilithium and eat it, too. The Romulans, for example, can simply specify their World ID of 2:
And they'll get a DB dump of what is (as far as they're concerned) … well, the whole world! (Note: please do not change your dietary habits per above innuendo, dilithium can harm your unborn baby).
And all thanks to a lil' bit of Python / SQL trickery, to filter things according to their world:
# ...

# Thanks to:
# http://bytes.com/topic/python/answers/438133-find-out-schema-psycopg
t_cur.execute((
    "SELECT        column_name "
    "FROM          information_schema.columns "
    "WHERE         table_name = '%s' "
    "ORDER BY      ordinal_position") % table)

t_fields_str = ', '.join([x[0] for x in t_cur])
d_cur = conn.cursor()

# Start constructing the query to grab the data for dumping.
query = (
    "SELECT        x.* "
    "FROM          %s x ") % table

# The rest of the query depends on which table we're at.
if table == 'world':
    query += "WHERE         x.id = %(world_id)s "
elif table == 'country':
    query += "WHERE         x.world_id = %(world_id)s "
elif table == 'city':
    query += (
        "INNER JOIN    country c "
        "ON            x.country_id = c.id ")
    query += "WHERE         c.world_id = %(world_id)s "
elif table == 'person':
    query += (
        "INNER JOIN    city ci "
        "ON            x.city_id = ci.id "
        "INNER JOIN    country c "
        "ON            ci.country_id = c.id ")
    query += "WHERE         c.world_id = %(world_id)s "

# For all tables, filter by the top-level ID.
d_cur.execute(query, {'world_id': world_id})
With a bit more trickery thrown in for good measure, to more-or-less emulate pg_dump's export of values for different data types:
# ...

# Start constructing the INSERT statement to dump.
d_str = "INSERT INTO %s (%s) VALUES (" % (table, t_fields_str)
d_vals = []

for i, d_field in enumerate(d_row):
    d_type = type(d_field).__name__

    # Rest of the INSERT statement depends on the type of
    # each field.
    if d_type == 'datetime':
        d_vals.append("'%s'" % d_field.isoformat().replace('T', ' '))
    elif d_type == 'bool':
        d_vals.append('%s' % (d_field and 'true' or 'false'))
    elif d_type == 'buffer':
        d_vals.append(r"'\x" + ("%s'" % hexlify(d_field)))
    elif d_type == 'int':
        d_vals.append('%d' % d_field)
    elif d_type == 'Decimal':
        d_vals.append('%f' % d_field)
    elif d_type in ('str', 'unicode'):
        d_vals.append("'%s'" % d_field.replace("'", "''"))
    elif d_type == 'NoneType':
        d_vals.append('NULL')

d_str += ', '.join(d_vals)
d_str += ');'
And that's the easy part done! Now, on to working out how to efficiently do Postgres master-slave replication over a distance of several thousand light years, without disrupting the space-time continuum.
(livelong AND prosper);
Hope my little example script comes in handy, for anyone else needing a version of pg_dump that can do arbitrary filtering on inter-related tables. As I said in the README, with only a small amount of tweaking, this script should be able to produce a dump of virtually any relational data set, filtered by virtually any criteria that you might fancy.
Also, this script is for Postgres: the pg_dump utility lacks any query-level filtering functionality, so using it in this way is simply not an option. The script could also be quite easily adapted to other DBMSes (e.g. MySQL, SQL Server, Oracle), although most of Postgres' competitors have a dump utility with at least some filtering capability.
]]>
Storing Flask uploaded images and files on Amazon S32015-04-20T00:00:00Z2015-04-20T00:00:00ZJazahttps://greenash.net.au/thoughts/2015/04/storing-flask-uploaded-images-and-files-on-amazon-s3/Flask is still a relative newcomer in the world of Python frameworks (it recently celebrated its fifth birthday); and because of this, it's still sometimes trailing behind its rivals in terms of plugins to scratch a given itch. I recently discovered that this was the case, with storing and retrieving user-uploaded files on Amazon S3.
For static files (i.e. an app's seldom-changing CSS, JS, and images), Flask-Assets and Flask-S3 work together like a charm. For more dynamic files, there exist numerous snippets of solutions, but I couldn't find anything to fill in all the gaps and tie it together nicely.
Due to a pressing itch in one of my projects, I decided to rectify this situation somewhat. Over the past few weeks, I've whipped up a bunch of Python / Flask tidbits, to handle the features that I needed:
I've also published an example app, that demonstrates how all these tools can be used together. Feel free to dive straight into the example code on GitHub; or read on for a step-by-step guide of how this Flask S3 tool suite works.
Using s3-saver
The key feature across most of this tool suite, is being able to use the same code for working with local and with S3-based files. Just change a single config option, or a single function argument, to switch from one to the other. This is critical to the way I need to work with files in my Flask projects: on my development environment, everything should be on the local filesystem; but on other environments (especially production), everything should be on S3. Others may have the same business requirements (in which case you're in luck). This is most evident with s3-saver.
Here's a sample of the typical code you might use, when working with s3-saver:
from io import BytesIO
from os import path

from flask import current_app as app
from flask import Blueprint
from flask import flash
from flask import redirect
from flask import render_template
from flask import url_for
from s3_saver import S3Saver

from project import db
from library.prefix_file_utcnow import prefix_file_utcnow
from foo.forms import ThingySaveForm
from foo.models import Thingy


mod = Blueprint('foo', __name__)


@mod.route('/', methods=['GET', 'POST'])
def home():
    """Displays the Flask S3 Save Example home page."""

    model = Thingy.query.first() or Thingy()

    form = ThingySaveForm(obj=model)

    if form.validate_on_submit():
        image_orig = model.image
        image_storage_type_orig = model.image_storage_type
        image_bucket_name_orig = model.image_storage_bucket_name

        # Initialise s3-saver.
        image_saver = S3Saver(
            storage_type=app.config['USE_S3'] and 's3' or None,
            bucket_name=app.config['S3_BUCKET_NAME'],
            access_key_id=app.config['AWS_ACCESS_KEY_ID'],
            access_key_secret=app.config['AWS_SECRET_ACCESS_KEY'],
            field_name='image',
            storage_type_field='image_storage_type',
            bucket_name_field='image_storage_bucket_name',
            base_path=app.config['UPLOADS_FOLDER'],
            static_root_parent=path.abspath(
                path.join(app.config['PROJECT_ROOT'], '..')))

        form.populate_obj(model)

        if form.image.data:
            filename = prefix_file_utcnow(model, form.image.data)

            filepath = path.abspath(
                path.join(
                    path.join(
                        app.config['UPLOADS_FOLDER'],
                        app.config['THINGY_IMAGE_RELATIVE_PATH']),
                    filename))

            # Best to pass in a BytesIO to S3Saver, containing the
            # contents of the file to save. A file from any source
            # (e.g. in a Flask form submission, a
            # werkzeug.datastructures.FileStorage object; or if
            # reading in a local file in a shell script, perhaps a
            # Python file object) can be easily converted to BytesIO.
            # This way, S3Saver isn't coupled to a Werkzeug POST
            # request or to anything else. It just wants the file.
            temp_file = BytesIO()
            form.image.data.save(temp_file)

            # Save the file. Depending on how S3Saver was initialised,
            # could get saved to local filesystem or to S3.
            image_saver.save(
                temp_file,
                app.config['THINGY_IMAGE_RELATIVE_PATH'] + filename,
                model)

            # If updating an existing image,
            # delete old original and thumbnails.
            if image_orig:
                if image_orig != model.image:
                    filepath = path.join(
                        app.config['UPLOADS_FOLDER'],
                        image_orig)

                    image_saver.delete(filepath,
                        storage_type=image_storage_type_orig,
                        bucket_name=image_bucket_name_orig)

                glob_filepath_split = path.splitext(path.join(
                    app.config['MEDIA_THUMBNAIL_FOLDER'],
                    image_orig))
                glob_filepath = glob_filepath_split[0]
                glob_matches = image_saver.find_by_path(
                    glob_filepath,
                    storage_type=image_storage_type_orig,
                    bucket_name=image_bucket_name_orig)

                for filepath in glob_matches:
                    image_saver.delete(
                        filepath,
                        storage_type=image_storage_type_orig,
                        bucket_name=image_bucket_name_orig)
        else:
            model.image = image_orig

        # Handle image deletion
        if form.image_delete.data and image_orig:
            filepath = path.join(
                app.config['UPLOADS_FOLDER'], image_orig)

            # Delete the file. In this case, we have to pass in
            # arguments specifying whether to delete locally or on
            # S3, as this should depend on where the file was
            # originally saved, rather than on how S3Saver was
            # initialised.
            image_saver.delete(filepath,
                storage_type=image_storage_type_orig,
                bucket_name=image_bucket_name_orig)

            # Also delete thumbnails
            glob_filepath_split = path.splitext(path.join(
                app.config['MEDIA_THUMBNAIL_FOLDER'],
                image_orig))
            glob_filepath = glob_filepath_split[0]

            # S3Saver can search for files too. When searching locally,
            # it uses glob(); when searching on S3, it uses key
            # prefixes.
            glob_matches = image_saver.find_by_path(
                glob_filepath,
                storage_type=image_storage_type_orig,
                bucket_name=image_bucket_name_orig)

            for filepath in glob_matches:
                image_saver.delete(filepath,
                                   storage_type=image_storage_type_orig,
                                   bucket_name=image_bucket_name_orig)

            model.image = ''
            model.image_storage_type = ''
            model.image_storage_bucket_name = ''

        if form.image.data or form.image_delete.data:
            db.session.add(model)
            db.session.commit()
            flash('Thingy %s' % (
                      form.image_delete.data and 'deleted' or 'saved'),
                  'success')
        else:
            flash(
                'Please upload a new thingy or delete the ' +
                    'existing thingy',
                'warning')

        return redirect(url_for('foo.home'))

    return render_template('home.html',
                           form=form,
                           model=model)
As is hopefully evident in the sample code above, the idea with s3-saver is that as little S3-specific code as possible is needed, when performing operations on a file. Just find, save, and delete files as usual, per the user's input, without worrying about the details of that file's storage back-end.
s3-saver uses the excellent Python boto library, as well as Python's built-in file handling functions, so that you don't have to. As you can see in the sample code, you don't need to directly import either boto, or the file-handling functions such as glob or os.remove. All you need to import is io.BytesIO, and os.path, in order to be able to pass s3-saver the parameters that it needs.
Using url-for-s3
This is a simple utility function, that generates a URL to a given S3-based file. It's designed to match flask.url_for as closely as possible, so that one can be swapped out for the other with minimal fuss.
from __future__ import print_function

from flask import url_for
from url_for_s3 import url_for_s3

from project import db


class Thingy(db.Model):
    """Sample model for flask-s3-save-example."""

    id = db.Column(db.Integer(), primary_key=True)
    image = db.Column(db.String(255), default='')
    image_storage_type = db.Column(db.String(255), default='')
    image_storage_bucket_name = db.Column(db.String(255), default='')

    def __repr__(self):
        return 'A thingy'

    @property
    def image_url(self):
        from flask import current_app as app
        return (self.image
            and '%s%s' % (
                app.config['UPLOADS_RELATIVE_PATH'],
                self.image)
            or None)

    @property
    def image_url_storageaware(self):
        if not self.image:
            return None

        if not (
                self.image_storage_type
                and self.image_storage_bucket_name):
            return url_for(
                'static',
                filename=self.image_url,
                _external=True)

        if self.image_storage_type != 's3':
            raise ValueError((
                'Storage type "%s" is invalid, the only supported ' +
                'storage type (apart from default local storage) ' +
                'is s3.') % self.image_storage_type)

        return url_for_s3(
            'static',
            bucket_name=self.image_storage_bucket_name,
            filename=self.image_url)
The above sample code illustrates how I typically use url_for_s3. For a given instance of a model, if that model's file is stored locally, then generate its URL using flask.url_for; otherwise, switch to url_for_s3. Only one extra parameter is needed: the S3 bucket name.
I can then easily show the "storage-aware URL" for this model in my front-end templates.
Using flask-thumbnails-s3
In my use case, the majority of the files being uploaded are images, and most of those images need to be resized when displayed in the front-end. Also, ideally, the dimensions for resizing shouldn't have to be pre-specified (i.e. thumbnails shouldn't only be able to get generated when the original image is first uploaded); new thumbnails of any size should get generated on-demand per the templates' needs. The front-end may change according to the design / branding whims of clients and other stakeholders, further on down the road.
flask-thumbnails handles just this workflow for local files; so, I decided to fork it and to create flask-thumbnails-s3, which works the same as flask-thumbnails when set to use local files, but which can also store and retrieve thumbnails on a S3 bucket.
    {% if image %}
    <div>
    <img src="{{ image|thumbnail(size,
                                 crop=crop,
                                 quality=quality,
                                 storage_type=storage_type,
                                 bucket_name=bucket_name) }}"
        alt="{{ alt }}" title="{{ title }}" />
    </div>
    {% endif %}
Like its parent project, flask-thumbnails-s3 is most commonly invoked by way of a template filter. If a thumbnail of the given original file exists, with the specified size and attributes, then it's returned straightaway; if not, then the original file is retrieved, a thumbnail is generated, and the thumbnail is saved to the specified storage back-end.
At the moment, flask-thumbnails-s3 blocks the running thread while it generates a thumbnail and saves it to S3. Ideally, this task would get sent to a queue, and a "dummy" thumbnail would be returned in the immediate request, until the "real" thumbnail is ready in a later request. The Sorlery plugin for Django uses the queued approach. It would be cool if flask-thumbnails-s3 (optionally) did the same. Anyway, it works without this fanciness for now; extra contributions welcome!
(By the way, in my testing, this is much less of a problem if your Flask app is deployed on an Amazon EC2 box, particularly if it's in the same region as your S3 bucket; unsurprisingly, there appears to be much less latency between an EC2 server and S3, than there is between a non-Amazon server and S3).
Using flask-admin-s3-upload
The purpose of flask-admin-s3-upload is basically to provide the same 'save' functionality as s3-saver, but automatically within Flask-Admin. It does this by providing alternatives to the flask_admin.form.upload.FileUploadField and flask_admin.form.upload.ImageUploadField classes, namely flask_admin_s3_upload.S3FileUploadField and flask_admin_s3_upload.S3ImageUploadField.
(Anecdote: I actually wrote flask-admin-s3-upload before any of the other tools in this suite, because I began by working with a part of my project that has no custom front-end, only a Flask-Admin based management console).
Using the utilities provided by flask-admin-s3-upload is fairly simple:
from os import path

from flask_admin_s3_upload import S3ImageUploadField

from project import admin, app, db
from foo.models import Thingy
from library.admin_utils import ProtectedModelView
from library.prefix_file_utcnow import prefix_file_utcnow


class ThingyView(ProtectedModelView):
    column_list = ('image',)
    form_excluded_columns = ('image_storage_type',
                             'image_storage_bucket_name')

    form_overrides = dict(
        image=S3ImageUploadField)

    form_args = dict(
        image=dict(
            base_path=app.config['UPLOADS_FOLDER'],
            relative_path=app.config['THINGY_IMAGE_RELATIVE_PATH'],
            url_relative_path=app.config['UPLOADS_RELATIVE_PATH'],
            namegen=prefix_file_utcnow,
            storage_type_field='image_storage_type',
            bucket_name_field='image_storage_bucket_name',
        ))

    def scaffold_form(self):
        form_class = super(ThingyView, self).scaffold_form()
        static_root_parent = path.abspath(
            path.join(app.config['PROJECT_ROOT'], '..'))

        if app.config['USE_S3']:
            form_class.image.kwargs['storage_type'] = 's3'

        form_class.image.kwargs['bucket_name'] = \
            app.config['S3_BUCKET_NAME']
        form_class.image.kwargs['access_key_id'] = \
            app.config['AWS_ACCESS_KEY_ID']
        form_class.image.kwargs['access_key_secret'] = \
            app.config['AWS_SECRET_ACCESS_KEY']
        form_class.image.kwargs['static_root_parent'] = \
            static_root_parent

        return form_class


admin.add_view(ThingyView(Thingy, db.session, name='Thingies'))
Note that flask-admin-s3-upload only handles saving, not deleting (the same as the regular Flask-Admin file / image upload fields only handle saving). If you wanted to handle deleting files in the admin as well, you could (for example) use s3-saver, and hook it in to one of the Flask-Admin event callbacks.
In summary
I'd also like to mention: one thing that others have implemented in Flask, is direct JavaScript-based upload to S3. Implementing this sort of functionality in my tool suite would be a great next step; however, it would have to play nice with everything else I've built (particularly with flask-thumbnails-s3), and it would have to work for local- and for S3-based files, the same as all the other tools do. I don't have time to address those hurdles right now – another area where contributions are welcome.
I hope that this article serves as a comprehensive guide, of how to use the Flask S3 tools that I've recently built and contributed to the community. Any questions or concerns, please drop me a line.
]]>
Conditionally adding HTTP response headers in Flask and Apache2014-12-29T00:00:00Z2014-12-29T00:00:00ZJazahttps://greenash.net.au/thoughts/2014/12/conditionally-adding-http-response-headers-in-flask-and-apache/
For a Flask-based project that I'm currently working on, I just added some front-end functionality that depends on Font Awesome. Getting Font Awesome to load properly (in well-behaved modern browsers) shouldn't be much of a chore. However, my app spans multiple subdomains (achieved with the help of Flask's Blueprints per-subdomain feature), and my static assets (CSS, JS, etc) are only served from one of those subdomains. And as it turns out (and unlike cross-domain CSS / JS / image requests), cross-domain font requests are forbidden unless the font files are served with an appropriate Access-Control-Allow-Origin HTTP response header. For example, this is the error message that's shown in Google Chrome for such a request:
Font from origin 'http://foo.local' has been blocked from loading by Cross-Origin Resource Sharing policy: No 'Access-Control-Allow-Origin' header is present on the requested resource. Origin 'http://bar.foo.local' is therefore not allowed access.
As a result of this, I had to quickly learn how to conditionally add custom HTTP response headers based on the URL being requested, both for Flask (when running locally with Flask's built-in development server), and for Apache (when running in staging and production). In a typical production Flask setup, it's impossible to do anything at the Python level when serving static files, because these are served directly by the web server (e.g. Apache, Nginx), without ever hitting WSGI. Conversely, in a typical development setup, there is no web server running separately to the WSGI app, and so playing around with static files must be done at the Python level.
The code
For a regular Flask request that's handled by one of the app's custom routes, adding another header to the HTTP response would be a simple matter of modifying the flask.Response object before returning it. However, static files (in a development setup) are served by Flask's built-in app.send_static_file() function, not by any route that you have control over. So, instead, it's necessary to intercept the response object via Flask's API.
Fortunately, this interception is easily accomplished, courtesy of Flask's app.after_request() function, which can either be passed a callback function, or used as a decorator. Here's what did the trick for me:
import re

from flask import Flask
from flask import request


app = Flask(__name__)

def add_headers_to_fontawesome_static_files(response):
    """
    Fix for font-awesome files: after Flask static send_file() does its
    thing, but before the response is sent, add an
    Access-Control-Allow-Origin: *
    HTTP header to the response (otherwise browsers complain).
    """

    if (request.path and
        re.search(r'\.(ttf|woff|svg|eot)$', request.path)):
        response.headers.add('Access-Control-Allow-Origin', '*')

    return response

if app.debug:
    app.after_request(add_headers_to_fontawesome_static_files)
For a production setup, the above Python code achieves nothing, and it's therefore necessary to add something like this to the config file for the app's VirtualHost:
<VirtualHost *:80>
  # ...

  Alias /static /path/to/myapp/static
  <Location /static>
    Order deny,allow
    Allow from all
    Satisfy Any

    SetEnvIf Request_URI "\.(ttf|woff|svg|eot)$" is_font_file
    Header set Access-Control-Allow-Origin "*" env=is_font_file
  </Location>
</VirtualHost>
Done
And there you go: an easy way to add custom HTTP headers to any response, in two different web server environments, based on a conditional request path. So far, cleanly serving cross-domain font files is all that I've neede this for. But it's a very handy little snippet, and no doubt there are plenty of other scenarios in which it could save the day.
]]>
Mixing GData auth with Google Discovery API queries2014-08-11T00:00:00Z2014-08-11T00:00:00ZJazahttps://greenash.net.au/thoughts/2014/08/mixing-gdata-auth-with-google-discovery-api-queries/
For those of you who have some experience working with Google's APIs, you may be aware of the fact that they fall into two categories: the Google Data APIs, which is mainly for older services; and the discovery-based APIs, which is mainly for newer services.
There has been considerable confusion regarding the difference between the two APIs. I'm no expert, and I admit that I too have fallen victim to the confusion at times. Both systems now require the use of OAuth2 for authentication (it's no longer possible to access any Google APIs without Oauth2). However, each of Google's APIs only falls into one of the two camps; and once authentication is complete, you must use the correct library (either GData or Discovery, for your chosen programming language) in order to actually perform API requests. So, all that really matters, is that for each API that you plan to use, you're crystal clear on which type of API it is, and you use the correct corresponding library.
The GData Python library has a very handy mechanism for exporting an authorised access token as a blob (i.e. a serialised string), and for later re-importing the blob back as a programmatic access token. I made extensive use of this when I recently worked with the Google Analytics API, which is GData-based. I couldn't find any similar functionality in the Discovery API Python library; and I wanted to interact similarly with the YouTube Data API, which is discovery-based. What to do?
Mix 'n' match
The GData API already supports converting a Credentials object to an OAuth2 token object. This is great for an app that has user-facing OAuth2, where a Credentials object is available at the time of making API requests. However, in my situation – making API requests in a server-side script, that runs via cron with no user-facing OAuth2 – that's not much use. I have the opposite problem: I can easily get the token object, but I don't have any Credentials object already instantiated.
Well, it turns out that manually instantiating your own Credentials object isn't that hard. So, this is how I go about querying the YouTube Data API:
import httplib2

import gdata.gauth
from apiclient.discovery import build
from oauth2client.client import OAuth2Credentials

from mysettings import token_blob_string, \
                       youtube_playlist_id, \
                       page_size, \
                       next_page_token

# De-serialise the access token that can be conveniently stored in a
# Python settings file elsewhere, as a blob (string).
# GData provides the blob functionality, but the Discovery API library
# doesn't.
token = gdata.gauth.token_from_blob(token_blob_string)

# Manually instantiate an OAuth2Credentials object from the
# de-serialised access token.
credentials = OAuth2Credentials(
    access_token=token.access_token,
    client_id=token.client_id,
    client_secret=token.client_secret,
    refresh_token=token.refresh_token,
    token_expiry=None,
    token_uri=token.token_uri,
    user_agent=None)

http = credentials.authorize(httplib2.Http())
youtube = build('youtube', 'v3', http=http)

# Profit!
response = youtube.playlistItems().list(
    playlistId=youtube_playlist_id,
    part="snippet",
    maxResults=page_size,
    pageToken=next_page_token
).execute()
Easy win
And there you go: you can have your cake and eat it, too! All you need is an OAuth2 access token that you've already saved elsewhere as a blob string; and with that, you can query discovery-based Google APIs from anywhere you want, at any time, with no additional OAuth2 hoops to jump through.
If you want more details on how to serialise and de-serialise access token blobs using the GData Python library, others have explained it step-by-step, I'm not going to repeat all of that here. I hope this makes life a bit easier, for anyone else who's trying to deal with "offline" long-lived access tokens and the discovery-based Google APIs.
]]>
Using PayPal WPS with Cartridge (Mezzanine / Django)2014-03-31T00:00:00Z2014-03-31T00:00:00ZJazahttps://greenash.net.au/thoughts/2014/03/using-paypal-wps-with-cartridge-mezzanine-django/
I recently built a web site using Mezzanine, a CMS built on top of Django. I decided to go with Mezzanine (which I've never used before) for two reasons: it nicely enhances Django's admin experience (plus it enhances, but doesn't get in the way of, the Django developer experience); and there's a shopping cart app called Cartridge that's built on top of Mezzanine, and for this particular site (a children's art class business in Sydney) I needed shopping cart / e-commerce functionality.
This suite turned out to deliver virtually everything I needed out-of-the-box, with one exception: Cartridge currently lacks support for payment methods that require redirecting to the payment gateway and then returning after payment completion (such as PayPal Website Payments Standard, or WPS). It only supports payment methods where payment is completed on-site (such as PayPal Website Payments Pro, or WPP). In this case, with the project being small and low-budget, I wanted to avoid the overhead of dealing with SSL and on-site payment, so PayPal WPS was the obvious candidate.
Turns out that, with a bit of hackery, making Cartridge play nice with WPS isn't too hard to achieve. Here's how you go about it.
I'm assuming that you've already got an environment set up, that's equipped for Django development. I.e. you've already installed Python (my examples here are tested on Python 2.7), a database engine (preferably SQLite on your local environment), pip (recommended), and virtualenv (recommended). If you want to implement these examples fully, then as well as a dev environment with these basics set up, you'll also need a server to which you can deploy a Django site, and on which you can set up a proper public domain or subdomain DNS (because the PayPal API won't actually talk to your localhost, it refuses to do that).
You'll also need a PayPal (regular and "sandbox") account, which you will use for authenticating with the PayPal API.
Here are the basic dependencies for the project. I've copy-pasted this straight out of my requirements.txt file, which I install on a virtualenv using pip install -E . -r requirements.txt (I recommend you do the same):
Note:for dcramer/django-paypal, which has no versioned releases, I'm using the latest git commit as of writing this. I recommend that you check for a newer commit and update your requirements accordingly. For the other dependencies, you should also be able to update version numbers to latest stable releases without issues (although Mezzanine 3.0.x / Cartridge 0.9.x is only compatible with Django 1.6.x, not Django 1.7.x which is still in beta as of writing this).
Once you've got those dependencies installed, make sure this Mezzanine-specific setting is in your settings.py file:
# If True, the south application will be automatically added to the
# INSTALLED_APPS setting.
USE_SOUTH = True
Then, let's get a new project set up per Mezzanine's standard install:
(When it asks "Would you like to install an initial demo product and sale?", I've gone with "yes" for my test / demo project; feel free to do the same, if you'd like some products available out-of-the-box with which to test checkout / payment).
This will get the Mezzanine foundations installed for you. The basic configuration of the Django / Mezzanine settings file, I leave up to you. If you have some experience already with Django (and if you've got this far, then I assume that you do), you no doubt have a standard settings template already in your toolkit (or at least a standard set of settings tweaks), so feel free to use it. I'll be going over the settings you'll need specifically for this app, in just a moment.
Fire up ye 'ol runserver, open your browser at http://localhost:8000/, and confirm that the "Congratulations!" default Mezzanine home page appears for you. Also confirm that you can access the admin. And that's the basics set up!
At this point, you should also be able to test out adding an item to your cart and going to checkout. After entering some billing / delivery details, on the 'payment details' screen it should ask for credit card details. This is the default Cartridge payment setup: we'll be switching this over to PayPal shortly.
Configure Django settings
I'm not too fussed about what else you have in your Django settings file (or in how your Django settings are structured or loaded, for that matter); but if you want to follow along, then you should have certain settings configured per the following guidelines (note: much of these instructions are virtually the same as the cartridge-payments install instructions):
Your TEMPLATE_CONTEXT_PROCESSORS is to include (as well as 'mezzanine.conf.context_processors.settings'):
Set a value for the PAYPAL_CURRENCY setting, for example:
# Currency type.
PAYPAL_CURRENCY = "AUD"
Set a value for the PAYPAL_BUSINESS setting, for example:
# Business account email. Sandbox emails look like this.
PAYPAL_BUSINESS = 'cartwpstest@blablablaaaaaaa.com'
Set a value for the PAYPAL_RECEIVER_EMAIL setting, for example:
PAYPAL_RECEIVER_EMAIL = PAYPAL_BUSINESS
Set a value for the PAYPAL_RETURN_WITH_HTTPS setting, for example:
# Use this to enable https on return URLs.  This is strongly recommended! (Except for sandbox)
PAYPAL_RETURN_WITH_HTTPS = False
Configure the PAYPAL_RETURN_URL setting to this:
# Function that returns args for `reverse`.
# URL is sent to PayPal as the for returning to a 'complete' landing page.
PAYPAL_RETURN_URL = lambda cart, uuid, order_form: ('shop_complete', None, None)
Configure the PAYPAL_IPN_URL setting to this:
# Function that returns args for `reverse`.
# URL is sent to PayPal as the URL to callback to for PayPal IPN.
# Set to None if you do not wish to use IPN.
PAYPAL_IPN_URL = lambda cart, uuid, order_form: ('paypal.standard.ipn.views.ipn', None, {})
Configure the PAYPAL_SUBMIT_URL setting to this:
# URL the secondary-payment-form is submitted to
# For real use set to 'https://www.paypal.com/cgi-bin/webscr'
PAYPAL_SUBMIT_URL = 'https://www.sandbox.paypal.com/cgi-bin/webscr'
After doing this, you'll probably need to manually create a migration in order to get this field added to your database (per Mezzanine's field injection caveat docs), and you'll then need to apply that migration (in this example, I'm adding the migration to an app called 'content' in my project):
Although it shouldn't be necessary, I've found that I need to copy the templates provided by explodes/cartridge-payments into my project's templates directory, otherwise they're ignored and Cartridge's default payment template still gets used:
Place the following code somewhere in your codebase (per the django-paypal docs, I placed it in the models.py file for one of my apps):
# ...

from importlib import import_module

from mezzanine.conf import settings

from cartridge.shop.models import Cart, Order, ProductVariation, \
DiscountCode
from paypal.standard.ipn.signals import payment_was_successful

# ...


def payment_complete(sender, **kwargs):
    """Performs the same logic as the code in
    cartridge.shop.models.Order.complete(), but fetches the session,
    order, and cart objects from storage, rather than relying on the
    request object being passed in (which it isn't, since this is
    triggered on PayPal IPN callback)."""

    ipn_obj = sender

    if ipn_obj.custom and ipn_obj.invoice:
        s_key, cart_pk = ipn_obj.custom.split(',')
        SessionStore = import_module(settings.SESSION_ENGINE) \
                           .SessionStore
        session = SessionStore(s_key)

        try:
            cart = Cart.objects.get(id=cart_pk)
            try:
                order = Order.objects.get(
                    transaction_id=ipn_obj.invoice)
                for field in order.session_fields:
                    if field in session:
                        del session[field]
                try:
                    del session["order"]
                except KeyError:
                    pass

                # Since we're manually changing session data outside of
                # a normal request, need to force the session object to
                # save after modifying its data.
                session.save()

                for item in cart:
                    try:
                        variation = ProductVariation.objects.get(
                            sku=item.sku)
                    except ProductVariation.DoesNotExist:
                        pass
                    else:
                        variation.update_stock(item.quantity * -1)
                        variation.product.actions.purchased()

                code = session.get('discount_code')
                if code:
                    DiscountCode.objects.active().filter(code=code) \
                        .update(uses_remaining=F('uses_remaining') - 1)
                cart.delete()
            except Order.DoesNotExist:
                pass
        except Cart.DoesNotExist:
            pass

payment_was_successful.connect(payment_complete)
This little snippet that I whipped up, is the critical spoonful of glue that gets PayPal WPS playing nice with Cartridge. Basically, when a successful payment is realised, PayPal WPS doesn't force the user to redirect back to the original web site, and therefore it doesn't rely on any redirection in order to notify the site of success. Instead, it uses PayPal's IPN (Instant Payment Notification) system to make a separate, asynchronous request to the original web site – and it's up to the site to receive this request and to process it as it sees fit.
This code uses the payment_was_successful signal that django-paypal provides (and that it triggers on IPN request), to do what Cartridge usually takes care of (for other payment methods), on success: i.e. it clears the user's shopping cart; it updates remaining quantities of products in stock (if applicable); it triggers Cartridge's "product purchased" actions (e.g. email an invoice / receipt); and it updates a discount code (if applicable).
Apply a hack to cartridge-payments (file lib/python2.7/site-packages/payments/multipayments/forms/paypal.py) per this diff:
After line 25 (charset = forms.CharField(widget=forms.HiddenInput(), initial='utf-8')), add this:
Apply a hack to django-paypal (file src/django-paypal/paypal/standard/forms.py) per these instructions:
After line 15 ("%H:%M:%S %b. %d, %Y PDT",), add this:
                      "%H:%M:%S %d %b %Y PST",    # note this
                      "%H:%M:%S %d %b %Y PDT",    # and that
That should be all you need, in order to get checkout with PayPal WPS working on your site. So, deploy everything that's been done so far to your online server, log in to the Django admin, and for some of the variations for the sample product in the database, add values for "number in stock".
Then, log out of the admin, and navigate to the "shop" section of the site. Try out adding an item to your cart.
Basic Django / Mezzanine / Cartridge site: adding an item to shopping cart.
Once on the "your cart" page, continue by clicking "go to checkout". On the "billing details" page, enter sample billing information as necessary, then click "next". On the "payment" page, you should see a single button labelled "pay with pay-pal".
Click the button, and you should be taken to the PayPal (sandbox, unless configured otherwise) payment landing page. For test cases, log in with a PayPal test account, and click 'Pay Now' to try out the process.
If payment is successful, you should see the PayPal confirmation page, saying "thanks for your order". Click the link labelled "return to email@here.com" to return to the Django site. You should see Cartridge's "order complete" page.
Basic Django / Mezzanine / Cartridge site: order complete screen.
And that's it, you're done! You should be able to verify that the IPN callback was triggered, by checking that the "number in stock" has decreased to reflect the item that was just purchased, and by confirming that an order email / confirmation email was received.
Finished process
I hope that this guide is of assistance, to anyone else who's looking to integrate PayPal WPS with Cartridge. The difficulties associated with it are also documented in this mailing list thread (to which I posted a rough version of what I've illustrated in this article). Feel free to leave comments here, and/or in that thread.
Hopefully the hacks necessary to get this working at the moment, will no longer be necessary in the future; it's up to the maintainers of the various projects to get the fixes for these committed. Ideally, the custom signal implementation won't be necessary either in the future: it would be great if Cartridge could work out-of-the-box with PayPal WPS. Unfortunately, the current architecture of Cartridge's payment system simply isn't designed for something like IPN, it only plays nicely with payment methods that keep the user on the Django site the entire time. In the meantime, with the help of this article, you should at least be able to get it working, even if more custom code is needed than what would be ideal.
]]>
Django Facebook user integration with whitelisting2011-11-02T00:00:00Z2011-11-02T00:00:00ZJazahttps://greenash.net.au/thoughts/2011/11/django-facebook-user-integration-with-whitelisting/
It's recently become quite popular for web sites to abandon the tasks of user authentication and account management, and to instead shoulder off this burden to a third-party service. One of the big services available for this purpose is Facebook. You may have noticed "Sign in with Facebook" buttons appearing ever more frequently around the 'Web.
The common workflow for Facebook user integration is: user is redirected to the Facebook login page (or is shown this page in a popup); user enters credentials; user is asked to authorise the sharing of Facebook account data with the non-Facebook source; a local account is automatically created for the user on the non-Facebook site; user is redirected to, and is automatically logged in to, the non-Facebook site. Also quite common is for the user's Facebook profile picture to be queried, and to be shown as the user's avatar on the non-Facebook site.
This article demonstrates how to achieve this common workflow in Django, with some added sugary sweetness: maintaning a whitelist of Facebook user IDs in your local database, and only authenticating and auto-registering users who exist on this whitelist.
Install dependencies
I'm assuming that you've already got an environment set up, that's equipped for Django development. I.e. you've already installed Python (my examples here are tested on Python 2.6 and 2.7), a database engine (preferably SQLite on your local environment), pip (recommended), and virtualenv (recommended). If you want to implement these examples fully, then as well as a dev environment with these basics set up, you'll also need a server to which you can deploy a Django site, and on which you can set up a proper public domain or subdomain DNS (because the Facebook API won't actually talk to or redirect back to your localhost, it refuses to do that).
You'll also need a Facebook account, with which you will be registering a new "Facebook app". We won't actually be developing a Facebook app in this article (at least, not in the usual sense, i.e. we won't be deploying anything to facebook.com), we just need an app key in order to talk to the Facebook API.
Here are the Python dependencies for our Django project. I've copy-pasted this straight out of my requirements.txt file, which I install on a virtualenv using pip install -E . -r requirements.txt (I recommend you do the same):
The first requirement, Django itself, is pretty self-explanatory. The next one, django-allauth, is the foundation upon which this demonstration is built. This app provides authentication and account management services for Facebook (plus Twitter and OAuth currently supported), as well as auto-registration, and profile pic to avatar auto-copying. The version we're using here, is my GitHub fork of the main project, which I've hacked a little bit in order to integrate with our whitelisting functionality.
The Facebook Python SDK is the base integration library provided by the Facebook team, and allauth depends on it for certain bits of functionality. Plus, we've installed django-avatar so that we get local user profile images.
Once you've got those dependencies installed, let's get a new Django project set up with the standard command:
django-admin.py startproject myproject
This will get the Django foundations installed for you. The basic configuration of the Django settings file, I leave up to you. If you have some experience already with Django (and if you've got this far, then I assume that you do), you no doubt have a standard settings template already in your toolkit (or at least a standard set of settings tweaks), so feel free to use it. I'll be going over the settings you'll need specifically for this app, in just a moment.
Fire up ye 'ol runserver, open your browser at http://localhost:8000/, and confirm that the "It worked!" page appears for you. At this point, you might also like to enable the Django admin (add 'admin' to INSTALLED_APPS, un-comment the admin callback in urls.py, and run syncdb; then confirm that you can access the admin). And that's the basics set up!
Register the Facebook app
Now, we're going to jump over to the Facebook side of the setup, in order to register our site as a Facebook app, and to then receive our Facebook app credentials. To get started, go to the Apps section of the Facebook Developers site. You'll probably be prompted to log in with your Facebook account, so go ahead and do that (if asked).
On this page, click the button labelled "Create New App". In the form that pops up, in the "App Display Name" field, enter a unique name for your app (e.g. the name of the site you're using this on — for the example app that I registered, I used the name "FB Whitelist"). Then, tick "I Agree" and click "Continue".
Once this is done, your Facebook app is registered, and you'll be taken to a form that lets you edit the basic settings of the app. The first setting that you'll want to configure is "App Domain": set this to the domain or subdomain URL of your site (without an http:// prefix or a trailing slash). A bit further down, in "Website — Site URL", enter this URL again (this time, with the http:// prefix and a trailing slash). Be sure to save your configuration changes on this page.
Next is a little annoying setting that must be configured. In the "Auth Dialog" section, for "Privacy Policy URL", once again enter the domain or subdomain URL of your site. Enter your actual privacy policy URL if you have one; if not, don't worry — Facebook's authentication API refuses to function if you don't enter something for this, so the URL of your site's front page is better than nothing.
Note: at some point, you'll also need to go to the "Advanced" section, and set "Sandbox Mode" to "Disabled". This is very important! If your app is set to Sandbox mode, then nobody will be able to log in to your Django site via Facebook auth, apart from those listed in the Facebook app config as "developers". It's up to you when you want to disable Sandbox mode, but make sure you do it before non-dev users start trying to log in to your site.
On the main "Settings — Basic" page for your newly-registered Facebook app, take note of the "App ID" and "App Secret" values. We'll be needing these shortly.
Configure Django settings
I'm not too fussed about what else you have in your Django settings file (or in how your Django settings are structured or loaded, for that matter); but if you want to follow along, then you should have certain settings configured per the following guidelines:
(You'll need to re-run syncdb after enabling these apps).
(Note: django-allauth also expects the database schema for the email confirmation app to exist; however, you don't actually need this app enabled. So, what you can do, is add 'emailconfirmation' to your INSTALLED_APPS, then syncdb, then immediately remove it).
Set a value for the AVATAR_STORAGE_DIR setting, for example:
AVATAR_STORAGE_DIR = 'uploads/avatars'
Set a value for the LOGIN_REDIRECT_URL setting, for example:
LOGIN_REDIRECT_URL = '/'
Set this:
ACCOUNT_EMAIL_REQUIRED = True
Additionally, you'll need to create a new Facebook App record in your Django database. To do this, log in to your shiny new Django admin, and under "Facebook — Facebook apps", add a new record:
For "Name", copy the "App Display Name" from the Facebook page.
For both "Application id" and "Api key", copy the "App ID" from the Facebook page.
For "Application secret", copy the "App Secret" from the Facebook page.
Once you've entered everything on this form (set "Site" as well), save the record.
Implement standard Facebook authentication
By "standard", I mean "without whitelisting". Here's how you do it:
Add these imports to your urls.py:
from allauth.account.views import logout
from allauth.socialaccount.views import login_cancelled, login_error
from allauth.facebook.views import login as facebook_login
And (in the same file), add these to your urlpatterns variable:
<div class="socialaccount_ballot">
<ul class="socialaccount_providers">
{% if not user.is_authenticated %}
{% if allauth.socialaccount_enabled  %}
{% include "socialaccount/snippets/provider_list.html" %}
{% include "socialaccount/snippets/login_extra.html" %}
{% endif %}
{% else %}
<li><a href="{% url account_logout %}?next=/">Logout</a></li>
{% endif %}
</ul>
</div>
(Note: I'm assuming that by this point, you've set up the necessary URL callbacks, views, templates, etc. to get a working front page on your site; I'm not going to hold your hand and go through all that).
If you'd like, you can customise the default authentication templates provided by django-allauth. For example, I overrode the socialaccount/snippets/provider_list.html and socialaccount/authentication_error.html templates in my test implementation.
That should be all you need, in order to get a working "Login with Facebook" link on your site. So, deploy everything that's been done so far to your online server, navigate to your front page, and click the "Login" link. If all goes well, then a popup will appear prompting you to log in to Facebook (unless you already have an active Facebook session in your browser), followed by a prompt to authorise your Django site to access your Facebook account credentials (to which you and your users will have to agree), and finishing with you being successfully authenticated.
The authorisation prompt during the initial login procedure.
You should be able to confirm authentication success, by noting that the link on your front page has changed to "Logout".
Additionally, if you go into the Django admin (you may first need to log out of your Facebook user's Django session, and then log in to the admin using your superuser credentials), you should be able to confirm that a new Django user was automatically created in response to the Facebook auth procedure. Additionally, you should find that an avatar record has been created, containing a copy of your Facebook profile picture; and, if you look in the "Facebook accounts" section, you should find that a record has been created here, complete with your Facebook user ID and profile page URL.
Facebook account record in the Django admin.
Great! Now, on to the really fun stuff.
Build a whitelisting app
So far, we've got a Django site that anyone can log into, using their Facebook credentials. That works fine for many sites, where registration is open to anyone in the general public, and where the idea is that the more user accounts get registered, the better. But what about a site where the general public cannot register, and where authentication should be restricted to only a select few individuals who have been pre-registered by site admins? For that, we need to go beyond the base capabilities of django-allauth.
Create a new app in your Django project, called fbwhitelist. The app should have the following files (file contents provided below):
models.py :
from django.contrib.auth.models import User
from django.db import models


class FBWhiteListUser(models.Model):
    name            = models.CharField(max_length=100)
    email           = models.EmailField(unique=True)
    social_id       = models.CharField(verbose_name='Facebook user ID',
                                       blank=True, max_length=100)
    active          = models.BooleanField(default=False)

    def __unicode__(self):
        return self.name

    class Meta:
        verbose_name = 'facebook whitelist user'
        verbose_name_plural = 'facebook whitelist users'
        ordering = ('name', 'email')

    def save(self, *args, **kwargs):
        try:
            old_instance = FBWhiteListUser.objects.get(pk=self.pk)
            if not self.active:
                if old_instance.active:
                    self.deactivate_user()
            else:
                if not old_instance.active:
                    self.activate_user()
        except FBWhiteListUser.DoesNotExist:
            pass

        super(FBWhiteListUser, self).save(*args, **kwargs)

    def delete(self):
        self.deactivate_user()

        super(FBWhiteListUser, self).delete()

    def deactivate_user(self):
        try:
            u = User.objects.get(email=self.email)
            if u.is_active and not u.is_superuser and not u.is_staff:
                u.is_active = False
                u.save()
        except User.DoesNotExist:
            pass

    def activate_user(self):
        try:
            u = User.objects.get(email=self.email)
            if not u.is_active:
                u.is_active = True
                u.save()
        except User.DoesNotExist:
            pass
import re
import urllib2

from django import forms
from django.contrib import admin
from django.contrib.auth.models import User

from allauth.facebook.models import FacebookAccount
from allauth.socialaccount import app_settings
from allauth.socialaccount.helpers import _copy_avatar

from utils import slugify

from models import FBWhiteListUser


class FBWhiteListUserAdminForm(forms.ModelForm):
    class Meta:
        model = FBWhiteListUser

    def __init__(self, *args, **kwargs):
        super(FBWhiteListUserAdminForm, self).__init__(*args, **kwargs)

    def save(self, *args, **kwargs):
        m = super(FBWhiteListUserAdminForm, self).save(*args, **kwargs)

        try:
            u = User.objects.get(email=self.cleaned_data['email'])
        except User.DoesNotExist:
            u = self.create_django_user()

            if self.cleaned_data['social_id']:
                self.create_facebook_account(u)

        return m

    def create_django_user(self):
        name = self.cleaned_data['name']
        email = self.cleaned_data['email']
        active = self.cleaned_data['active']
        m = re.search(r'^(?P<first_name>[^ ]+) (?P<last_name>.+)$', name)
        name_slugified = slugify(name)
        first_name = ''
        last_name = ''

        if m:
            d = m.groupdict()
            first_name = d['first_name']
            last_name = d['last_name']

        u = User(username=name_slugified,
                 email=email,
                 last_name=last_name,
                 first_name=first_name)

        u.set_unusable_password()
        u.is_active = active
        u.save()

        return u

    def create_facebook_account(self, u):
        social_id = self.cleaned_data['social_id']
        name = self.cleaned_data['name']
        try:
            account = FacebookAccount.objects.get(social_id=social_id)
        except FacebookAccount.DoesNotExist:
            account = FacebookAccount(social_id=social_id)

        account.link = 'http://www.facebook.com/profile.php?id=%s' % social_id

        req = urllib2.Request(account.link)
        res = urllib2.urlopen(req)

        new_link = res.geturl()
        if not '/people/' in new_link and not 'profile.php' in new_link:
            account.link = new_link

        account.name = name

        request = None
        if app_settings.AVATAR_SUPPORT:
            _copy_avatar(request, u, account)

        account.user = u
        account.save()


class FBWhiteListUserAdmin(admin.ModelAdmin):
    list_display = ('name', 'email', 'active')
    list_filter = ('active',)
    search_fields = ('name', 'email')
    fields = ('name', 'email', 'social_id', 'active')

    def __init__(self, *args, **kwargs):
        super(FBWhiteListUserAdmin, self).__init__(*args, **kwargs)

    form = FBWhiteListUserAdminForm


admin.site.register(FBWhiteListUser, FBWhiteListUserAdmin)
(Note: also ensure that you have an empty __init__.py file in your app's directory, as you do with most all Django apps).
Also, of course, you'll need to add 'fbwhitelist' to your INSTALLED_APPS setting (and after doing that, a syncdb will be necessary).
Most of the code above is pretty basic, it just defines a Django model for the whitelist, and provides a basic admin view for that model. In implementing this code, feel free to modify the model and the admin definitions liberally — in particular, you may want to add additional fields to the model, per your own custom project needs. What this code also does, is automatically create both a corresponding Django user, and a corresponding socialaccount Facebook account record (including Facebook profile picture to django-avatar handling), whenever a new Facebook whitelist user instance is created.
Integrate it with django-allauth
In order to let django-allauth know about the new fbwhitelist app and its FBWhiteListUser model, all you need to do, is to add this to your Django settings file:
If you're interested in the dodgy little hacks I made to django-allauth, in order to make it magically integrate with a specified whitelist app, here's the main code snippet responsible, just for your viewing pleasure (from _process_signup in socialaccount/helpers.py):
# Extra stuff hacked in here to integrate with
# the account whitelist app.
# Will be ignored if the whitelist app can't be
# imported, thus making this slightly less hacky.
whitelist_model_setting = getattr(
    settings,
    'SOCIALACCOUNT_WHITELIST_MODEL',
    None
)
if whitelist_model_setting:
    whitelist_model_path = whitelist_model_setting.split(r'.')
    whitelist_model_str = whitelist_model_path[-1]
    whitelist_path_str = r'.'.join(whitelist_model_path[:-1])
    try:
        whitelist_app = __import__(whitelist_path_str, fromlist=[whitelist_path_str])
        whitelist_model = getattr(whitelist_app, whitelist_model_str, None)
        if whitelist_model:
            try:
                guest = whitelist_model.objects.get(email=email)
                if not guest.active:
                    auto_signup = False
            except whitelist_model.DoesNotExist:
                auto_signup = False
    except ImportError:
        pass
Basically, the hack attempts to find and to query our whitelist model; and if it doesn't find a whitelist instance whose email matches that provided by the Facebook auth API, or if the found whitelist instance is not set to 'active', then it halts auto-creation and auto-login of the user into the Django site. What can I say… it does the trick!
Build a Facebook ID lookup utility
The Django admin interface so far for managing the whitelist is good, but it does have one glaring problem: it requires administrators to know the Facebook account ID of the person they're whitelisting. And, as it turns out, Facebook doesn't make it that easy for regular non-techies to find account IDs these days. It used to be straightforward enough, as profile page URLs all had the account ID in them; but now, most profile page URLs on Facebook are aliased, and the account ID is pretty well obliterated from the Facebook front-end.
So, let's build a quick little utility that looks up Facebook account IDs, based on a specified email. Add these files to your 'fbwhitelist' app to implement it:
facebook.py :
import urllib


class FacebookSearchUser(object):
    @staticmethod
    def get_query_email_request_url(email, access_token):
        """Queries a Facebook user based on a given email address. A valid Facebook Graph API access token must also be provided."""

        args = {
            'q': email,
            'type': 'user',
            'access_token': access_token,
        }
        return 'https://graph.facebook.com/search?' + \
               urllib.urlencode(args)
views.py :
from django.utils.simplejson import loads
import urllib2

from django.conf import settings
from django.contrib.admin.views.decorators import staff_member_required
from django.http import HttpResponse, HttpResponseBadRequest

from fbwhitelist.facebook import FacebookSearchUser


class FacebookSearchUserView(object):
    @staticmethod
    @staff_member_required
    def query_email(request, email):
        """Queries a Facebook user based on the given email address. This view cannot be accessed directly."""

        access_token = getattr(settings, 'FBWHITELIST_FACEBOOK_ACCESS_TOKEN', None)

        if access_token:
            url = FacebookSearchUser.get_query_email_request_url(email, access_token)
            response = urllib2.urlopen(url)
            fb_data = loads(response.read())
            if fb_data['data'] and fb_data['data'][0] and fb_data['data'][0]['id']:
                return HttpResponse('Facebook ID: %s' % fb_data['data'][0]['id'])
            else:
                return HttpResponse('No Facebook credentials found for the specified email.')

        return HttpResponseBadRequest('Error: no access token specified in Django settings.')
urls.py :
from django.conf.urls.defaults import *

from views import FacebookSearchUserView


urlpatterns = patterns('',
    url(r'^facebook_search_user/query_email/(?P<email>[^\/]+)/$',
        FacebookSearchUserView.query_email,
        name='fbwhitelist_search_user_query_email'),
)
Plus, add this to the urlpatterns variable in your project's main urls.py file:
In your MEDIA_ROOT directory, create a file js/fbwhitelistadmin.js, with this content:
(function($) {
    var fbwhitelistadmin = function() {

        function init_social_id_from_email() {
            $('.social_id').append('<input type="submit" value="Find Facebook ID" id="social_id_get_from_email" /><p>After entering an email, click "Find Facebook ID" to bring up a new window, where you can see the Facebook ID of the Facebook user with this email. Copy the Facebook user ID number into the text field "Facebook user ID", and save. If it is a valid Facebook ID, it will automatically create a new user on this site, that corresponds to the specified Facebook user.</p>');
            $('#social_id_get_from_email').live('click', function() {
                var email_val = $('#id_email').val();
                if (email_val) {
                    var url = 'http://fbwhitelist.greenash.net.au/fbwhitelist/facebook_search_user/query_email/' + email_val + '/';
                    window.open(url);
                }

                return false;
            });
        }

        return {
            init: function() {
                if ($('#content h1').text() == 'Change facebook whitelist user') {
                    $('#id_name, #id_email, #id_social_id').attr('disabled', 'disabled');
                }
                else {
                    init_social_id_from_email();
                }
            }
        }
    }();

    $(document).ready(function() {
        fbwhitelistadmin.init();
    });
})(django.jQuery);
And to load this file on the correct Django admin page, add this code to the FBWhiteListUserAdmin class in the fbwhitelist/admin.py file:
    class Media:
        js = ("js/fbwhitelistadmin.js",)
Additionally, you're going to need a Facebook Graph API access token. To obtain one, go to a URL like this:
Replacing the APP_ID, SITE_URL, and APP_SECRET bits with your relevant Facebook credentials, and replacing TEMP_CODE with the code from the URL above. You should then see a plain-text page response in this form:
access_token=ACCESS_TOKEN
And the ACCESS_TOKEN bit is what you need to take note of. Add this value to your settings file:
Of very important note, is the fact that what you've just saved in your settings is a long-life offline access Facebook access token. We requested that the access token be long-life, with the scope=offline_access parameter in the first URL request that we made to Facebook (above). This means that the access token won't expire for a very long time, so you can safely keep it in your settings file without having to worry about constantly needing to change it.
Exactly how long these tokens last, I'm not sure — so far, I've been using mine for about six weeks with no problems. You should be notified if and when your access token expires, because if you provide an invalid access token to the Graph API call, then Facebook will return an HTTP 400 response (bad request), and this will trigger urllib2.urlopen to raise an HTTPError exception. How you get notified, will depend on how you've configured Django to respond to uncaught exceptions; in my case, Django emails me an error report, which is sufficient notification for me.
Your Django admin should now have a nice enough little addition for Facebook account ID lookup:
Facebook account ID lookup integrated into the whitelist admin.
I say "nice enough", because it would also be great to change this from showing the ID in a popup, to actually populating the form field with the ID value via JavaScript (and showing an error, on fail, also via JavaScript). But honestly, I just haven't got around to doing this. Anyway, the basic popup display works as is — only drawback is that it requires copy-pasting the ID into the form field.
Finished product
And that's everything — your Django-Facebook auth integration with whitelisting should now be fully functional! Give it a try: attempt to log in to your Django site via Facebook, and it should fail; then add your Facebook account to the whitelist, attempt to log in again, and there should be no errors in sight. It's a fair bit of work, but this setup is possible once all the pieces are in place.
I should also mention that it's quite ironic, my publishing this long and detailed article about developing with the Facebook API, when barely a month ago I wrote a scathing article on the evils of Facebook. So, just to clarify: yes, I do still loathe Facebook, my opinion has not taken a somersault since publishing that rant.
However— what can I say, sometimes you get clients that want Facebook integration. And hey, them clients do pay the bills. Also, even I cannot deny that Facebook's enormous user base makes it an extremely attractive authentication source. And I must also concede that since the introduction of the Graph API, Facebook has become a much friendlier and a much more stable platform for developers to work with.
]]>
Thread progress monitoring in Python2011-06-30T00:00:00Z2011-06-30T00:00:00ZJazahttps://greenash.net.au/thoughts/2011/06/thread-progress-monitoring-in-python/
My recent hobby hack-together, my photo cleanup tool FotoJazz, required me getting my hands dirty with threads for the first time (in Python or otherwise). Threads allow you to run a task in the background, and to continue doing whatever else you want your program to do, while you wait for the (usually long-running) task to finish (that's one definition / use of threads, anyway — a much less complex one than usual, I dare say).
However, if your program hasn't got much else to do in the meantime (as was the case for me), threads are still very useful, because they allow you to report on the progress of a long-running task at the UI level, which is better than your task simply blocking execution, leaving the UI hanging, and providing no feedback.
As part of coding up FotoJazz, I developed a re-usable architecture for running batch processing tasks in a thread, and for reporting on the thread's progress in both a web-based (AJAX-based) UI, and in a shell UI. This article is a tour of what I've developed, in the hope that it helps others with their thread progress monitoring needs in Python or in other languages.
The FotoJazzProcess base class
The foundation of the system is a Python class called FotoJazzProcess, which is in the project/fotojazz/fotojazzprocess.py file in the source code. This is a base class, designed to be sub-classed for actual implementations of batch tasks; although the base class itself also contains a "dummy" batch task, which can be run and monitored for testing / example purposes. All the dummy task does, is sleep for 100ms, for each file in the directory path provided:
#!/usr/bin/env python

# ...

from threading import Thread
from time import sleep

class FotoJazzProcess(Thread):
    """Parent / example class for running threaded FotoJazz processes.
    You should use this as a base class if you want to process a
    directory full of files, in batch, within a thread, and you want to
    report on the progress of the thread."""

    # ...

    filenames = []
    total_file_count = 0

    # This number is updated continuously as the thread runs.
    # Check the value of this number to determine the current progress
    # of FotoJazzProcess (if it equals 0, progress is 0%; if it equals
    # total_file_count, progress is 100%).
    files_processed_count = 0

    def __init__(self, *args, **kwargs):
        """When initialising this class, you can pass in either a list
        of filenames (first param), or a string of space-delimited
        filenames (second param). No need to pass in both."""
        Thread.__init__(self)

        # ...

    def run(self):
        """Iterates through the files in the specified directory. This
        example implementation just sleeps on each file - in subclass
        implementations, you should do some real processing on each
        file (e.g. re-orient the image, change date modified). You
        should also generally call self.prepare_filenames() at the
        start, and increment self.files_processed_count, in subclass
        implementations."""
        self.prepare_filenames()

        for filename in self.filenames:
            sleep(0.1)
            self.files_processed_count += 1
You could monitor the thread's progress, simply by checking obj.files_processed_count from your calling code. However, the base class also provides some convenience methods, for getting the progress value in a more refined form — i.e. as a percentage value, or as a formatted string:
    # ...

    def percent_done(self):
        """Gets the current percent done for the thread."""
        return float(self.files_processed_count) / \
                     float(self.total_file_count) \
               * 100.0

    def get_progress(self):
        """Can be called at any time before, during or after thread
        execution, to get current progress."""
        return '%d files (%.2f%%)' % (self.files_processed_count,
                                      self.percent_done())
The FotoJazzProcessShellRun command-line progress class
FotoJazzProcessShellRun contains all the code needed to report on a thread's progress via the command-line. All you have to do is instantiate it, and pass it a class (as an object) that inherits from FotoJazzProcess (or, if no class is provided, it uses the FotoJazzProcess base class). Then, execute the instantiated object — it takes care of the rest for you:
class FotoJazzProcessShellRun(object):
    """Runs an instance of the thread with shell output / feedback."""

    def __init__(self, init_class=FotoJazzProcess):
        self.init_class = init_class

    def __call__(self, *args, **kwargs):
        # ...

        fjp = self.init_class(*args, **kwargs)

        print '%s threaded process beginning.' % fjp.__class__.__name__
        print '%d files will be processed. ' % fjp.total_file_count + \
              'Now beginning progress output.'
        print fjp.get_progress()

        fjp.start()

        while fjp.is_alive() and \
              fjp.files_processed_count < fjp.total_file_count:
            sleep(1)
            if fjp.files_processed_count < fjp.total_file_count:
                print fjp.get_progress()

        print fjp.get_progress()
        print '%s threaded process complete. Now exiting.' \
              % fjp.__class__.__name__


if __name__ == '__main__':
    FotoJazzProcessShellRun()()
At this point, we're able to see the progress feedback in action already, through the command-line interface. This is just running the dummy batch task, but the feedback looks the same regardless of what process is running:
Thread progress output on the command-line.
The way this command-line progress system is implemented, it provides feedback once per second (timing handled with a simple sleep() call), and outputs feedback in terms of both number of files and percentage done. These details, of course, merely form an example for the purposes of this article — when implementing your own command-line progress feedback, you would change these details per your own tastes and needs.
The web front-end: HTML
Cool, we've now got a framework for running batch tasks within a thread, and for monitoring the progress of the thread; and we've built a simple interface for printing the thread's progress via command-line execution.
That was the easy part! Now, let's build an AJAX-powered web front-end on top of all that.
To start off, let's look at the basic HTML we'd need, for allowing the user to initiate a batch task (e.g. by pushing a submit button), and to see the latest progress of that task (e.g. with a JavaScript progress bar widget):
Close your eyes for a second, and pretend we've also just coded up some gorgeous, orgasmic CSS styling for this markup (and don't worry about the class / id names for now, either — they're needed for the JavaScript, which we'll get to shortly). Now, open your eyes, and behold! A glorious little web-based dialog for our dummy task:
Web-based dialog for initiating and monitoring our dummy task.
The web front-end: JavaScript
That's a lovely little interface we've just built. Now, let's begin to actually make it do something. Let's write some JavaScript that hooks into our new submit button and progress indicator (with the help of jQuery, and the jQuery UI progress bar — this code can be found in the static/js/fotojazz.js file in the source code):
This code is best read by starting at the bottom. First off, we call fotojazz.operations.init(). If you look up just a few lines, you'll see that function defined (it's the init: function() one). In the init() function, the first thing we do is initialise a (disabled) jQuery progress bar widget, on our div with class operation-progress. Then, we call process_start(), passing in a process_css_name of 'dummy', and a process_class_name of 'FotoJazzProcess'.
The process_start() function binds all of its code to the click() event of our submit button. So, when we click the button, an AJAX request is sent to the path /process/start/process_class_name/ on the server side. We haven't yet implemented this server-side callback, but for now let's assume that (as its pathname suggests), this callback starts a new process thread, and returns some info about the new thread (e.g. a reference ID, a progress indication, etc). The AJAX 'success' callback for this request then waits 100ms (with the help of setTimeout()), before calling process_progress(), passing it the CSS name and the class name that process_start() originally received, plus data.key, which is the unique ID of the new thread on the server.
The main job of process_progress(), is to make AJAX calls to the server that request the latest progress of the thread (again, let's imagine that the callback for this is done on the server side). When it receives the latest progress data, it then updates the jQuery progress bar widget's value, waits 100ms, and calls itself recursively. Via this recursion loop, it continues to update the progress bar widget, until the process is 100% complete, at which point the JavaScript terminates, and our job is done.
This code is extremely generic and re-usable. There's only one line in all the code, that's actually specific to the batch task that we're running: the process_start('dummy', 'FotoJazzProcess'); call. To implement another task on the front-end, all we'd have to do is copy and paste this one-line function call, changing the two parameter values that get passed to it (along with also copy-pasting the HTML markup to match). Or, if things started to get unwieldy, we could even put the function call inside a loop, and iterate through an array of parameter values.
The web front-end: Python
Now, let's take a look at the Python code to implement our server-side callback paths (which, in this case, are built as views in the Flask framework, and can be found in the project/fotojazz/views.py file in the source code):
from uuid import uuid4

from flask import jsonify
from flask import Module
from flask import request

from project import fotojazz_processes

# ...

mod = Module(__name__, 'fotojazz')

# ...

@mod.route('/process/start/<process_class_name>/')
def process_start(process_class_name):
    """Starts the specified threaded process. This is a sort-of
    'generic' view, all the different FotoJazz tasks share it."""

    # ...

    process_module_name = process_class_name
    if process_class_name != 'FotoJazzProcess':
        process_module_name = process_module_name.replace('Process', '')
    process_module_name = process_module_name.lower()

    # Dynamically import the class / module for the particular process
    # being started. This saves needing to import all possible
    # modules / classes.
    process_module_obj = __import__('%s.%s.%s' % ('project',
                                                  'fotojazz',
                                                  process_module_name),
                                    fromlist=[process_class_name])
    process_class_obj = getattr(process_module_obj, process_class_name)

    # ...

    # Initialise the process thread object.
    fjp = process_class_obj(*args, **kwargs)
    fjp.start()

    if not process_class_name in fotojazz_processes:
        fotojazz_processes[process_class_name] = {}
    key = str(uuid4())

    # Store the process thread object in a global dict variable, so it
    # continues to run and can have its progress queried, independent
    # of the current session or the current request.
    fotojazz_processes[process_class_name][key] = fjp

    percent_done = round(fjp.percent_done(), 1)
    done=False

    return jsonify(key=key, percent=percent_done, done=done)

@mod.route('/process/progress/<process_class_name>/')
def process_progress(process_class_name):
    """Reports on the progress of the specified threaded process.
    This is a sort-of 'generic' view, all the different FotoJazz tasks
    share it."""

    key = request.args.get('key', '', type=str)

    if not process_class_name in fotojazz_processes:
        fotojazz_processes[process_class_name] = {}

    if not key in fotojazz_processes[process_class_name]:
        return jsonify(error='Invalid process key.')

    # Retrieve progress of requested process thread, from global
    # dict variable where the thread reference is stored.
    percent_done = fotojazz_processes[process_class_name][key] \
                   .percent_done()

    done = False
    if not fotojazz_processes[process_class_name][key].is_alive() or \
       percent_done == 100.0:
        del fotojazz_processes[process_class_name][key]
        done = True
    percent_done = round(percent_done, 1)

    return jsonify(key=key, percent=percent_done, done=done)
As with the JavaScript, these Python functions are completely generic and re-usable. The process_start() function dynamically imports and instantiates the process class object needed for this particular task, based on the parameter sent to it in the URL path. It then kicks off the thread, and stores the thread in fotojazz_processes, which is a global dictionary variable. A unique ID is generated as the key for this dictionary, and that ID is then sent back to the javascript, via the JSON response object.
The process_progress() function retrieves the running thread by its unique key, and finds the progress of the thread as a percentage value. It also checks if the thread is now finished, as this is valuable information back on the JavaScript end (we don't want that recursive AJAX polling to continue forever!). It also returns its data to the front-end, via a JSON response object.
With code now in place at all necessary levels, our AJAX interface to the dummy batch task should now be working smoothly:
The dummy task is off and running, and the progress bar is working.
Absolutely no extra Python view code is needed, in order to implement new batch tasks. As long as the correct new thread class (inheriting from FotoJazzProcess) exists and can be found, everything Just Works™. Not bad, eh?
Final thoughts
Progress feedback on threads is a fairly common development pattern in more traditional desktop GUI apps. There's a lot of info out there on threads and progress bars in Python's version of the Qt GUI library, for example. However, I had trouble finding much info about implementing threads and progress bars in a web-based app. Hopefully, this article will help those of you looking for info on the topic.
The example code I've used here is taken directly from my FotoJazz app, and is still loosely coupled to it. As such, it's example code, not a ready-to-go framework or library for Python threads with web-based progress indication. However, it wouldn't take that much more work to get the code to that level. Consider it your homework!
Also, an important note: the code demonstrated in this article — and the FotoJazz app in general — is not suitable for a real-life online web app (in its current state), as it has not been developed with security, performance, or scalability in mind at all. In particular, I'm pretty sure that the AJAX in its current state is vulnerable to all sorts of CSRF attacks; not to mention the fact that all sorts of errors and exceptions are liable to occur, most of them currently uncaught. I'm also a total newbie to threads, and I understand that threads in web apps are particularly prone to cause strange explosions. You must remember: FotoJazz is a web-based desktop app, not an actual web app; and web-based desktop app code is not necessarily web-app-ready code.
Finally, what I've demonstrated here is not particularly specific to the technologies I've chosen to use. Instead of jQuery, any number of other JavaScript libraries could be used (e.g. YUI, Prototype). And instead of Python, the whole back-end could be implemented in any other server-side language (e.g. PHP, Java), or in another Python framework (e.g. Django, web.py). I'd be interested to hear if anyone else has done (or plans to do) similar work, but with a different technology stack.
]]>
FotoJazz: A tool for cleaning up your photo collection2011-06-29T00:00:00Z2011-06-29T00:00:00ZJazahttps://greenash.net.au/thoughts/2011/06/fotojazz-a-tool-for-cleaning-up-your-photo-collection/
I am at times quite a prolific photographer. Particularly when I'm travelling, I tend to accumulate quite a quantity of digital snaps (although am still working on the quality of said snaps). I'm also a reasonably organised and systematic person: as such, I've developed a workflow for fixing up, naming and archiving my soft-copy photos; and I've also come to depend on a variety of scripts and little apps, that perform various steps of the workflow for me.
Sadly, my system has had some disadvantages. Most importantly, there are too many separate scripts / apps involved, and with too many different interfaces (mix of manual point-and-click, drap-and-drop, and command-line). Ideally, I'd like all the functionality unified in one app, with one streamlined graphical interface (and also everything with equivalent shell access). Also, my various tools are platform-dependent, with most of them being Windows-based, and one being *nix-based. I'd like everything to be platform-independent, and in particular, I'd like everything to run best on Linux — as I'm trying to do as much as possible on Ubuntu these days.
Plus, I felt in the mood for getting my hands dirty coding up the photo-management app of my dreams. Hence, it is with pleasure that I present FotoJazz, a browser-based (plus shell-accessible) tool built with Python and Flask.
The FotoJazz web browser interface in action.
FotoJazz is a simple app, that performs a few common tasks involved in cleaning up photos copied off a digital camera. It does the following:
Orientation
FotoJazz rotates an image to its correct orientation, per its Exif metadata. This is done via the exiftran utility. Some people don't bother to rotate their photos, as many modern apps pay attention to the Exif orientation metadata anyway, when displaying a photo. However, not all apps do (in particular, the Windows XP / Vista / 7 default photo viewer does not). I like to be on the safe side, and to rotate the actual image myself.
I was previously doing this manually, using the 'rotate left / right' buttons in the Windows photo viewer. Hardly ideal. Discovering exiftran was a very pleasant surprise for me — I thought I'd at least have to code an auto-orientation script myself, but turns out all I had to do was build on the shoulders of giants. After doing this task manually for so long, I can't say I 100% trust the Exif orientation tags in my digital photos. But that's OK — while I wait for my trust to develop, FotoJazz lets me review Exiftran's handiwork as part of the process.
Date / time shifting
FotoJazz shifts the Exif 'date taken' value of an image backwards or forwards by a specified time interval. This is handy in two situations that I find myself facing quite often. First, the clock on my camera has been set wrongly, usually if I recently travelled to a new time zone and forgot to adjust it (or if daylight savings has recently begun or ended). And secondly, if I copy photos from a friend's camera (to add to my own photo collection), and the clock on my friend's camera has been set wrongly (this is particularly bad, because I'll usually then be wanting to merge my friend's photos with my own, and to sort the combined set of photos by date / time). In both cases, the result is a batch of photos whose 'date taken' values are off by a particular time interval.
FotoJazz lets you specify a time interval in the format:
[-][Xhr][Xm][Xs]
For example, to shift dates forward by 3 hours and 30 seconds, enter:
3hr30s
Or to shift dates back by 23 minutes, enter:
-23m
I was previously doing this using Exif Date Changer, a small freeware Windows app. Exif Date Changer works quite well, and it has a nice enough interface; but it is Windows-only. It also has a fairly robust batch rename feature, which unfortunately doesn't support my preferred renaming scheme (which I'll be discussing next).
Batch rename
FotoJazz renames a batch of images per a specified prefix, and with a unique integer ID. For example, say you specify this prefix:
new_york_trip_may2008
And say you have 11 photos in your set. The photos would then be renamed to:
As you can see, the unique ID added to the filenames is padded with leading zeros, as needed per the batch. This is important for sorting the photos by filename in most systems / apps.
I was previously using mvb for this. Mvb ("batch mv") is a bash script that renames files according to the same scheme — i.e. you specify a prefix, and it renames the files with the prefix, plus a unique incremented ID padded with zeros. Unfortunately, mvb always worked extremely slowly for me (probably because I ran it through cygwin, hardly ideal).
Date modified
FotoJazz updates the 'date modified' metadata of an image to match its 'take taken' value. It will also fix the date accessed, and the Exif 'PhotoDate' value (which might be different to the Exif 'PhotoDateOriginal' value, which is the authoritative 'date taken' field). This is very important for the many systems / apps that sort photos by their 'date modified' file metadata, rather than by their 'date taken' Exif metadata.
I was previously using JpgDateChanger for this task. I had no problems with JpgDateChanger — it has a great drag-n-drop interface, and it's very fast. However, it is Windows-based, and it is one more app that I have to open as part of my workflow.
Shell interface
The FotoJazz command-line interface.
All of the functionality of FotoJazz can also be accessed via the command-line. This is great if you want to use one or more FotoJazz features as part of another script, or if you just don't like using GUIs. For example, to do some date shifting on the command line, just enter a command like this:
More information on shell usage is available in the README file.
Technical side
I've been getting into Python a lot lately, and FotoJazz was a good excuse to do some solid Python hacking, I don't deny it. I've also been working with Django a lot, but I haven't before used a Python microframework. FotoJazz was a good excuse to dive into one for the first time, and the microframework that I chose was Flask (and Flask ships with the Jinja template engine, something I was also overdue on playing with).
From my point of view, FotoJazz's coolest code feature is its handling of the batch photo tasks as threads. This is mainly encapsulated in the FotoJazzProcess Python class in the code. The architecture allows the tasks to run asynchronously, and for either the command-line or the browser-based (slash AJAX-based) interface to easily provide feedback on the progress of the thread. I'll be discussing this in more detail, in a separate article — stay tuned.
FotoJazz makes heavy use of pyexiv2 for its reading / writing of Jpg Exif metadata within a Python environment. Also, as mentioned earlier, it uses exiftran for the photo auto-orientation task; exiftran is called directly on the command-line, and its stream output is captured, monitored, and transformed into progress feedback on the Python end.
Get the code
All the code is availble on GitHub. Use it as you will: hack, fork, play.
]]>
Jimmy Page: site-wide Django page caching made simple2011-01-31T00:00:00Z2011-01-31T00:00:00ZJazahttps://greenash.net.au/thoughts/2011/01/jimmy-page-site-wide-django-page-caching-made-simple/
For some time, I've been using the per-site cache feature that comes included with Django. This site's caching needs are very modest: small personal site, updated infrequently, with two simple blog-like sections and a handful of static pages. Plus, it runs fast enough even without any caching. A simple "brute force" solution like Django's per-site cache is more than adequate.
However, I grew tired of the fact that whenever I published new content, nothing was invalidated in the cache. I began to develop a routine of first writing and publishing the content in the Django admin, and then SSHing in to my box and restarting memcached. Not a good regime! But then again, I also couldn't bring myself to make the effort of writing custom invalidation routines for my cached pages. Considering my modest needs, it just wasn't worth it. What I needed was a solution that takes the same "brute force" page caching approach that Django's per-site cache already provided for me, but that also includes a similarly "brute force" approach to invalidation. Enter Jimmy Page.
Jimmy Page is the world's simplest generational page cache. It essentially functions on just two principles:
It caches the output of all pages on your site (for which you use its @cache_view decorator).
It invalidates* the cache for all pages, whenever any model instance is saved or deleted (apart from those models in the "whitelist", which is a configurable setting).
* Technically, generational caches never invalidate anything, they just increment the generation number of the cache key, and store a new version of the cached content. But if you ask me, it's easiest to think of this simply as "invalidation".
That's it. No custom invalidation routines needed. No stale cache content, ever. And no excuse for not applying caching to the majority of pages on your site.
If you ask me, the biggest advantage to using Jimmy Page, is that you simply don't have to worry about which model content you've got showing on which views. For example, it's perfectly possible to write routines for manually invalidating specific pages in your Django per-site cache. This is done using Django's low-level cache API. But if you do this, you're left with the constant headache of having to keep track of which views need invalidating when which model content changes.
With Jimmy Page, on the other hand, if your latest blog post shows on five different places on your site — on its own detail page, on the blog index page, in the monthly archive, in the tag listing, and on the front page — then don't worry! When you publish a new post, the cache for all those pages will be re-generated, without you having to configure anything. And when you decide, in six months' time, that you also want your latest blog post showing in a sixth place — e.g. on the "about" page — you have to do precisely diddly-squat, because the cache for the "about" page will already be getting re-generated too, sans config.
Of course, Jimmy Page is only going to help you if you're running a simple lil' site, with infrequently-updated content and precious few bells 'n' whistles. As the author states: "This technique is not likely to be effective in sites that have a high ratio of database writes to reads." That is, if you're running a Twitter clone in Django, then Jimmy Page probably ain't gonna help you (and it will very probably harm you). But if you ask me, Jimmy Page is the way to go for all your blog-slash-brochureware Django site caching needs.
]]>
An inline image Django template filter2010-06-06T00:00:00Z2010-06-06T00:00:00ZJazahttps://greenash.net.au/thoughts/2010/06/an-inline-image-django-template-filter/
Adding image fields to a Django model is easy, thanks to the built-in ImageField class. Auto-resizing uploaded images is also a breeze, courtesy of sorl-thumbnail and its forks/variants. But what about embedding resized images inline within text content? This is a very common use case for bloggers, and it's a final step that seems to be missing in Django at the moment.
Having recently migrated this site over from Drupal, my old blog posts had inline images embedded using image assist. Images could be inserted into an arbitrary spot within a text field by entering a token, with a syntax of [img_assist nid=123 ... ]. I wanted to be able to continue embedding images in roughly the same fashion, using a syntax as closely matching the old one as possible.
So, I've written a simple template filter that parses a text block for tokens with a syntax of [thumbnail image-identifier], and that replaces every such token with the image matching the given identifier, resized according to a pre-determined width and height (by sorl-thumbnail), and formatted as an image tag with a caption underneath. The code for the filter is below.
import re

from django import template
from django.template.defaultfilters import stringfilter

from sorl.thumbnail.main import DjangoThumbnail

from models import InlineImage

register = template.Library()

regex = re.compile(r'\[thumbnail (?P<identifier>[\-\w]+)\]')


@register.filter
@stringfilter
def inline_thumbnails(value):
    new_value = value
    it = regex.finditer(value)
    for m in it:
        try:
            image = InlineImage.objects.get(identifier=identifier)
            thumbnail = DjangoThumbnail(image.image, (500, 500))
            new_value = new_value.replace(m.group(), '<img src="%s%s" width="%d" height="%d" alt="%s" /><p><em>%s</em></p>' % ('http://mysite.com', thumbnail.absolute_url, thumbnail.width(), thumbnail.height(), image.title, image.title))
        except InlineImage.DoesNotExist:
            pass
    return new_value
This code belongs in a file such as appname/templatetags/inline_thumbnails.py within your Django project directory. It also assumes that you have an InlineImage model that looks something like this (in your app's models.py file):
from django.db import models

class InlineImage(models.Model):
    created         = models.DateTimeField(auto_now_add=True)
    modified        = models.DateTimeField(auto_now=True)

    title           = models.CharField(max_length=100)

    image           = models.ImageField(upload_to='uploads/images')
    identifier      = models.SlugField(unique=True)

    def __unicode__(self):
        return self.title
        ordering = ('-created',)
Say you have a model for your site's blog posts, called Entry. The main body text field for this model is content. You could upload an InlineImage with identifier hokey-pokey. You'd then embed the image into the body text of a blog post like so:
<p>You put your left foot in,
You put your left foot out,
You put your left foot in,
And you shake it all about.</p>

[thumbnail hokey-pokey]

<p>You do the Hokey Pokey and you turn around,
That's what it's all about.</p>
To render the blog post content with the thumbnail tokens converted into actual images, simply filter the variable in your template, like so:
The code here is just a simple example — if you copy it and adapt it to your own needs, you'll probably want to add a bit more functionality to it. For example, the token could be extended to support specifying image alignment (left/right), width/height per image, caption override, etc. But I didn't particularly need any of these things, and I wanted to keep my code simple, so I've omitted those features from my filter.
]]>
An autop Django template filter2010-05-30T00:00:00Z2010-05-30T00:00:00ZJazahttps://greenash.net.au/thoughts/2010/05/an-autop-django-template-filter/autop is a script that was first written for WordPress by Matt Mullenweg (the WordPress founder). All WordPress blog posts are filtered using wpautop() (unless you install an additional plug-in to disable the filter). The function was also ported to Drupal, and it's enabled by default when entering body text into Drupal nodes. As far as I'm aware, autop has never been ported to a language other than PHP. Until now.
In the process of migrating this site from Drupal to Django, I was surprised to discover that not only Django, but also Python in general, lacks any linebreak filtering function (official or otherwise) that's anywhere near as intelligent as autop. The built-in Django linebreaks filter converts all single newlines to <br /> tags, and all double newlines to <p> tags, completely irrespective of HTML block elements such as <code> and <script>. This was a fairly major problem for me, as I was migrating a lot of old content over from Drupal, and that content was all formatted in autop style. Plus, I'm used to writing content in that way, and I'd like to continue writing content in that way, whether I'm in a PHP environment or not.
Therefore, I've ported Drupal's _filter_autop() function to Python, and implemented it as a Django template filter. From the limited testing I've done, the function appears to be working just as well in Django as it does in Drupal. You can find the function below.
import re
from django import template
from django.template.defaultfilters import force_escape, stringfilter
from django.utils.encoding import force_unicode
from django.utils.functional import allow_lazy
from django.utils.safestring import mark_safe
register = template.Library()
def autop_function(value):
"""
Convert line breaks into <p> and <br> in an intelligent fashion.
Originally based on: http://photomatt.net/scripts/autop
Ported directly from the Drupal _filter_autop() function:
http://api.drupal.org/api/function/_filter_autop
"""
# All block level tags
block = '(?:table|thead|tfoot|caption|colgroup|tbody|tr|td|th|div|dl|dd|dt|ul|ol|li|pre|select|form|blockquote|address|p|h[1-6]|hr)'
# Split at <pre>, <script>, <style> and </pre>, </script>, </style> tags.
# We don't apply any processing to the contents of these tags to avoid messing
# up code. We look for matched pairs and allow basic nesting. For example:
# "processed <pre> ignored <script> ignored </script> ignored </pre> processed"
chunks = re.split('(</?(?:pre|script|style|object)[^>]*>)', value)
ignore = False
ignoretag = ''
output = ''
for i, chunk in zip(range(len(chunks)), chunks):
prev_ignore = ignore
if i % 2:
# Opening or closing tag?
is_open = chunk[1] != '/'
tag = re.split('[ >]', chunk[2-is_open:], 2)[0]
if not ignore:
if is_open:
ignore = True
ignoretag = tag
# Only allow a matching tag to close it.
elif not is_open and ignoretag == tag:
ignore = False
ignoretag = ''
elif not ignore:
chunk = re.sub('\n*$', '', chunk) + "\n\n" # just to make things a little easier, pad the end
chunk = re.sub('<br />\s*<br />', "\n\n", chunk)
chunk = re.sub('(<'+ block +'[^>]*>)', r"\n\1", chunk) # Space things out a little
chunk = re.sub('(</'+ block +'>)', r"\1\n\n", chunk) # Space things out a little
chunk = re.sub("\n\n+", "\n\n", chunk) # take care of duplicates
chunk = re.sub('\n?(.+?)(?:\n\s*\n|$)', r"<p>\1</p>\n", chunk) # make paragraphs, including one at the end
chunk = re.sub("<p>(<li.+?)</p>", r"\1", chunk) # problem with nested lists
chunk = re.sub('<p><blockquote([^>]*)>', r"<blockquote\1><p>", chunk)
chunk = chunk.replace('</blockquote></p>', '</p></blockquote>')
chunk = re.sub('<p>\s*</p>\n?', '', chunk) # under certain strange conditions it could create a P of entirely whitespace
chunk = re.sub('<p>\s*(</?'+ block +'[^>]*>)', r"\1", chunk)
chunk = re.sub('(</?'+ block +'[^>]*>)\s*</p>', r"\1", chunk)
chunk = re.sub('(?<!<br />)\s*\n', "<br />\n", chunk) # make line breaks
chunk = re.sub('(</?'+ block +'[^>]*>)\s*<br />', r"\1", chunk)
chunk = re.sub('<br />(\s*</?(?:p|li|div|th|pre|td|ul|ol)>)', r'\1', chunk)
chunk = re.sub('&([^#])(?![A-Za-z0-9]{1,8};)', r'&\1', chunk)
# Extra (not ported from Drupal) to escape the contents of code blocks.
code_start = re.search('^<code>', chunk)
code_end = re.search(r'(.*?)<\/code>$', chunk)
if prev_ignore and ignore:
if code_start:
chunk = re.sub('^<code>(.+)', r'\1', chunk)
if code_end:
chunk = re.sub(r'(.*?)<\/code>$', r'\1', chunk)
chunk = chunk.replace('<\\/pre>', '</pre>')
chunk = force_escape(chunk)
if code_start:
chunk = '<code>' + chunk
if code_end:
chunk += '</code>'
output += chunk
return output
autop_function = allow_lazy(autop_function, unicode)
@register.filter
def autop(value, autoescape=None):
return mark_safe(autop_function(value))
autop.is_safe = True
autop.needs_autoescape = True
autop = stringfilter(autop)
Update (31 May 2010): added the "Extra (not ported from Drupal) to escape the contents of code blocks" part of the code.
To use this filter in your Django templates, simply save the code above in a file called autop.py (or anything else you want) in a templatetags directory within one of your installed apps. Then, just declare {% load autop %} at the top of your templates, and filter your markup variables with something like {{ object.content|autop }}.
Note that this is pretty much a direct port of the Drupal / PHP function into Django / Python. As such, it's probably not as efficient nor as Pythonic as it could be. However, it seems to work quite well. Feedback and comments are welcome.