django - GreenAsh Poignant wit and hippie ramblings that are pertinent to django https://greenash.net.au/thoughts/topics/django/ 2014-03-31T00:00:00Z Using PayPal WPS with Cartridge (Mezzanine / Django) 2014-03-31T00:00:00Z 2014-03-31T00:00:00Z Jaza https://greenash.net.au/thoughts/2014/03/using-paypal-wps-with-cartridge-mezzanine-django/ I recently built a web site using Mezzanine, a CMS built on top of Django. I decided to go with Mezzanine (which I've never used before) for two reasons: it nicely enhances Django's admin experience (plus it enhances, but doesn't get in the way of, the Django developer experience); and there's a shopping cart app called Cartridge that's built on top of Mezzanine, and for this particular site (a children's art class business in Sydney) I needed shopping cart / e-commerce functionality.

This suite turned out to deliver virtually everything I needed out-of-the-box, with one exception: Cartridge currently lacks support for payment methods that require redirecting to the payment gateway and then returning after payment completion (such as PayPal Website Payments Standard, or WPS). It only supports payment methods where payment is completed on-site (such as PayPal Website Payments Pro, or WPP). In this case, with the project being small and low-budget, I wanted to avoid the overhead of dealing with SSL and on-site payment, so PayPal WPS was the obvious candidate.

Turns out that, with a bit of hackery, making Cartridge play nice with WPS isn't too hard to achieve. Here's how you go about it.

Install dependencies

Note / disclaimer: this section is mostly copied from my Django Facebook user integration with whitelisting article from over two years ago, because the basic dependencies are quite similar.

I'm assuming that you've already got an environment set up, that's equipped for Django development. I.e. you've already installed Python (my examples here are tested on Python 2.7), a database engine (preferably SQLite on your local environment), pip (recommended), and virtualenv (recommended). If you want to implement these examples fully, then as well as a dev environment with these basics set up, you'll also need a server to which you can deploy a Django site, and on which you can set up a proper public domain or subdomain DNS (because the PayPal API won't actually talk to your localhost, it refuses to do that).

You'll also need a PayPal (regular and "sandbox") account, which you will use for authenticating with the PayPal API.

Here are the basic dependencies for the project. I've copy-pasted this straight out of my requirements.txt file, which I install on a virtualenv using pip install -E . -r requirements.txt (I recommend you do the same):

Django==1.6.2
Mezzanine==3.0.9
South==0.8.4
Cartridge==0.9.2
cartridge-payments==0.97.0
-e git+https://github.com/dcramer/django-paypal.git@4d582243#egg=django_paypal
django-uuidfield==0.5.0

Note: for dcramer/django-paypal, which has no versioned releases, I'm using the latest git commit as of writing this. I recommend that you check for a newer commit and update your requirements accordingly. For the other dependencies, you should also be able to update version numbers to latest stable releases without issues (although Mezzanine 3.0.x / Cartridge 0.9.x is only compatible with Django 1.6.x, not Django 1.7.x which is still in beta as of writing this).

Once you've got those dependencies installed, make sure this Mezzanine-specific setting is in your settings.py file:

# If True, the south application will be automatically added to the
# INSTALLED_APPS setting.
USE_SOUTH = True

Then, let's get a new project set up per Mezzanine's standard install:

mezzanine-project myproject
cd myproject
python manage.py createdb
python manage.py migrate --all

(When it asks "Would you like to install an initial demo product and sale?", I've gone with "yes" for my test / demo project; feel free to do the same, if you'd like some products available out-of-the-box with which to test checkout / payment).

This will get the Mezzanine foundations installed for you. The basic configuration of the Django / Mezzanine settings file, I leave up to you. If you have some experience already with Django (and if you've got this far, then I assume that you do), you no doubt have a standard settings template already in your toolkit (or at least a standard set of settings tweaks), so feel free to use it. I'll be going over the settings you'll need specifically for this app, in just a moment.

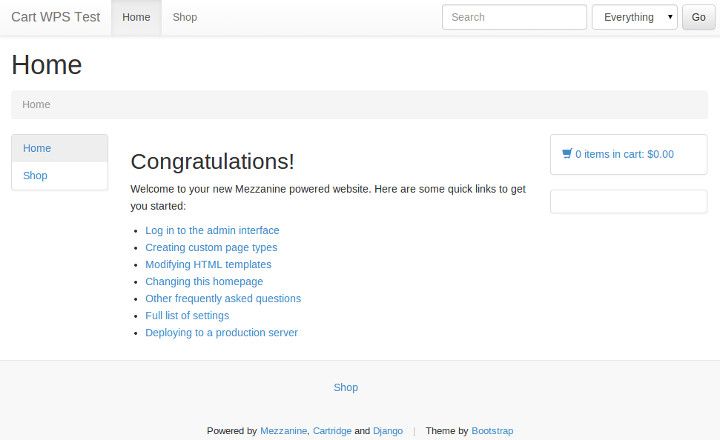
Fire up ye 'ol runserver, open your browser at http://localhost:8000/, and confirm that the "Congratulations!" default Mezzanine home page appears for you. Also confirm that you can access the admin. And that's the basics set up!

Basic Django / Mezzanine / Cartridge site: default look after install.

At this point, you should also be able to test out adding an item to your cart and going to checkout. After entering some billing / delivery details, on the 'payment details' screen it should ask for credit card details. This is the default Cartridge payment setup: we'll be switching this over to PayPal shortly.

Configure Django settings

I'm not too fussed about what else you have in your Django settings file (or in how your Django settings are structured or loaded, for that matter); but if you want to follow along, then you should have certain settings configured per the following guidelines (note: much of these instructions are virtually the same as the cartridge-payments install instructions):

  • Your TEMPLATE_CONTEXT_PROCESSORS is to include (as well as 'mezzanine.conf.context_processors.settings'):
    [
        'payments.multipayments.context_processors.settings',
    ]

    (See the TEMPLATE_CONTEXT_PROCESSORS documentation for the default value of this setting, to paste into your settings file).

  • Re-configure the SHOP_CHECKOUT_FORM_CLASS setting to this:
    SHOP_CHECKOUT_FORM_CLASS = 'payments.multipayments.forms.base.CallbackUUIDOrderForm'
  • Disable the PRIMARY_PAYMENT_PROCESSOR_IN_USE setting:
    PRIMARY_PAYMENT_PROCESSOR_IN_USE = False
  • Configure the SECONDARY_PAYMENT_PROCESSORS setting to this:
    SECONDARY_PAYMENT_PROCESSORS = (
        ('paypal', {
            'name' : 'Pay With Pay-Pal',
            'form' : 'payments.multipayments.forms.paypal.PaypalSubmissionForm'
        }),
    )
  • Set a value for the PAYPAL_CURRENCY setting, for example:
    # Currency type.
    PAYPAL_CURRENCY = "AUD"
  • Set a value for the PAYPAL_BUSINESS setting, for example:
    # Business account email. Sandbox emails look like this.
    PAYPAL_BUSINESS = 'cartwpstest@blablablaaaaaaa.com'
  • Set a value for the PAYPAL_RECEIVER_EMAIL setting, for example:
    PAYPAL_RECEIVER_EMAIL = PAYPAL_BUSINESS
  • Set a value for the PAYPAL_RETURN_WITH_HTTPS setting, for example:
    # Use this to enable https on return URLs.  This is strongly recommended! (Except for sandbox)
    PAYPAL_RETURN_WITH_HTTPS = False
  • Configure the PAYPAL_RETURN_URL setting to this:
    # Function that returns args for `reverse`.
    # URL is sent to PayPal as the for returning to a 'complete' landing page.
    PAYPAL_RETURN_URL = lambda cart, uuid, order_form: ('shop_complete', None, None)
  • Configure the PAYPAL_IPN_URL setting to this:
    # Function that returns args for `reverse`.
    # URL is sent to PayPal as the URL to callback to for PayPal IPN.
    # Set to None if you do not wish to use IPN.
    PAYPAL_IPN_URL = lambda cart, uuid, order_form: ('paypal.standard.ipn.views.ipn', None, {})
  • Configure the PAYPAL_SUBMIT_URL setting to this:
    # URL the secondary-payment-form is submitted to
    # For real use set to 'https://www.paypal.com/cgi-bin/webscr'
    PAYPAL_SUBMIT_URL = 'https://www.sandbox.paypal.com/cgi-bin/webscr'
  • Configure the PAYPAL_TEST setting to this:
    # For real use set to False
    PAYPAL_TEST = True
  • Configure the EXTRA_MODEL_FIELDS setting to this:
    EXTRA_MODEL_FIELDS = (
        (
            "cartridge.shop.models.Order.callback_uuid",
            "django.db.models.CharField",
            (),
            {"blank" : False, "max_length" : 36, "default": ""},
        ),
    )

    After doing this, you'll probably need to manually create a migration in order to get this field added to your database (per Mezzanine's field injection caveat docs), and you'll then need to apply that migration (in this example, I'm adding the migration to an app called 'content' in my project):

    mkdir /projectpath/content/migrations
    touch /projectpath/content/migrations/__init__.py
    python manage.py schemamigration cartridge.shop --auto --stdout > /projectpath/content/migrations/0001_cartridge_shop_add_callback_uuid.py

    python manage.py migrate --all

  • Your INSTALLED_APPS is to include (as well as the basic 'mezzanine.*' apps, and 'cartridge.shop'):
    [
        'payments.multipayments',
        'paypal.standard.ipn',
    ]

    (You'll need to re-run python manage.py migrate --all after enabling these apps).

Implement PayPal payment

Here's how you do it:

  • Add this to your urlpatterns variable in your urls.py file (replace the part after paypal-ipn- with a random string of your choice):
    [
        (r'^paypal-ipn-8c5erc9ye49ia51rn655mi4xs7/', include('paypal.standard.ipn.urls')),
    ]
  • Although it shouldn't be necessary, I've found that I need to copy the templates provided by explodes/cartridge-payments into my project's templates directory, otherwise they're ignored and Cartridge's default payment template still gets used:

    cp -R /projectpath/lib/python2.7/site-packages/payments/multipayments/templates/shop /projectpath/templates/

  • Place the following code somewhere in your codebase (per the django-paypal docs, I placed it in the models.py file for one of my apps):
    # ...
    
    from importlib import import_module
    
    from mezzanine.conf import settings
    
    from cartridge.shop.models import Cart, Order, ProductVariation, \
    DiscountCode
    from paypal.standard.ipn.signals import payment_was_successful
    
    # ...
    
    
    def payment_complete(sender, **kwargs):
        """Performs the same logic as the code in
        cartridge.shop.models.Order.complete(), but fetches the session,
        order, and cart objects from storage, rather than relying on the
        request object being passed in (which it isn't, since this is
        triggered on PayPal IPN callback)."""
    
        ipn_obj = sender
    
        if ipn_obj.custom and ipn_obj.invoice:
            s_key, cart_pk = ipn_obj.custom.split(',')
            SessionStore = import_module(settings.SESSION_ENGINE) \
                               .SessionStore
            session = SessionStore(s_key)
    
            try:
                cart = Cart.objects.get(id=cart_pk)
                try:
                    order = Order.objects.get(
                        transaction_id=ipn_obj.invoice)
                    for field in order.session_fields:
                        if field in session:
                            del session[field]
                    try:
                        del session["order"]
                    except KeyError:
                        pass
    
                    # Since we're manually changing session data outside of
                    # a normal request, need to force the session object to
                    # save after modifying its data.
                    session.save()
    
                    for item in cart:
                        try:
                            variation = ProductVariation.objects.get(
                                sku=item.sku)
                        except ProductVariation.DoesNotExist:
                            pass
                        else:
                            variation.update_stock(item.quantity * -1)
                            variation.product.actions.purchased()
    
                    code = session.get('discount_code')
                    if code:
                        DiscountCode.objects.active().filter(code=code) \
                            .update(uses_remaining=F('uses_remaining') - 1)
                    cart.delete()
                except Order.DoesNotExist:
                    pass
            except Cart.DoesNotExist:
                pass
    
    payment_was_successful.connect(payment_complete)
    

    This little snippet that I whipped up, is the critical spoonful of glue that gets PayPal WPS playing nice with Cartridge. Basically, when a successful payment is realised, PayPal WPS doesn't force the user to redirect back to the original web site, and therefore it doesn't rely on any redirection in order to notify the site of success. Instead, it uses PayPal's IPN (Instant Payment Notification) system to make a separate, asynchronous request to the original web site – and it's up to the site to receive this request and to process it as it sees fit.

    This code uses the payment_was_successful signal that django-paypal provides (and that it triggers on IPN request), to do what Cartridge usually takes care of (for other payment methods), on success: i.e. it clears the user's shopping cart; it updates remaining quantities of products in stock (if applicable); it triggers Cartridge's "product purchased" actions (e.g. email an invoice / receipt); and it updates a discount code (if applicable).

  • Apply a hack to cartridge-payments (file lib/python2.7/site-packages/payments/multipayments/forms/paypal.py) per this diff:

    After line 25 (charset = forms.CharField(widget=forms.HiddenInput(), initial='utf-8')), add this:

        custom = forms.CharField(required=False, widget=forms.HiddenInput())

    After line 49 ((tax_price if tax_price else const.Decimal('0'))), add this:

            try:
                s_key = request.session.session_key
            except:
                # for Django 1.4 and above
                s_key = request.session._session_key

    After line 70 (self.fields['business'].initial = settings.PAYPAL_BUSINESS), add this:

    self.fields['custom'].initial = ','.join([s_key, str(request.cart.pk)])
  • Apply a hack to django-paypal (file src/django-paypal/paypal/standard/forms.py) per these instructions:

    After line 15 ("%H:%M:%S %b. %d, %Y PDT",), add this:

                          "%H:%M:%S %d %b %Y PST",    # note this
                          "%H:%M:%S %d %b %Y PDT",    # and that

That should be all you need, in order to get checkout with PayPal WPS working on your site. So, deploy everything that's been done so far to your online server, log in to the Django admin, and for some of the variations for the sample product in the database, add values for "number in stock".

Then, log out of the admin, and navigate to the "shop" section of the site. Try out adding an item to your cart.

Basic Django / Mezzanine / Cartridge site: adding an item to shopping cart.

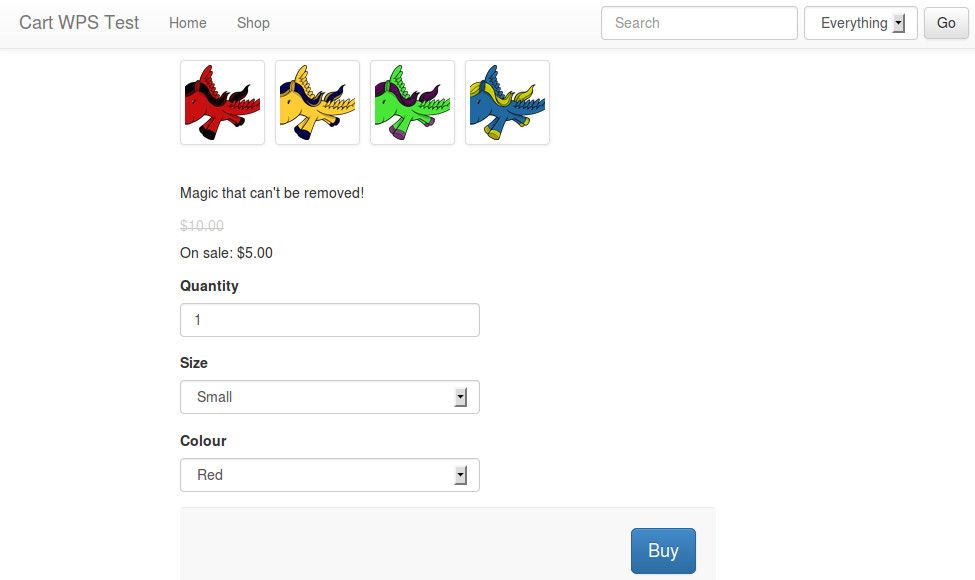
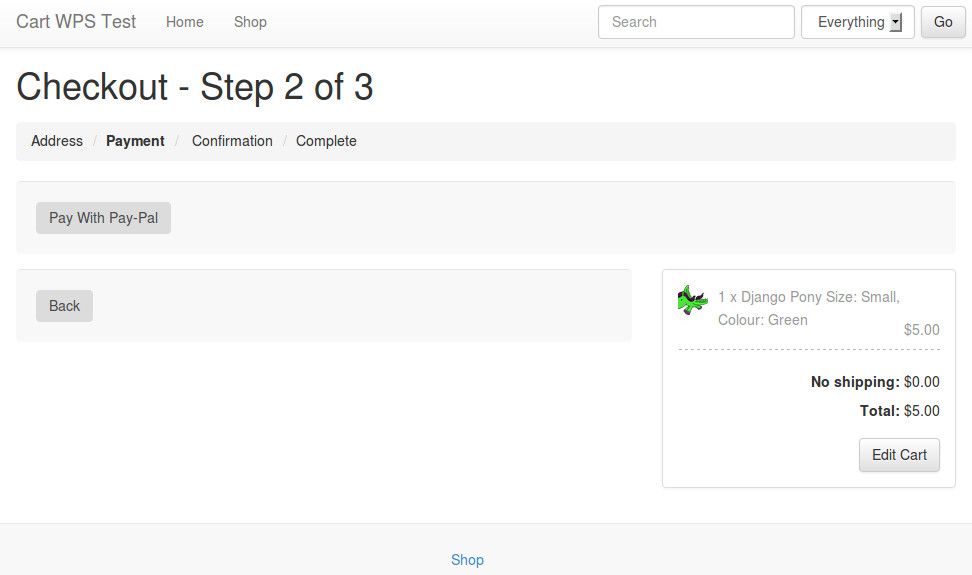
Once on the "your cart" page, continue by clicking "go to checkout". On the "billing details" page, enter sample billing information as necessary, then click "next". On the "payment" page, you should see a single button labelled "pay with pay-pal".

Basic Django / Mezzanine / Cartridge site: 'go to pay-pal' button.

Click the button, and you should be taken to the PayPal (sandbox, unless configured otherwise) payment landing page. For test cases, log in with a PayPal test account, and click 'Pay Now' to try out the process.

Basic Django / Mezzanine / Cartridge site: PayPal payment screen.

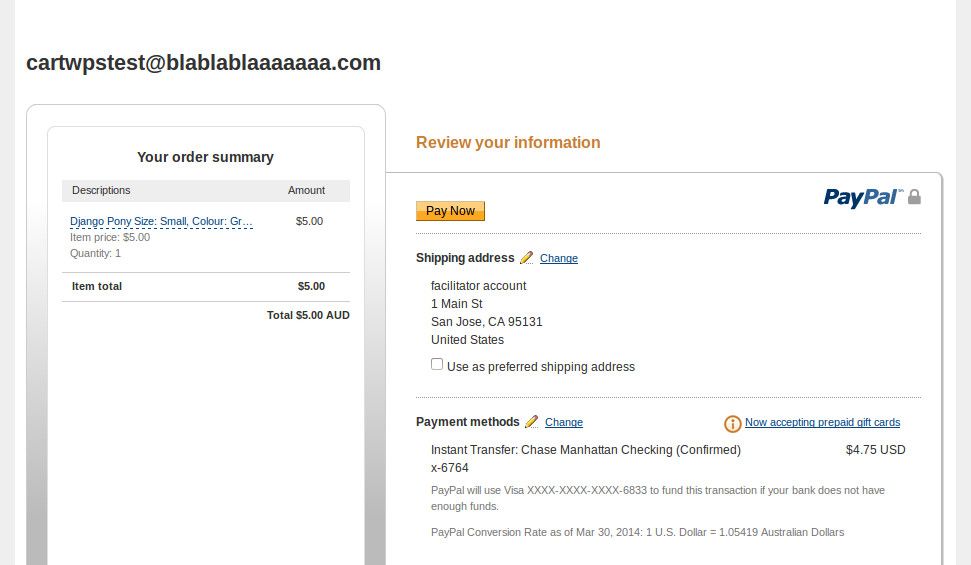
If payment is successful, you should see the PayPal confirmation page, saying "thanks for your order". Click the link labelled "return to email@here.com" to return to the Django site. You should see Cartridge's "order complete" page.

Basic Django / Mezzanine / Cartridge site: order complete screen.

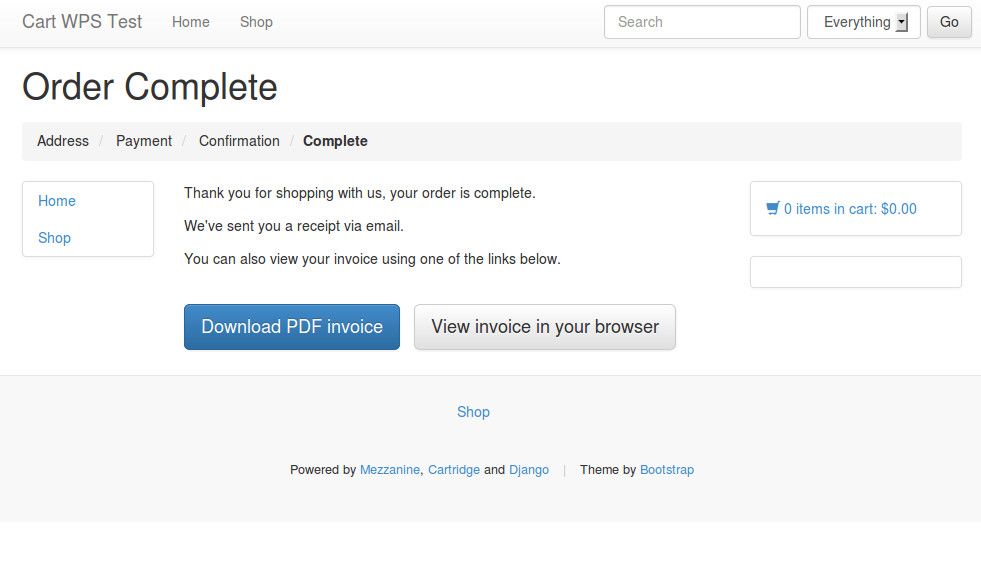
And that's it, you're done! You should be able to verify that the IPN callback was triggered, by checking that the "number in stock" has decreased to reflect the item that was just purchased, and by confirming that an order email / confirmation email was received.

Finished process

I hope that this guide is of assistance, to anyone else who's looking to integrate PayPal WPS with Cartridge. The difficulties associated with it are also documented in this mailing list thread (to which I posted a rough version of what I've illustrated in this article). Feel free to leave comments here, and/or in that thread.

Hopefully the hacks necessary to get this working at the moment, will no longer be necessary in the future; it's up to the maintainers of the various projects to get the fixes for these committed. Ideally, the custom signal implementation won't be necessary either in the future: it would be great if Cartridge could work out-of-the-box with PayPal WPS. Unfortunately, the current architecture of Cartridge's payment system simply isn't designed for something like IPN, it only plays nicely with payment methods that keep the user on the Django site the entire time. In the meantime, with the help of this article, you should at least be able to get it working, even if more custom code is needed than what would be ideal.

]]>
Django Facebook user integration with whitelisting 2011-11-02T00:00:00Z 2011-11-02T00:00:00Z Jaza https://greenash.net.au/thoughts/2011/11/django-facebook-user-integration-with-whitelisting/ It's recently become quite popular for web sites to abandon the tasks of user authentication and account management, and to instead shoulder off this burden to a third-party service. One of the big services available for this purpose is Facebook. You may have noticed "Sign in with Facebook" buttons appearing ever more frequently around the 'Web.

The common workflow for Facebook user integration is: user is redirected to the Facebook login page (or is shown this page in a popup); user enters credentials; user is asked to authorise the sharing of Facebook account data with the non-Facebook source; a local account is automatically created for the user on the non-Facebook site; user is redirected to, and is automatically logged in to, the non-Facebook site. Also quite common is for the user's Facebook profile picture to be queried, and to be shown as the user's avatar on the non-Facebook site.

This article demonstrates how to achieve this common workflow in Django, with some added sugary sweetness: maintaning a whitelist of Facebook user IDs in your local database, and only authenticating and auto-registering users who exist on this whitelist.

Install dependencies

I'm assuming that you've already got an environment set up, that's equipped for Django development. I.e. you've already installed Python (my examples here are tested on Python 2.6 and 2.7), a database engine (preferably SQLite on your local environment), pip (recommended), and virtualenv (recommended). If you want to implement these examples fully, then as well as a dev environment with these basics set up, you'll also need a server to which you can deploy a Django site, and on which you can set up a proper public domain or subdomain DNS (because the Facebook API won't actually talk to or redirect back to your localhost, it refuses to do that).

You'll also need a Facebook account, with which you will be registering a new "Facebook app". We won't actually be developing a Facebook app in this article (at least, not in the usual sense, i.e. we won't be deploying anything to facebook.com), we just need an app key in order to talk to the Facebook API.

Here are the Python dependencies for our Django project. I've copy-pasted this straight out of my requirements.txt file, which I install on a virtualenv using pip install -E . -r requirements.txt (I recommend you do the same):

Django==1.3.0
-e git+http://github.com/Jaza/django-allauth.git#egg=django-allauth
-e git+http://github.com/facebook/python-sdk.git#egg=facebook-python-sdk
-e git+http://github.com/ericflo/django-avatar.git#egg=django-avatar

The first requirement, Django itself, is pretty self-explanatory. The next one, django-allauth, is the foundation upon which this demonstration is built. This app provides authentication and account management services for Facebook (plus Twitter and OAuth currently supported), as well as auto-registration, and profile pic to avatar auto-copying. The version we're using here, is my GitHub fork of the main project, which I've hacked a little bit in order to integrate with our whitelisting functionality.

The Facebook Python SDK is the base integration library provided by the Facebook team, and allauth depends on it for certain bits of functionality. Plus, we've installed django-avatar so that we get local user profile images.

Once you've got those dependencies installed, let's get a new Django project set up with the standard command:

django-admin.py startproject myproject

This will get the Django foundations installed for you. The basic configuration of the Django settings file, I leave up to you. If you have some experience already with Django (and if you've got this far, then I assume that you do), you no doubt have a standard settings template already in your toolkit (or at least a standard set of settings tweaks), so feel free to use it. I'll be going over the settings you'll need specifically for this app, in just a moment.

Fire up ye 'ol runserver, open your browser at http://localhost:8000/, and confirm that the "It worked!" page appears for you. At this point, you might also like to enable the Django admin (add 'admin' to INSTALLED_APPS, un-comment the admin callback in urls.py, and run syncdb; then confirm that you can access the admin). And that's the basics set up!

Register the Facebook app

Now, we're going to jump over to the Facebook side of the setup, in order to register our site as a Facebook app, and to then receive our Facebook app credentials. To get started, go to the Apps section of the Facebook Developers site. You'll probably be prompted to log in with your Facebook account, so go ahead and do that (if asked).

On this page, click the button labelled "Create New App". In the form that pops up, in the "App Display Name" field, enter a unique name for your app (e.g. the name of the site you're using this on — for the example app that I registered, I used the name "FB Whitelist"). Then, tick "I Agree" and click "Continue".

Once this is done, your Facebook app is registered, and you'll be taken to a form that lets you edit the basic settings of the app. The first setting that you'll want to configure is "App Domain": set this to the domain or subdomain URL of your site (without an http:// prefix or a trailing slash). A bit further down, in "Website — Site URL", enter this URL again (this time, with the http:// prefix and a trailing slash). Be sure to save your configuration changes on this page.

Next is a little annoying setting that must be configured. In the "Auth Dialog" section, for "Privacy Policy URL", once again enter the domain or subdomain URL of your site. Enter your actual privacy policy URL if you have one; if not, don't worry — Facebook's authentication API refuses to function if you don't enter something for this, so the URL of your site's front page is better than nothing.

Note: at some point, you'll also need to go to the "Advanced" section, and set "Sandbox Mode" to "Disabled". This is very important! If your app is set to Sandbox mode, then nobody will be able to log in to your Django site via Facebook auth, apart from those listed in the Facebook app config as "developers". It's up to you when you want to disable Sandbox mode, but make sure you do it before non-dev users start trying to log in to your site.

On the main "Settings — Basic" page for your newly-registered Facebook app, take note of the "App ID" and "App Secret" values. We'll be needing these shortly.

Configure Django settings

I'm not too fussed about what else you have in your Django settings file (or in how your Django settings are structured or loaded, for that matter); but if you want to follow along, then you should have certain settings configured per the following guidelines:

  • Your INSTALLED_APPS is to include:
    [
        'avatar',
        'uni_form',
    
        'allauth',
        'allauth.account',
        'allauth.socialaccount',
        'allauth.facebook',
    ]

    (You'll need to re-run syncdb after enabling these apps).

    (Note: django-allauth also expects the database schema for the email confirmation app to exist; however, you don't actually need this app enabled. So, what you can do, is add 'emailconfirmation' to your INSTALLED_APPS, then syncdb, then immediately remove it).

  • Your TEMPLATE_CONTEXT_PROCESSORS is to include:
    [
        'allauth.context_processors.allauth',
        'allauth.account.context_processors.account',
    ]

    (See the TEMPLATE_CONTEXT_PROCESSORS documentation for the default value of this setting, to paste into your settings file).

  • Your AUTHENTICATION_BACKENDS is to include:
    [
        'allauth.account.auth_backends.AuthenticationBackend',
    ]

    (See the AUTHENTICATION_BACKENDS documentation for the default value of this setting, to paste into your settings file).

  • Set a value for the AVATAR_STORAGE_DIR setting, for example:
    AVATAR_STORAGE_DIR = 'uploads/avatars'
  • Set a value for the LOGIN_REDIRECT_URL setting, for example:
    LOGIN_REDIRECT_URL = '/'
  • Set this:
    ACCOUNT_EMAIL_REQUIRED = True

Additionally, you'll need to create a new Facebook App record in your Django database. To do this, log in to your shiny new Django admin, and under "Facebook — Facebook apps", add a new record:

  • For "Name", copy the "App Display Name" from the Facebook page.
  • For both "Application id" and "Api key", copy the "App ID" from the Facebook page.
  • For "Application secret", copy the "App Secret" from the Facebook page.

Once you've entered everything on this form (set "Site" as well), save the record.

Implement standard Facebook authentication

By "standard", I mean "without whitelisting". Here's how you do it:

  • Add these imports to your urls.py:
    from allauth.account.views import logout
    from allauth.socialaccount.views import login_cancelled, login_error
    from allauth.facebook.views import login as facebook_login

    And (in the same file), add these to your urlpatterns variable:

    [
        url(r"^logout/$", logout, name="account_logout"),
        url('^login/cancelled/$', login_cancelled, name='socialaccount_login_cancelled'),
        url('^login/error/$', login_error, name='socialaccount_login_error'),
        url('^login/facebook/$', facebook_login, name="facebook_login"),
    ]
  • Add this to your front page template file:
    <div class="socialaccount_ballot">
    <ul class="socialaccount_providers">
    {% if not user.is_authenticated %}
    {% if allauth.socialaccount_enabled  %}
    {% include "socialaccount/snippets/provider_list.html" %}
    {% include "socialaccount/snippets/login_extra.html" %}
    {% endif %}
    {% else %}
    <li><a href="{% url account_logout %}?next=/">Logout</a></li>
    {% endif %}
    </ul>
    </div>

    (Note: I'm assuming that by this point, you've set up the necessary URL callbacks, views, templates, etc. to get a working front page on your site; I'm not going to hold your hand and go through all that).

  • If you'd like, you can customise the default authentication templates provided by django-allauth. For example, I overrode the socialaccount/snippets/provider_list.html and socialaccount/authentication_error.html templates in my test implementation.

That should be all you need, in order to get a working "Login with Facebook" link on your site. So, deploy everything that's been done so far to your online server, navigate to your front page, and click the "Login" link. If all goes well, then a popup will appear prompting you to log in to Facebook (unless you already have an active Facebook session in your browser), followed by a prompt to authorise your Django site to access your Facebook account credentials (to which you and your users will have to agree), and finishing with you being successfully authenticated.

The authorisation prompt during the initial login procedure.

You should be able to confirm authentication success, by noting that the link on your front page has changed to "Logout".

Additionally, if you go into the Django admin (you may first need to log out of your Facebook user's Django session, and then log in to the admin using your superuser credentials), you should be able to confirm that a new Django user was automatically created in response to the Facebook auth procedure. Additionally, you should find that an avatar record has been created, containing a copy of your Facebook profile picture; and, if you look in the "Facebook accounts" section, you should find that a record has been created here, complete with your Facebook user ID and profile page URL.

Facebook account record in the Django admin.

Great! Now, on to the really fun stuff.

Build a whitelisting app

So far, we've got a Django site that anyone can log into, using their Facebook credentials. That works fine for many sites, where registration is open to anyone in the general public, and where the idea is that the more user accounts get registered, the better. But what about a site where the general public cannot register, and where authentication should be restricted to only a select few individuals who have been pre-registered by site admins? For that, we need to go beyond the base capabilities of django-allauth.

Create a new app in your Django project, called fbwhitelist. The app should have the following files (file contents provided below):

models.py :

from django.contrib.auth.models import User
from django.db import models


class FBWhiteListUser(models.Model):
    name            = models.CharField(max_length=100)
    email           = models.EmailField(unique=True)
    social_id       = models.CharField(verbose_name='Facebook user ID',
                                       blank=True, max_length=100)
    active          = models.BooleanField(default=False)

    def __unicode__(self):
        return self.name

    class Meta:
        verbose_name = 'facebook whitelist user'
        verbose_name_plural = 'facebook whitelist users'
        ordering = ('name', 'email')

    def save(self, *args, **kwargs):
        try:
            old_instance = FBWhiteListUser.objects.get(pk=self.pk)
            if not self.active:
                if old_instance.active:
                    self.deactivate_user()
            else:
                if not old_instance.active:
                    self.activate_user()
        except FBWhiteListUser.DoesNotExist:
            pass

        super(FBWhiteListUser, self).save(*args, **kwargs)

    def delete(self):
        self.deactivate_user()

        super(FBWhiteListUser, self).delete()

    def deactivate_user(self):
        try:
            u = User.objects.get(email=self.email)
            if u.is_active and not u.is_superuser and not u.is_staff:
                u.is_active = False
                u.save()
        except User.DoesNotExist:
            pass

    def activate_user(self):
        try:
            u = User.objects.get(email=self.email)
            if not u.is_active:
                u.is_active = True
                u.save()
        except User.DoesNotExist:
            pass

utils.py :

Copy this slugify code snippet as the full contents of the utils.py file.

admin.py :

import re
import urllib2

from django import forms
from django.contrib import admin
from django.contrib.auth.models import User

from allauth.facebook.models import FacebookAccount
from allauth.socialaccount import app_settings
from allauth.socialaccount.helpers import _copy_avatar

from utils import slugify

from models import FBWhiteListUser


class FBWhiteListUserAdminForm(forms.ModelForm):
    class Meta:
        model = FBWhiteListUser

    def __init__(self, *args, **kwargs):
        super(FBWhiteListUserAdminForm, self).__init__(*args, **kwargs)

    def save(self, *args, **kwargs):
        m = super(FBWhiteListUserAdminForm, self).save(*args, **kwargs)

        try:
            u = User.objects.get(email=self.cleaned_data['email'])
        except User.DoesNotExist:
            u = self.create_django_user()

            if self.cleaned_data['social_id']:
                self.create_facebook_account(u)

        return m

    def create_django_user(self):
        name = self.cleaned_data['name']
        email = self.cleaned_data['email']
        active = self.cleaned_data['active']
        m = re.search(r'^(?P<first_name>[^ ]+) (?P<last_name>.+)$', name)
        name_slugified = slugify(name)
        first_name = ''
        last_name = ''

        if m:
            d = m.groupdict()
            first_name = d['first_name']
            last_name = d['last_name']

        u = User(username=name_slugified,
                 email=email,
                 last_name=last_name,
                 first_name=first_name)

        u.set_unusable_password()
        u.is_active = active
        u.save()

        return u

    def create_facebook_account(self, u):
        social_id = self.cleaned_data['social_id']
        name = self.cleaned_data['name']
        try:
            account = FacebookAccount.objects.get(social_id=social_id)
        except FacebookAccount.DoesNotExist:
            account = FacebookAccount(social_id=social_id)

        account.link = 'http://www.facebook.com/profile.php?id=%s' % social_id

        req = urllib2.Request(account.link)
        res = urllib2.urlopen(req)

        new_link = res.geturl()
        if not '/people/' in new_link and not 'profile.php' in new_link:
            account.link = new_link

        account.name = name

        request = None
        if app_settings.AVATAR_SUPPORT:
            _copy_avatar(request, u, account)

        account.user = u
        account.save()


class FBWhiteListUserAdmin(admin.ModelAdmin):
    list_display = ('name', 'email', 'active')
    list_filter = ('active',)
    search_fields = ('name', 'email')
    fields = ('name', 'email', 'social_id', 'active')

    def __init__(self, *args, **kwargs):
        super(FBWhiteListUserAdmin, self).__init__(*args, **kwargs)

    form = FBWhiteListUserAdminForm


admin.site.register(FBWhiteListUser, FBWhiteListUserAdmin)

(Note: also ensure that you have an empty __init__.py file in your app's directory, as you do with most all Django apps).

Also, of course, you'll need to add 'fbwhitelist' to your INSTALLED_APPS setting (and after doing that, a syncdb will be necessary).

Most of the code above is pretty basic, it just defines a Django model for the whitelist, and provides a basic admin view for that model. In implementing this code, feel free to modify the model and the admin definitions liberally — in particular, you may want to add additional fields to the model, per your own custom project needs. What this code also does, is automatically create both a corresponding Django user, and a corresponding socialaccount Facebook account record (including Facebook profile picture to django-avatar handling), whenever a new Facebook whitelist user instance is created.

Integrate it with django-allauth

In order to let django-allauth know about the new fbwhitelist app and its FBWhiteListUser model, all you need to do, is to add this to your Django settings file:

SOCIALACCOUNT_WHITELIST_MODEL = 'fbwhitelist.models.FBWhiteListUser'

If you're interested in the dodgy little hacks I made to django-allauth, in order to make it magically integrate with a specified whitelist app, here's the main code snippet responsible, just for your viewing pleasure (from _process_signup in socialaccount/helpers.py):

# Extra stuff hacked in here to integrate with
# the account whitelist app.
# Will be ignored if the whitelist app can't be
# imported, thus making this slightly less hacky.
whitelist_model_setting = getattr(
    settings,
    'SOCIALACCOUNT_WHITELIST_MODEL',
    None
)
if whitelist_model_setting:
    whitelist_model_path = whitelist_model_setting.split(r'.')
    whitelist_model_str = whitelist_model_path[-1]
    whitelist_path_str = r'.'.join(whitelist_model_path[:-1])
    try:
        whitelist_app = __import__(whitelist_path_str, fromlist=[whitelist_path_str])
        whitelist_model = getattr(whitelist_app, whitelist_model_str, None)
        if whitelist_model:
            try:
                guest = whitelist_model.objects.get(email=email)
                if not guest.active:
                    auto_signup = False
            except whitelist_model.DoesNotExist:
                auto_signup = False
    except ImportError:
        pass

Basically, the hack attempts to find and to query our whitelist model; and if it doesn't find a whitelist instance whose email matches that provided by the Facebook auth API, or if the found whitelist instance is not set to 'active', then it halts auto-creation and auto-login of the user into the Django site. What can I say… it does the trick!

Build a Facebook ID lookup utility

The Django admin interface so far for managing the whitelist is good, but it does have one glaring problem: it requires administrators to know the Facebook account ID of the person they're whitelisting. And, as it turns out, Facebook doesn't make it that easy for regular non-techies to find account IDs these days. It used to be straightforward enough, as profile page URLs all had the account ID in them; but now, most profile page URLs on Facebook are aliased, and the account ID is pretty well obliterated from the Facebook front-end.

So, let's build a quick little utility that looks up Facebook account IDs, based on a specified email. Add these files to your 'fbwhitelist' app to implement it:

facebook.py :

import urllib


class FacebookSearchUser(object):
    @staticmethod
    def get_query_email_request_url(email, access_token):
        """Queries a Facebook user based on a given email address. A valid Facebook Graph API access token must also be provided."""

        args = {
            'q': email,
            'type': 'user',
            'access_token': access_token,
        }
        return 'https://graph.facebook.com/search?' + \
               urllib.urlencode(args)

views.py :

from django.utils.simplejson import loads
import urllib2

from django.conf import settings
from django.contrib.admin.views.decorators import staff_member_required
from django.http import HttpResponse, HttpResponseBadRequest

from fbwhitelist.facebook import FacebookSearchUser


class FacebookSearchUserView(object):
    @staticmethod
    @staff_member_required
    def query_email(request, email):
        """Queries a Facebook user based on the given email address. This view cannot be accessed directly."""

        access_token = getattr(settings, 'FBWHITELIST_FACEBOOK_ACCESS_TOKEN', None)

        if access_token:
            url = FacebookSearchUser.get_query_email_request_url(email, access_token)
            response = urllib2.urlopen(url)
            fb_data = loads(response.read())
            if fb_data['data'] and fb_data['data'][0] and fb_data['data'][0]['id']:
                return HttpResponse('Facebook ID: %s' % fb_data['data'][0]['id'])
            else:
                return HttpResponse('No Facebook credentials found for the specified email.')

        return HttpResponseBadRequest('Error: no access token specified in Django settings.')

urls.py :

from django.conf.urls.defaults import *

from views import FacebookSearchUserView


urlpatterns = patterns('',
    url(r'^facebook_search_user/query_email/(?P<email>[^\/]+)/$',
        FacebookSearchUserView.query_email,
        name='fbwhitelist_search_user_query_email'),
)

Plus, add this to the urlpatterns variable in your project's main urls.py file:

[
    (r'^fbwhitelist/', include('fbwhitelist.urls')),
]

In your MEDIA_ROOT directory, create a file js/fbwhitelistadmin.js, with this content:

(function($) {
    var fbwhitelistadmin = function() {

        function init_social_id_from_email() {
            $('.social_id').append('<input type="submit" value="Find Facebook ID" id="social_id_get_from_email" /><p>After entering an email, click "Find Facebook ID" to bring up a new window, where you can see the Facebook ID of the Facebook user with this email. Copy the Facebook user ID number into the text field "Facebook user ID", and save. If it is a valid Facebook ID, it will automatically create a new user on this site, that corresponds to the specified Facebook user.</p>');
            $('#social_id_get_from_email').live('click', function() {
                var email_val = $('#id_email').val();
                if (email_val) {
                    var url = 'http://fbwhitelist.greenash.net.au/fbwhitelist/facebook_search_user/query_email/' + email_val + '/';
                    window.open(url);
                }

                return false;
            });
        }

        return {
            init: function() {
                if ($('#content h1').text() == 'Change facebook whitelist user') {
                    $('#id_name, #id_email, #id_social_id').attr('disabled', 'disabled');
                }
                else {
                    init_social_id_from_email();
                }
            }
        }
    }();

    $(document).ready(function() {
        fbwhitelistadmin.init();
    });
})(django.jQuery);

And to load this file on the correct Django admin page, add this code to the FBWhiteListUserAdmin class in the fbwhitelist/admin.py file:

    class Media:
        js = ("js/fbwhitelistadmin.js",)

Additionally, you're going to need a Facebook Graph API access token. To obtain one, go to a URL like this:

https://graph.facebook.com/oauth/authorize?client_id=APP_ID&scope=offline_access&redirect_uri=SITE_URL

Replacing the APP_ID and SITE_URL bits with your relevant Facebook App credentials. You should then be redirected to a URL like this:

SITE_URL?code=TEMP_CODE

Then, taking note of the TEMP_CODE part, go to a URL like this:

https://graph.facebook.com/oauth/access_token?client_id=APP_ID&redirect_uri=SITE_URL&client_secret=APP_SECRET&code=TEMP_CODE

Replacing the APP_ID, SITE_URL, and APP_SECRET bits with your relevant Facebook credentials, and replacing TEMP_CODE with the code from the URL above. You should then see a plain-text page response in this form:

access_token=ACCESS_TOKEN

And the ACCESS_TOKEN bit is what you need to take note of. Add this value to your settings file:

FBWHITELIST_FACEBOOK_ACCESS_TOKEN = 'ACCESS_TOKEN'

Of very important note, is the fact that what you've just saved in your settings is a long-life offline access Facebook access token. We requested that the access token be long-life, with the scope=offline_access parameter in the first URL request that we made to Facebook (above). This means that the access token won't expire for a very long time, so you can safely keep it in your settings file without having to worry about constantly needing to change it.

Exactly how long these tokens last, I'm not sure — so far, I've been using mine for about six weeks with no problems. You should be notified if and when your access token expires, because if you provide an invalid access token to the Graph API call, then Facebook will return an HTTP 400 response (bad request), and this will trigger urllib2.urlopen to raise an HTTPError exception. How you get notified, will depend on how you've configured Django to respond to uncaught exceptions; in my case, Django emails me an error report, which is sufficient notification for me.

Your Django admin should now have a nice enough little addition for Facebook account ID lookup:

Facebook account ID lookup integrated into the whitelist admin.

I say "nice enough", because it would also be great to change this from showing the ID in a popup, to actually populating the form field with the ID value via JavaScript (and showing an error, on fail, also via JavaScript). But honestly, I just haven't got around to doing this. Anyway, the basic popup display works as is — only drawback is that it requires copy-pasting the ID into the form field.

Finished product

And that's everything — your Django-Facebook auth integration with whitelisting should now be fully functional! Give it a try: attempt to log in to your Django site via Facebook, and it should fail; then add your Facebook account to the whitelist, attempt to log in again, and there should be no errors in sight. It's a fair bit of work, but this setup is possible once all the pieces are in place.

I should also mention that it's quite ironic, my publishing this long and detailed article about developing with the Facebook API, when barely a month ago I wrote a scathing article on the evils of Facebook. So, just to clarify: yes, I do still loathe Facebook, my opinion has not taken a somersault since publishing that rant.

However— what can I say, sometimes you get clients that want Facebook integration. And hey, them clients do pay the bills. Also, even I cannot deny that Facebook's enormous user base makes it an extremely attractive authentication source. And I must also concede that since the introduction of the Graph API, Facebook has become a much friendlier and a much more stable platform for developers to work with.

]]>
Solr, Jetty, and daemons: debugging jetty.sh 2011-02-10T00:00:00Z 2011-02-10T00:00:00Z Jaza https://greenash.net.au/thoughts/2011/02/solr-jetty-and-daemons-debugging-jettysh/ I recently added a Solr-powered search feature to this site (using django-haystack). Rather than go to the trouble (and server resources drain) of deploying Solr via Tomcat, I decided instead to deploy it via Jetty. There's a wiki page with detailed instructions for deploying Solr with Jetty, and the wiki page also includes a link to the jetty.sh startup script.

The instructions seem simple enough. However, I ran into some serious problems when trying to get the startup script to work. The standard java -jar start.jar was working fine for me. But after following the instructions to the letter, and after double-checking everything, a call to:

sudo /etc/init.d/jetty start

still resulted in my getting the (incredibly unhelpful) error message:

Starting Jetty: FAILED

My server is running Ubuntu Jaunty (9.04), and from my experience, the start-stop-daemon command in jetty.sh doesn't work on that platform. Let me know if you've experienced the same or similar issues on other *nix flavours or on other Ubuntu versions. Your mileage may vary.

When Jetty fails to start, it doesn't log the details of the failure anywhere. So, in attempting to nail down the problem, I had no choice but to open up the jetty.sh script, and to get my hands dirty with some old-skool debugging. It didn't take me too long to figure out which part of the script I should be concentrating my efforts on, it's the lines of code from 397-425:

##################################################
# Do the action
##################################################
case "$ACTION" in
  start)
    echo -n "Starting Jetty: "

    if (( NO_START )); then
      echo "Not starting jetty - NO_START=1";
      exit
    fi

    if type start-stop-daemon > /dev/null 2>&1
    then
      unset CH_USER
      if [ -n "$JETTY_USER" ]
      then
        CH_USER="-c$JETTY_USER"
      fi
      if start-stop-daemon -S -p"$JETTY_PID" $CH_USER -d"$JETTY_HOME" -b -m -a "$JAVA" -- "${RUN_ARGS[@]}" --daemon
      then
        sleep 1
        if running "$JETTY_PID"
        then
          echo "OK"
        else
          echo "FAILED"
        fi
      fi

To be specific, the line with if start-stop-daemon … (line 416) was clearly where the problem lay for me. So, I decided to see exactly what this command looks like (after all the variables have been substituted), by adding a line to the script that echo'es it:

echo start-stop-daemon -S -p"$JETTY_PID" $CH_USER -d"$JETTY_HOME" -b -m -a "$JAVA" -- "${RUN_ARGS[@]}" --daemon

And the result of that debugging statement looked something like:

start-stop-daemon -S -p/var/run/jetty.pid -cjetty -d/path/to/solr -b -m -a /usr/bin/java -- -Dsolr.solr.home=/path/to/solr/solr -Djetty.logs=/path/to/solr/logs -Djetty.home=/path/to/solr -Djava.io.tmpdir=/tmp -jar /path/to/solr/start.jar --daemon

That's a good start. Now, I have a command that I can try to run manually myself, as a debugging test. So, I took the above statement, pasted it into my terminal, and whacked a sudo in front of it:

sudo start-stop-daemon -S -p/var/run/jetty.pid -cjetty -d/path/to/solr -b -m -a /usr/bin/java -- -Dsolr.solr.home=/path/to/solr/solr -Djetty.logs=/path/to/solr/logs -Djetty.home=/path/to/solr -Djava.io.tmpdir=/tmp -jar /path/to/solr/start.jar --daemon

Well, that didn't give me any error messages; but then again, no positive feedback, either. To see if this command was successful in launching the Jetty daemon, I tried:

ps aux | grep java

But all that resulted in was:

myuser      3710  0.0  0.0   3048   796 pts/0    S+   19:35   0:00 grep java

That is, the command failed to launch the daemon.

Next, I decided to investigate the man page for the start-stop-daemon command. I'm no sysadmin or Unix guru — I've never dealt with this command before, and I have no idea what its options are.

When I have a Unix command that doesn't work, and that doesn't output or log any useful information about the failure, the first thing I look for is a "verbose" option. And it just so turns out that start-stop-daemon has a -v option. So, next step for me was to add that option and try again:

sudo start-stop-daemon -S -p/var/run/jetty.pid -cjetty -d/path/to/solr -v -b -m -a /usr/bin/java -- -Dsolr.solr.home=/path/to/solr/solr -Djetty.logs=/path/to/solr/logs -Djetty.home=/path/to/solr -Djava.io.tmpdir=/tmp -jar /path/to/solr/start.jar --daemon

Unfortunately, no cigar; the result of running that was exactly the same. Still absolutely no output (so much for verbose mode!), and ps aux showed the daemon had not launched.

Next, I decided to read up (in the man page) on the various options that the script was using with the start-stop-daemon command. Turns out that the -b option is rather a problematic one — as the manual says:

Typically used with programs that don't detach on their own. This option will force start-stop-daemon to fork before starting the process, and force it into the background. WARNING: start-stop-daemon cannot check the exit status if the process fails to execute for any reason. This is a last resort, and is only meant for programs that either make no sense forking on their own, or where it's not feasible to add the code for them to do this themselves.

Ouch — that sounds suspicious. Ergo, next step: remove that option, and try again:

sudo start-stop-daemon -S -p/var/run/jetty.pid -cjetty -d/path/to/solr -v -m -a /usr/bin/java -- -Dsolr.solr.home=/path/to/solr/solr -Djetty.logs=/path/to/solr/logs -Djetty.home=/path/to/solr -Djava.io.tmpdir=/tmp -jar /path/to/solr/start.jar --daemon

Running that command resulted in me seeing a fairly long Java exception report, the main line of which was:

java.io.FileNotFoundException: /path/to/solr/--daemon (No such file or directory)

Great — removing the -b option meant that I was finally able to see the error that was occurring. And… seems like the error is that it's trying to add the --daemon option to the solr filepath.

I decided that this might be a good time to read up on what exactly the --daemon option is. And as it turns out, the start-stop-daemon command has no such option. No wonder it wasn't working! (No such option in the java command-line app, either, or in any other standard *nix util that I was able to find).

I have no idea what this option is doing in the jetty.sh script. Perhaps it's available on some other *nix variants? Anyway, doesn't seem to be recognised at all on Ubuntu. Any info that may shed some light on this mystery would be greatly appreciated, if there are any start-stop-daemon experts out there.

Next step: remove the --daemon option, re-add the -b option, remove the -v option, and try again:

sudo start-stop-daemon -S -p/var/run/jetty.pid -cjetty -d/path/to/solr -b -m -a /usr/bin/java -- -Dsolr.solr.home=/path/to/solr/solr -Djetty.logs=/path/to/solr/logs -Djetty.home=/path/to/solr -Djava.io.tmpdir=/tmp -jar /path/to/solr/start.jar

And… success! Running that command resulted in no output; and when I tried a quick ps aux | grep java, I could see the daemon running:

myuser      3801 75.7  1.9 1069776 68980 ?       Sl   19:57   0:03 /usr/bin/java -Dsolr.solr.home=/path/to/solr/solr -Djetty.logs=/path/to/solr/logs -Djetty.home=/path/to/solr -Djava.io.tmpdir=/tmp -jar /path/to/solr/start.jar
myuser      3828  0.0  0.0   3048   796 pts/0    S+   19:57   0:00 grep java

Now that I'd successfully managed to launch the daemon with a manual terminal command, all that remained was to modify the jetty.sh script, and to do some integration testing. So, I removed the --daemon option from the relevant line of the script (line 416), and I tried:

sudo /etc/init.d/jetty start

And it worked. That command gave me the output:

Starting Jetty: OK

And a call to ps aux | grep java was also able to verify that the daemon was running.

Just one final step left in testing: restart the server (assuming that the Jetty startup script was added to Ubuntu's startup list at some point, manually or using update-rc.d), and see if Jetty is running. So, I restarted (sudo reboot), and… bup-bummmmm. No good. A call to ps aux | grep java showed that Jetty had not launched automatically after restart.

I remembered the discovery I'd made earlier, that the -b option is "dangerous". So, I removed this option from the relevant line of the script (line 416), and restarted the server again.

And, at long last, it worked! After restarting, a call to ps aux | grep java verified that the daemon was running. Apparently, Ubuntu doesn't like its startup daemons forking as background processes, this seems to result in things not working.

However, there is one lingering caveat. With this final solution — i.e. both the --daemon and the -b options removed from the start-stop-daemon call in the script — the daemon launches just fine after restarting the server. However, with this solution, if the daemon stops for some reason, and you need to manually invoke:

sudo /etc/init.d/jetty start

Then the daemon will effectively be running as a terminal process, not as a daemon process. This means that if you close your terminal session, or if you push CTRL+C, the process will end. Not exactly what init.d scripts are designed for! So, if you do need to manually start Jetty for some reason, you'll have to use another version of the script that maintains the -b option (adding an ampersand — i.e. the & symbol — to the end of the command should also do the trick, although that's not 100% reliable).

So, that's the long and winding story of my recent trials and tribulations with Solr, Jetty, and start-stop-daemon. If you're experiencing similar problems, hope this explanation is of use to you.

]]>
Jimmy Page: site-wide Django page caching made simple 2011-01-31T00:00:00Z 2011-01-31T00:00:00Z Jaza https://greenash.net.au/thoughts/2011/01/jimmy-page-site-wide-django-page-caching-made-simple/ For some time, I've been using the per-site cache feature that comes included with Django. This site's caching needs are very modest: small personal site, updated infrequently, with two simple blog-like sections and a handful of static pages. Plus, it runs fast enough even without any caching. A simple "brute force" solution like Django's per-site cache is more than adequate.

However, I grew tired of the fact that whenever I published new content, nothing was invalidated in the cache. I began to develop a routine of first writing and publishing the content in the Django admin, and then SSHing in to my box and restarting memcached. Not a good regime! But then again, I also couldn't bring myself to make the effort of writing custom invalidation routines for my cached pages. Considering my modest needs, it just wasn't worth it. What I needed was a solution that takes the same "brute force" page caching approach that Django's per-site cache already provided for me, but that also includes a similarly "brute force" approach to invalidation. Enter Jimmy Page.

Jimmy Page is the world's simplest generational page cache. It essentially functions on just two principles:

  1. It caches the output of all pages on your site (for which you use its @cache_view decorator).
  2. It invalidates* the cache for all pages, whenever any model instance is saved or deleted (apart from those models in the "whitelist", which is a configurable setting).

* Technically, generational caches never invalidate anything, they just increment the generation number of the cache key, and store a new version of the cached content. But if you ask me, it's easiest to think of this simply as "invalidation".

That's it. No custom invalidation routines needed. No stale cache content, ever. And no excuse for not applying caching to the majority of pages on your site.

If you ask me, the biggest advantage to using Jimmy Page, is that you simply don't have to worry about which model content you've got showing on which views. For example, it's perfectly possible to write routines for manually invalidating specific pages in your Django per-site cache. This is done using Django's low-level cache API. But if you do this, you're left with the constant headache of having to keep track of which views need invalidating when which model content changes.

With Jimmy Page, on the other hand, if your latest blog post shows on five different places on your site — on its own detail page, on the blog index page, in the monthly archive, in the tag listing, and on the front page — then don't worry! When you publish a new post, the cache for all those pages will be re-generated, without you having to configure anything. And when you decide, in six months' time, that you also want your latest blog post showing in a sixth place — e.g. on the "about" page — you have to do precisely diddly-squat, because the cache for the "about" page will already be getting re-generated too, sans config.

Of course, Jimmy Page is only going to help you if you're running a simple lil' site, with infrequently-updated content and precious few bells 'n' whistles. As the author states: "This technique is not likely to be effective in sites that have a high ratio of database writes to reads." That is, if you're running a Twitter clone in Django, then Jimmy Page probably ain't gonna help you (and it will very probably harm you). But if you ask me, Jimmy Page is the way to go for all your blog-slash-brochureware Django site caching needs.

]]>
An inline image Django template filter 2010-06-06T00:00:00Z 2010-06-06T00:00:00Z Jaza https://greenash.net.au/thoughts/2010/06/an-inline-image-django-template-filter/ Adding image fields to a Django model is easy, thanks to the built-in ImageField class. Auto-resizing uploaded images is also a breeze, courtesy of sorl-thumbnail and its forks/variants. But what about embedding resized images inline within text content? This is a very common use case for bloggers, and it's a final step that seems to be missing in Django at the moment.

Having recently migrated this site over from Drupal, my old blog posts had inline images embedded using image assist. Images could be inserted into an arbitrary spot within a text field by entering a token, with a syntax of [img_assist nid=123 ... ]. I wanted to be able to continue embedding images in roughly the same fashion, using a syntax as closely matching the old one as possible.

So, I've written a simple template filter that parses a text block for tokens with a syntax of [thumbnail image-identifier], and that replaces every such token with the image matching the given identifier, resized according to a pre-determined width and height (by sorl-thumbnail), and formatted as an image tag with a caption underneath. The code for the filter is below.

import re

from django import template
from django.template.defaultfilters import stringfilter

from sorl.thumbnail.main import DjangoThumbnail

from models import InlineImage

register = template.Library()

regex = re.compile(r'\[thumbnail (?P<identifier>[\-\w]+)\]')


@register.filter
@stringfilter
def inline_thumbnails(value):
    new_value = value
    it = regex.finditer(value)
    for m in it:
        try:
            image = InlineImage.objects.get(identifier=identifier)
            thumbnail = DjangoThumbnail(image.image, (500, 500))
            new_value = new_value.replace(m.group(), '<img src="%s%s" width="%d" height="%d" alt="%s" /><p><em>%s</em></p>' % ('http://mysite.com', thumbnail.absolute_url, thumbnail.width(), thumbnail.height(), image.title, image.title))
        except InlineImage.DoesNotExist:
            pass
    return new_value

This code belongs in a file such as appname/templatetags/inline_thumbnails.py within your Django project directory. It also assumes that you have an InlineImage model that looks something like this (in your app's models.py file):

from django.db import models

class InlineImage(models.Model):
    created         = models.DateTimeField(auto_now_add=True)
    modified        = models.DateTimeField(auto_now=True)

    title           = models.CharField(max_length=100)

    image           = models.ImageField(upload_to='uploads/images')
    identifier      = models.SlugField(unique=True)

    def __unicode__(self):
        return self.title
        ordering = ('-created',)

Say you have a model for your site's blog posts, called Entry. The main body text field for this model is content. You could upload an InlineImage with identifier hokey-pokey. You'd then embed the image into the body text of a blog post like so:

<p>You put your left foot in,
You put your left foot out,
You put your left foot in,
And you shake it all about.</p>

[thumbnail hokey-pokey]

<p>You do the Hokey Pokey and you turn around,
That's what it's all about.</p>

To render the blog post content with the thumbnail tokens converted into actual images, simply filter the variable in your template, like so:

{% load inline_thumbnails %}

{{ entry.content|inline_thumbnails|safe }}

The code here is just a simple example — if you copy it and adapt it to your own needs, you'll probably want to add a bit more functionality to it. For example, the token could be extended to support specifying image alignment (left/right), width/height per image, caption override, etc. But I didn't particularly need any of these things, and I wanted to keep my code simple, so I've omitted those features from my filter.

]]>
An autop Django template filter 2010-05-30T00:00:00Z 2010-05-30T00:00:00Z Jaza https://greenash.net.au/thoughts/2010/05/an-autop-django-template-filter/ autop is a script that was first written for WordPress by Matt Mullenweg (the WordPress founder). All WordPress blog posts are filtered using wpautop() (unless you install an additional plug-in to disable the filter). The function was also ported to Drupal, and it's enabled by default when entering body text into Drupal nodes. As far as I'm aware, autop has never been ported to a language other than PHP. Until now.

In the process of migrating this site from Drupal to Django, I was surprised to discover that not only Django, but also Python in general, lacks any linebreak filtering function (official or otherwise) that's anywhere near as intelligent as autop. The built-in Django linebreaks filter converts all single newlines to <br /> tags, and all double newlines to <p> tags, completely irrespective of HTML block elements such as <code> and <script>. This was a fairly major problem for me, as I was migrating a lot of old content over from Drupal, and that content was all formatted in autop style. Plus, I'm used to writing content in that way, and I'd like to continue writing content in that way, whether I'm in a PHP environment or not.

Therefore, I've ported Drupal's _filter_autop() function to Python, and implemented it as a Django template filter. From the limited testing I've done, the function appears to be working just as well in Django as it does in Drupal. You can find the function below.

import re
from django import template
from django.template.defaultfilters import force_escape, stringfilter
from django.utils.encoding import force_unicode
from django.utils.functional import allow_lazy
from django.utils.safestring import mark_safe


register = template.Library()


def autop_function(value):
    """
    Convert line breaks into <p> and <br> in an intelligent fashion.
    Originally based on: http://photomatt.net/scripts/autop

    Ported directly from the Drupal _filter_autop() function:
    http://api.drupal.org/api/function/_filter_autop
    """

    # All block level tags
    block = '(?:table|thead|tfoot|caption|colgroup|tbody|tr|td|th|div|dl|dd|dt|ul|ol|li|pre|select|form|blockquote|address|p|h[1-6]|hr)'

    # Split at <pre>, <script>, <style> and </pre>, </script>, </style> tags.
    # We don't apply any processing to the contents of these tags to avoid messing
    # up code. We look for matched pairs and allow basic nesting. For example:
    # "processed <pre> ignored <script> ignored </script> ignored </pre> processed"
    chunks = re.split('(</?(?:pre|script|style|object)[^>]*>)', value)
    ignore = False
    ignoretag = ''
    output = ''

    for i, chunk in zip(range(len(chunks)), chunks):
        prev_ignore = ignore

        if i % 2:
            # Opening or closing tag?
            is_open = chunk[1] != '/'
            tag = re.split('[ >]', chunk[2-is_open:], 2)[0]
            if not ignore:
                if is_open:
                    ignore = True
                    ignoretag = tag

            # Only allow a matching tag to close it.
            elif not is_open and ignoretag == tag:
                ignore = False
                ignoretag = ''

        elif not ignore:
            chunk = re.sub('\n*$', '', chunk) + "\n\n" # just to make things a little easier, pad the end
            chunk = re.sub('<br />\s*<br />', "\n\n", chunk)
            chunk = re.sub('(<'+ block +'[^>]*>)', r"\n\1", chunk) # Space things out a little
            chunk = re.sub('(</'+ block +'>)', r"\1\n\n", chunk) # Space things out a little
            chunk = re.sub("\n\n+", "\n\n", chunk) # take care of duplicates
            chunk = re.sub('\n?(.+?)(?:\n\s*\n|$)', r"<p>\1</p>\n", chunk) # make paragraphs, including one at the end
            chunk = re.sub("<p>(<li.+?)</p>", r"\1", chunk) # problem with nested lists
            chunk = re.sub('<p><blockquote([^>]*)>', r"<blockquote\1><p>", chunk)
            chunk = chunk.replace('</blockquote></p>', '</p></blockquote>')
            chunk = re.sub('<p>\s*</p>\n?', '', chunk) # under certain strange conditions it could create a P of entirely whitespace
            chunk = re.sub('<p>\s*(</?'+ block +'[^>]*>)', r"\1", chunk)
            chunk = re.sub('(</?'+ block +'[^>]*>)\s*</p>', r"\1", chunk)
            chunk = re.sub('(?<!<br />)\s*\n', "<br />\n", chunk) # make line breaks
            chunk = re.sub('(</?'+ block +'[^>]*>)\s*<br />', r"\1", chunk)
            chunk = re.sub('<br />(\s*</?(?:p|li|div|th|pre|td|ul|ol)>)', r'\1', chunk)
            chunk = re.sub('&([^#])(?![A-Za-z0-9]{1,8};)', r'&amp;\1', chunk)

        # Extra (not ported from Drupal) to escape the contents of code blocks.
        code_start = re.search('^<code>', chunk)
        code_end = re.search(r'(.*?)<\/code>$', chunk)
        if prev_ignore and ignore:
            if code_start:
                chunk = re.sub('^<code>(.+)', r'\1', chunk)
            if code_end:
                chunk = re.sub(r'(.*?)<\/code>$', r'\1', chunk)
            chunk = chunk.replace('<\\/pre>', '</pre>')
            chunk = force_escape(chunk)
            if code_start:
                chunk = '<code>' + chunk
            if code_end:
                chunk += '</code>'

        output += chunk

    return output

autop_function = allow_lazy(autop_function, unicode)

@register.filter
def autop(value, autoescape=None):
    return mark_safe(autop_function(value))
autop.is_safe = True
autop.needs_autoescape = True
autop = stringfilter(autop)

Update (31 May 2010): added the "Extra (not ported from Drupal) to escape the contents of code blocks" part of the code.

To use this filter in your Django templates, simply save the code above in a file called autop.py (or anything else you want) in a templatetags directory within one of your installed apps. Then, just declare {% load autop %} at the top of your templates, and filter your markup variables with something like {{ object.content|autop }}.

Note that this is pretty much a direct port of the Drupal / PHP function into Django / Python. As such, it's probably not as efficient nor as Pythonic as it could be. However, it seems to work quite well. Feedback and comments are welcome.

]]>
Refugee Buddy: a project of OzSiCamp Sydney 2010 2010-03-10T00:00:00Z 2010-03-10T00:00:00Z Jaza https://greenash.net.au/thoughts/2010/03/refugee-buddy-a-project-of-ozsicamp-sydney-2010/ Last weekend, I attended Social Innovation Camp Sydney 2010. SiCamp is an event where several teams have one weekend in which to take an idea for an online social innovation technology, and to make something of it. Ideally, the technology gets built and deployed by the end of the camp, but if a team doesn't reach that stage, simply developing the concept is an acceptable outcome as well.

I was part of a team of seven (including our team leader), and we were the team that built Refugee Buddy. As the site's slogan says: "Refugee Buddy is a way for you to welcome people to your community from other cultures and countries." It allows regular Australians to sign up and become volunteers to help out people in our community who are refugees from overseas. It then allows refugee welfare organisations (both governmnent and independent) to search the database of volunteers, and to match "buddies" with people in need.

Of the eight teams present at this OzSiCamp, we won! Big congratulations to everyone on the team: Oz, Alex, James, Daniela, Tom, (and Jeremy — that's me!) and most of all Joy, who came to the camp with a great concept, and who provided sound leadership to the rest of us. Personally, I really enjoyed working on Refugee Buddy, and I felt that the team had a great vibe and the perfect mix of skills.

OzSiCamp Sydney 2010 was the first "build a site in one weekend" event in which I've participated. It was hectic, but fun. I may have overdosed on Mentos refreshments on the Saturday night (in fact, I never want to eat another Mentos again). All up, I think it was a great experience — and in our case, one with a demonstrable concrete result — and I hope to attend similar events in the future.

For building Refugee Buddy, our team decided to use Django, a Python web framework. This was basically the decision of Oz and myself: we were the two programmers on the team; and we both have solid experience with developing sites in Django, primarily from using it at Digital Eskimo (where we both work). Oz is a Django junkie; and I've been getting increasingly proficient in it. Other teams built their sites using Ruby on Rails, Drupal, MediaWiki, and various other platforms.

Going with a Django team rather than a Drupal team (and pushing for Django rather than Drupal) was a step in a new direction for me. It surprised my fellow members of the Sydney Drupal community who were also in attendance. And, to tell the truth, I also surprised myself. Anyway, I think Django was a superior match for the project compared to Drupal, and the fact that we were able to build the most fully-functioning end product out of all the teams, pretty much speaks for itself.

Refugee Buddy is an open source project, and the full code is available on GitHub. Feel free to get involved: we need design and dev help for the long-term maintenance and nurturing of the site. But most of all, I encourage you all to visit Refugee Buddy, and to sign up as a buddy.

]]>