nodejs - GreenAsh Poignant wit and hippie ramblings that are pertinent to nodejs https://greenash.net.au/thoughts/topics/nodejs/ 2022-03-17T00:00:00Z Email-based comment moderation with Netlify Functions 2022-03-17T00:00:00Z 2022-03-17T00:00:00Z Jaza https://greenash.net.au/thoughts/2022/03/email-based-comment-moderation-with-netlify-functions/ The most noteworthy feature of the recently-launched GreenAsh v5, programming-wise, is its comment submission system. I enjoyed the luxury of the robust batteries-included comment engines of Drupal and Django, back in the day; but dynamic functionality like that isn't as straight-forward in the brave new world of SSG's. I promised that I'd provide a detailed run-down of what I built, so here goes.

Some of GreenAsh's oldest published comments, looking mighty fine in v5.

In a nutshell, the way it works is as follows:

  1. The user submits their comment via a simple HTML form powered by Netlify Forms
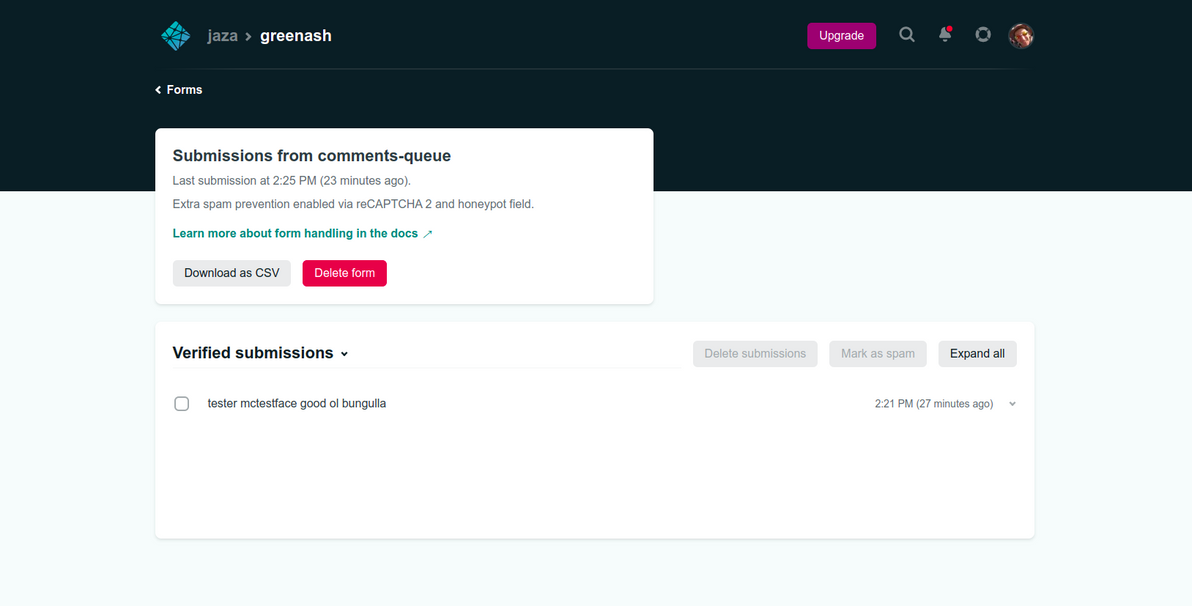
  2. The submission gets saved to the Netlify Forms data store
  3. The submission-created event handler sends the site admin (me!) an email containing the submission data and a URL
  4. The site admin opens the URL, which displays an HTML form populated with the submission data
  5. After eyeballing the submission data, the site admin enters a secret token to authenticate
  6. The site admin clicks "Approve", which writes the new comment to a JSON file, pushes the code change to the site's repo via the GitHub Contents API, and deletes the submission from the data store via the Netlify Forms API (or the site admin clicks "Delete", in which case it just deletes the submission from the data store)
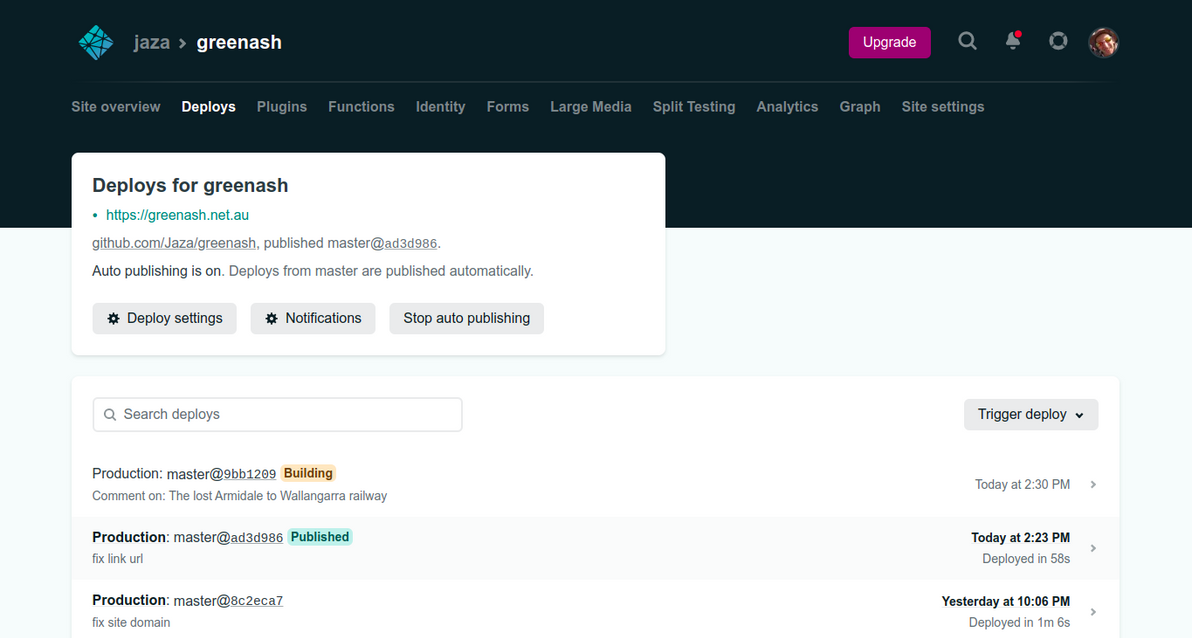
  7. Netlify rebuilds the site in response to a GitHub code change as usual, thus publishing the comment

The initial form submission is basically handled for me, by Netlify Forms. The bit where I had to write code only begins at the submission-created event handler. I could have POSTed form submissions directly to a serverless function, and that would have allowed me a lot more usage for free. Netlify Forms is a premium product, with a not-particularly-generous free tier of only 100 (non-spam) submissions per site per month. However, I'd rather use it, and live with its limits, because:

  • It has solid built-in spam protection, and defence against spam is something that was my problem for nearly the past 20 years, and I'd really really like for it to be Somebody Else's Problem from now on
  • It has its own data store of submissions, which I don't strictly need (because I'm emailing myself each submission), but which I consider really nice to have, if for any reason the email notifications don't reach me (and I also have many years of experience with unreliable email delivery), and which would be a pain (and totally not worth it) to build myself in a serverless way (would need something like DynamoDB, API Gateway, various lambda's, it would be a whole project in itself)
  • I can interact with that data store via a nice API
  • I can review spam submissions in the Netlify Forms UI (which is good, because I don't get notified of them, so otherwise I'd have no visibility over them)
  • Even if I bypassed Netlify Forms, I'd still have to send myself a customised email notification, which I do, using the SparkPost Transmissions API, which has a free tier limit of 500 emails per month anyway

So, the way the event handler works, is that all you have to do, in order to hook up a function, is to create a file in your repo with the correct magic name netlify/functions/submission-created.js (that's magic that isn't as well-documented as it could be, if you ask me, which is why I'm pointing it out here as explicitly as possible). You can see my full event handler code on GitHub. Here's the meat of it:

// Loosely based on:
// https://www.seancdavis.com/posts/netlify-function-sends-conditional-email/
const sendMail = async (
  sparkpostToken,
  fromEmail,
  toEmail,
  siteName,
  siteDomain,
  title,
  path,
  id,
  date,
  name,
  email,
  url,
  comment,
) => {
  const options = {
    hostname: SPARKPOST_API_HOSTNAME,
    port: HTTPS_PORT,
    path: SPARKPOST_TRANSMISSION_API_ENDPOINT,
    method: "POST",
    headers: {
      Authorization: sparkpostToken,
      "Content-Type": "application/json",
    }
  };

  const commentSafe = escapeHtml(comment);
  const moderateUrl = getModerateUrl(
    siteDomain, title, path, id, date, name, url, commentSafe
  );

  let data = {
    options: {
      open_tracking: false,
      click_tracking: false,
    },
    recipients: [
      {
        address: {
          email: toEmail,
        },
      },
    ],
    content: {
      from: {
        email: fromEmail,
      },
      subject: getNotifyMailSubject(siteName, title),
      text: getNotifyMailText(name, email, url, comment, moderateUrl),
    },
  };

  try {
    return await doRequest(options, JSON.stringify(data));
  } catch (e) {
    console.error(`SparkPost create transmission call failed: ${e}`);
    throw e;
  }
};

The way I'm crafting the notification email, is pretty similar to the way my comment notification emails worked before in Django. That is, the email includes the commenter's name and email, and the comment body, in readable plain text. And it includes a URL that you can follow, to go and moderate the comment. In Django, that was simply a URL to the relevant page in the admin. But this is a static site, it has no admin. So it's a URL to a form, and the URL includes all of the submission data, encoded into it as GET parameters.

How the comment notification email looks in GMail

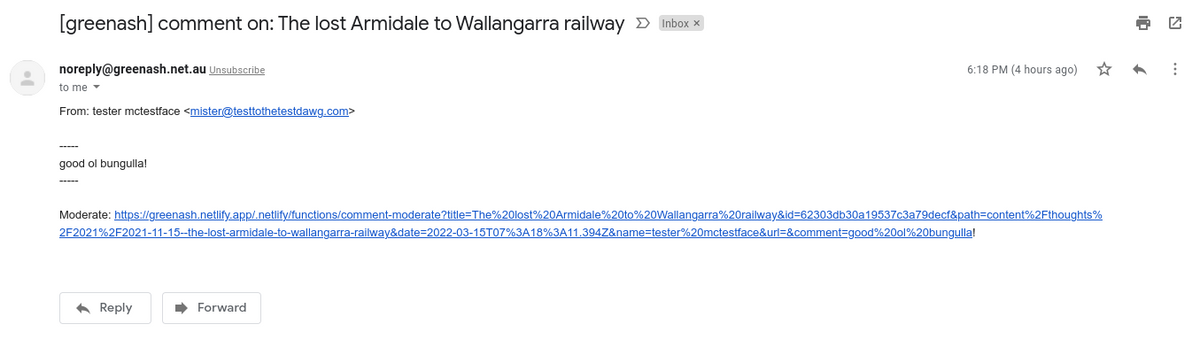
Clicking the URL then displays an HTML form, which is generated by another serverless function, the code for which you can find here. That HTML form doesn't actually need to be generated by a function, it could itself be a static page (containing some client-side JS to populate the form fields from GET parameters), but it was just as easy to make it a function, and it effectively costs me no money either way, and I thought, meh, I'm in functions land anyway.

All the data in that form gets populated from what's encoded in the clicked-on URL, except for token, which I have to enter in manually. But, because it's a standard HTML password field, I can tell my browser to "remember password for this site", so it gets populated for me most of the time. And it's dead-simple HTML, so I was able to make it responsive with minimal effort, which is good, because it means I can moderate comments on my phone if I'm out and about.

The comment moderation form

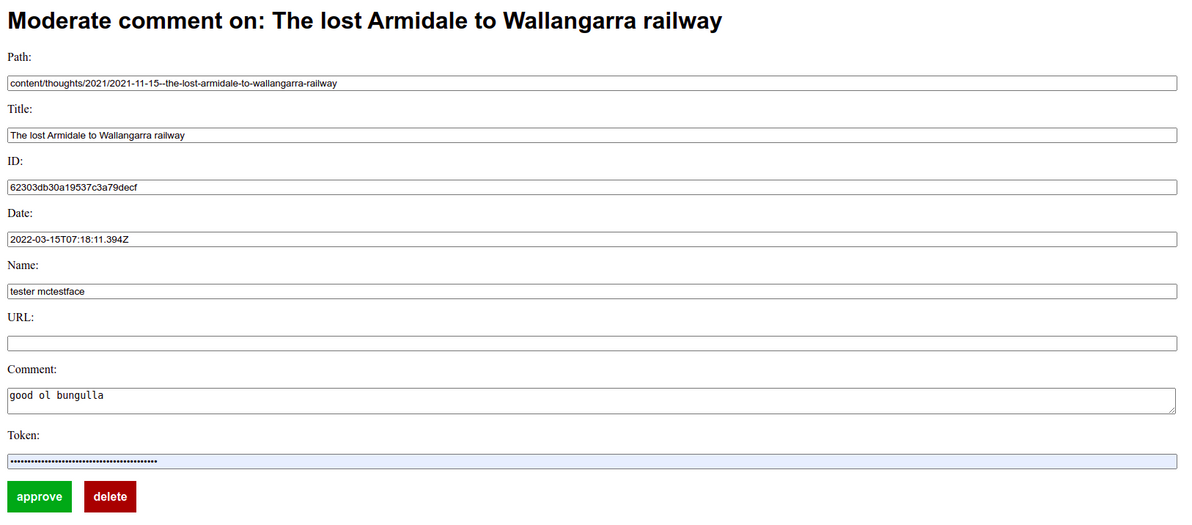
Having this intermediary HTML form is necessary, because a clickable URL in an email can't POST directly (and I certainly don't want to actually write comments to the repo in a GET request). It's also good, because it means that the secret token has to be entered manually in the browser, which is more secure, and less mistake-prone, than the alternative, which would be sending the secret token in the notification email, and including it in the URL. And it gives me a slightly nicer UI (slightly nicer than email, that is) in which to eyeball the comment, and it gives me the opportunity to edit the comment before publishing it (which I sometimes do, usually just to fix formatting, not to censor or distort what people have to say!).

Next, we get to the business of actually approving or rejecting the comment. You can see my full comment action code on GitHub. Here's where the approval happens:

const approveComment = async (
  githubToken,
  githubUser,
  githubRepo,
  netlifyToken,
  id,
  path,
  title,
  date,
  name,
  url,
  comment,
) => {
  try {
    let existingSha;
    let existingJson;
    let existingComments;

    try {
      const existingFile = await getExistingCommentsFile(
        githubToken, githubUser, githubRepo, path
      );
      existingSha = existingFile.sha;
      existingJson = getExistingJson(existingFile);
      existingComments = getExistingComments(existingJson);
    } catch (e) {
      existingSha = null;
      existingJson = {};
      existingComments = [];
    }

    const newComments = getNewComments(existingComments, date, name, url, comment);
    const newJson = getNewJson(existingJson, newComments);

    await putNewCommentsFile(
      githubToken, githubUser, githubRepo, path, title, date, name, newJson, existingSha
    );

    await purgeComment(id, netlifyToken);

    return { statusCode: 200, body: "Comment approved" };
  }
  catch (e) {
    return { statusCode: 400, body: "Failed to approve comment" };
  }
};

I'm using Eleventy's template data files (i.e. posts/subdir/my-first-blog-post.11tydata.json style files) to store the comments, in simple JSON files alongside the thought content files themselves, in the repo. So the comment approval function has to append to the relevant JSON file if it already exists, otherwise it has to create the relevant JSON file from scratch. That's why the first thing the function does, is try to get the existing JSON file and its comments, and if none exists, then it sets the list of existing comments to an empty array.

The function appends the new comment to the existing comments array, it serializes the new array to JSON, and it writes the new JSON file to the repo. Both interactions with the repo – reading the existing comments file, and writing the new file – are done using the GitHub Contents API, as simple HTTP calls (the PUT call results in a new commit on the repo's default branch). This way, the function doesn't have to actually interact with Git, i.e. it doesn't have to clone the repo, read from the filesystem, perform a commit, or push the change (and, therefore, nor does it need an SSH key, it just needs a GitHub API key).

The newly-approved comment in the GitHub UI's commit details screen

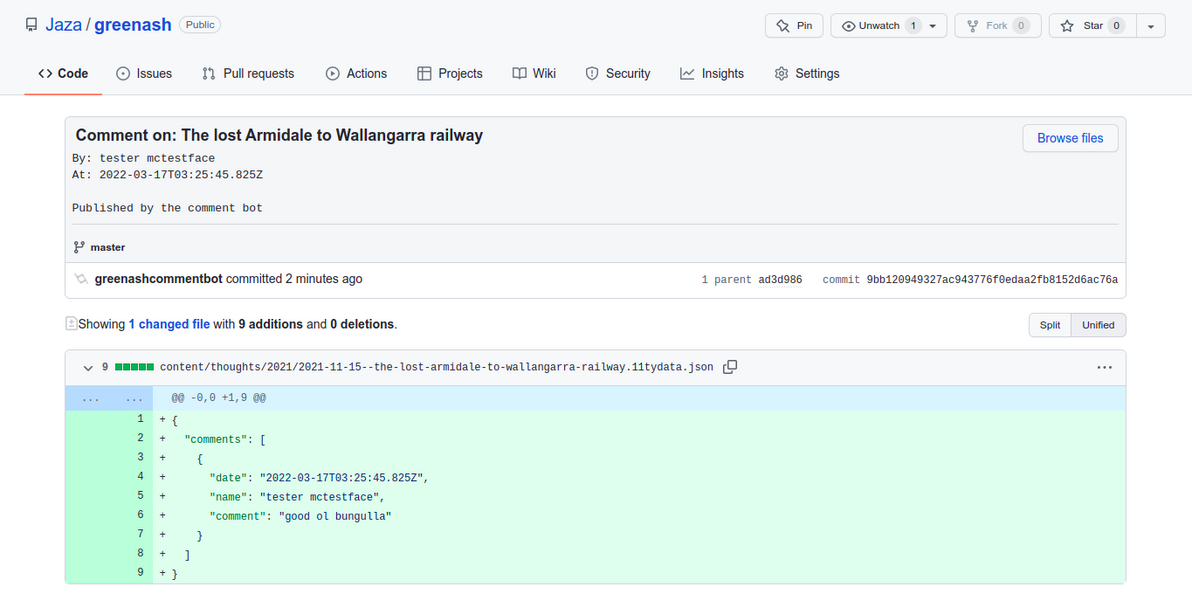
From that point on, just like for any other commit pushed to the repo's default branch, Netlify receives a webhook notification from GitHub, and that triggers a standard Netlify deploy, which builds the latest version of the site using Eleventy.

Netlify re-deploying the site with the new comment

The only other thing that the comment approval function does, is the same thing (and the only thing) that the comment rejection function does, which is to delete the submission via the Netlify Forms API. This isn't strictly necessary: I could just let the comments sit in the Netlify Forms data store forever (and as far as I know, Netlify has no limit on how many submissions it will store indefinitely for free, only on how many submissions it will process per month for free).

But by deleting each comment from there after I've moderated it, the Netlify Forms data store becomes a nice "todo queue", should I ever need one to refer to (i.e. should my inbox not be a good enough such queue). And I figure that a comment really doesn't need to be stored anywhere else, once it's approved and committed in Git (and, conversely, it really doesn't need to be stored anywhere at all, once it's rejected).

The new comment can be seen in the Netlify UI before it gets approved or rejected

The old Django-powered site was set up to immediately publish comments (i.e. no moderation) on thoughts that were less than one month old; and to publish comments after they'd been moderated, for thoughts that were up to one year old; and to close comment submission, for thoughts that were more than one year old.

Publishing comments immediately upon submission (or, at least, within a minute or two of submission, allowing for Eleventy build time / Netlify deploy time) would be possible in the new site, but personally I'm not comfortable with letting actual Git commits (as opposed to just database inserts) get triggered directly like that. So all comments will now be moderated. And, for now, I'm keeping comment submission open for all thoughts, old or new, and hopefully Netlify's spam protection will prove tougher than my old defences (the only reason why I'd closed comments for older thoughts, in the past, was due to a deluge of spam).

I should also note that the comment form on the new site has a (mandatory) "email" field, same as on the old site. However, on the old site, I was able to store the emails of commenters in the Django database indefinitely, but to not render them in the front-end, thus keeping them confidential. In the new site, I don't have that luxury, because if the emails are in Git, then (even if they're not rendered in the front-end) they're publicly visible on GitHub (unless I were to make the whole repo private, which I specifically don't want to do, I want the site itself to be open source!).

So, in the new site, emails of commenters are included in the notification email that gets sent to me (so that I can contact the commenter should I want to or need to), and they're stored (usually only temporarily) in the Netlify Forms data store, but they don't make it anywhere else. Rest assured, commenters, I respect your privacy, I will never publish your email address.

Commenting: because everyone's voice deserves to be heard!
Image source: Illawarra Mercury

Well, there you have it, my answer to "what about comments" in the static serverless SaaS web of 2022. For your information, there's another, more official solution for powering comments with Netlify and Eleventy, with a great accompanying article.. And, full disclosure, I copied quite a few bits and pieces from that project. My main gripe with the approach taken there, is that it uses Slack, instead of email, for the notifications. It's not that I don't like Slack – I've been using it every day for work, across several jobs, for many years now (albeit not by choice) – but, call me old-fashioned if you will, I prefer good ol' email.

More credit where it's due: thanks to this article that shows how to push a comments JSON file directly to GitHub (which I also much prefer, compared to the official solution's approach of using the Netlify Forms data store as the source of truth, and querying it for approved comments during each site build); this one that shows how to send notification emails from Netlify Functions; and this one that shows how to connect a form to a submission-created.js function. I couldn't have built what I did, without standing on the shoulders of giants.

You've read this far, all about my whiz bang new comments system. Now, the least you can do is try it out, the form's directly below. :D

]]>
Private photo collections with AWSPics 2021-02-02T00:00:00Z 2021-02-02T00:00:00Z Jaza https://greenash.net.au/thoughts/2021/02/private-photo-collections-with-awspics/ I've created a new online home for my formidable collection of 25,000 personal photos. They now all live in an S3 bucket, and are viewable in a private gallery powered by the open-source AWSPics. In general, I'm happy with the new setup.

For the past 15 years, I have painstakingly curated and organised my photos on Flickr. I have no complaints or regrets: Flickr was and still is a fantastic service, and in its heyday it was ahead of its time. However, after 15 years as a loyal Pro member, it's with bittersweet reluctance that I've decided to cancel my Flickr account. The main reason for my parting ways with Flickr, is that its price has increased (and is continuing to increase), quite significantly of late, after being set in stone for many years.

I also just wanted to build (and felt that I was quite overdue in building) a photo solution crafted (at least partially) with my own hands, and that I fully control, rather than just letting SaaS do all the work for me. Similarly, even though I've always trusted and I still trust Flickr with my data, I wanted to migrate my photos to a storage back-end that I own and manage myself, and an S3 bucket is just that (at the least, IaaS is closer to that ideal than SaaS is).

I had never made any of my personal photos private, although I always could have, back in the Flickr days. I never felt that it was necessary. I was young and free, and the photos were all of me hanging out with my friends, and/or gallivanting around the world with other carefree backpackers. But I'm at a different stage of my life now. These days, the photos are all of my kids, and so publishing them for the whole world to see is somewhat less appropriate. And AWSPics makes them all private by default. So, private it is.

Many thanks to jpsim for building AWSPics, it's a great little stack. AWSPics had nearly everything I needed, when I stumbled across it about 3 months ago, and I certainly could have used it as-is, no yours-truly dev required. But, me being a fastidious ol' dev, and it being open-source, naturally I couldn't help but add a few bells and whistles to it. In particular, I scratched my own itch by building support for collections of albums, so that I could preserve the three-level hierarchy of Collections -> Albums -> Pictures that I used religiously on Flickr. I also wrote a whole lot of unit tests for the AWSPics site builder (which is a Node.js Lambda function), before making any changes, to ensure that I didn't break existing functionality. Other than that, I just submitted a few minor bug fixes.

I'm not planning on enhancing AWSPics a whole lot more. It works for my humble needs. I'm a dev, not a designer, nor a photographer. Although 25,000 photos is a lot (and growing), and I feel like I'm pushing the site builder Lambda a bit close to its limits at the moment (it takes over a minute to run, and ideally a Lambda function completes within a few seconds). Adding support for partial site rebuilds (i.e. only rebuild specific albums or collections) would resolve that. Plus I'm sure there are a few more minor bits and pieces I could work on, should I have the time and the inclination.

Well, that's all I have to say about that. Just wanted to formally announce that shift that my photo collection has made, and to give kudos where it's deserved.

]]>
Node.js itself is blocking, only its I/O is non-blocking 2012-11-15T00:00:00Z 2012-11-15T00:00:00Z Jaza https://greenash.net.au/thoughts/2012/11/nodejs-itself-is-blocking-only-its-io-is-non-blocking/ I've recently been getting my feet wet, playing around with Node.js (yes, I know – what took me so long?). I'm having a lot of fun, learning new technologies by the handful. It's all very exciting.

I just thought I'd stop for a minute, however, to point out one important detail of Node.js that had me confused for a while, and that seems to have confused others, too. More likely than not, the first feature of Node.js that you heard about, was its non-blocking I/O model.

Now, please re-read that last phrase, and re-read it carefully. Non. Blocking. I/O. You will never hear anywhere, from anyone, that Node.js is non-blocking. You will only hear that it has non-blocking I/O. If, like me, you're new to Node.js, and you didn't stop to think about what exactly "I/O" means (in the context of Node.js) before diving in (and perhaps you weren't too clear on "non-blocking", either), then fear not.

What exactly – with reference to Node.js – is blocking, and what is non-blocking? And what exactly – also with reference to Node.js – is I/O, and what is not I/O? Let me clarify, for me as much as for you.

Blocking vs non-blocking

Let's start by defining blocking. A line of code is blocking, if all functionality invoked by that line of code must terminate before the next line of code executes.

This is the way that all traditional procedural code works. Here's a super-basic example of some blocking code in JavaScript:

console.log('Peking duck');
console.log('Coconut lychee');

In this example, the first line of code is blocking. Therefore, the first line must finish doing everything we told it to do, before our CPU gives the second line of code the time of day. Therefore, we are guaranteed to get this output:

Peking duck
Coconut lychee

Now, let me introduce you to Kev the Kook. Rather than just outputting the above lines to console, Kev wants to thoroughly cook his Peking duck, and exquisitely prepare his coconut lychee, before going ahead and brashly telling the guests that the various courses of their dinner are ready. Here's what we're talking about:

function prepare_peking_duck() {
  var duck = slaughter_duck();
  duck = remove_feathers(duck);
  var oven = preheat_oven(180, 'Celsius');
  duck = marinate_duck(duck, "Mr Wu's secret Peking herbs and spices");
  duck = bake_duck(duck, oven);
  serve_duck_with(duck, 'Spring rolls');
}

function prepare_coconut_lychee() {
  bowl = get_bowl_from_cupboard();
  bowl = put_lychees_in_bowl(bowl);
  bowl = put_coconut_milk_in_bowl(bowl);
  garnish_bowl_with(bowl, 'Peanut butter');
}

prepare_peking_duck();
console.log('Peking duck is ready');

prepare_coconut_lychee();
console.log('Coconut lychee is ready');

In this example, we're doing quite a bit of grunt work. Also, it's quite likely that the first task we call will take considerably longer to execute than the second task (mainly because we have to remove the feathers, that can be quite a tedious process). However, all that grunt work is still guaranteed to be performed in the order that we specified. So, the Peking duck will always be ready before the coconut lychee. This is excellent news, because eating the coconut lychee first would simply be revolting, everyone knows that it's a dessert dish.

Now, let's suppose that Kev previously had this code implemented in server-side JavaScript, but in a regular library that provided only blocking functions. He's just decided to port the code to Node.js, and to re-implement it using non-blocking functions.

Up until now, everything was working perfectly: the Peking duck was always ready before the coconut lychee, and nobody ever went home with a sour stomach (well, alright, maybe the peanut butter garnish didn't go down so well with everyone… but hey, just no pleasing some folks). Life was good for Kev. But now, things are more complicated.

In contrast to blocking, a line of code is non-blocking, if the next line of code may execute before the line of functionality invoked by that line of code has terminated.

Back to Kev's Chinese dinner. It turns out that in order to port the duck and lychee code to Node.js, pretty much all of his high-level functions will have to call some non-blocking Node.js library functions. And the way that non-blocking code essentially works is: if a function calls any other function that is non-blocking, then the calling function itself is also non-blocking. Sort of a viral, from-the-inside-out effect.

Kev hasn't really got his head around this whole non-blocking business. He decides, what the hell, let's just implement the code exactly as it was before, and see how it works. To his great dismay, though, the results of executing the original code with Node.js non-blocking functions is not great:

Peking duck is ready
Coconut lychee is ready

/path/to/prepare_peking_duck.js:9
    duck.toString();
         ^
TypeError: Cannot call method 'toString' of undefined
    at remove_feathers (/path/to/prepare_peking_duck.js:9:8)

This output worries Kev for two reasons. Firstly, and less importantly, it worries him because there's an error being thrown, and Kev doesn't like errors. Secondly, and much more importantly, it worries him because the error is being thrown after the program successfully outputs both "Peking duck is ready" and "Coconut lychee is ready". If the program isn't able to get past the end of remove_feathers() without throwing a fatal error, then how could it possibly have finished the rest of the duck and lychee preparation?

The answer, of course, is that all of Kev's dinner preparation functions are now effectively non-blocking. This means that the following happened when Kev ran his script:

Called prepare_peking_duck()
  Called slaughter_duck()
    Non-blocking code in slaughter_duck() doesn't execute until
    after current blocking code is done. Is supposed to return an int,
    but actually returns nothing
  Called remove_feathers() with return value of slaughter_duck()
  as parameter
    Non-blocking code in remove_feathers() doesn't execute until
    after current blocking code is done. Is supposed to return an int,
    but actually returns nothing
  Called other duck-preparation functions
    They all also contain non-blocking code, which doesn't execute
    until after current blocking code is done
Printed 'Peking duck is ready'
Called prepare_coconut_lychee()
  Called lychee-preparation functions
    They all also contain non-blocking code, which doesn't execute
    until after current blocking code is done
Printed 'Coconut lychee is ready'
Returned to prepare_peking_duck() context
  Returned to slaughter_duck() context
    Executed non-blocking code in slaughter_duck()
  Returned to remove_feathers() context
    Error executing non-blocking code in remove_feathers()

Before too long, Kev works out – by way of logical reasoning – that the execution flow described above is indeed what is happening. So, he comes to the realisation that he needs to re-structure his code to work the Node.js way: that is, using a whole lotta callbacks.

After spending a while fiddling with the code, this is what Kev ends up with:

function prepare_peking_duck(done) {
  slaughter_duck(function(err, duck) {
    remove_feathers(duck, function(err, duck) {
      preheat_oven(180, 'Celsius', function(err, oven) {
        marinate_duck(duck,
                      "Mr Wu's secret Peking herbs and spices",
                      function(err, duck) {
          bake_duck(duck, oven, function(err, duck) {
            serve_duck_with(duck, 'Spring rolls', done);
          });
        });
      });
    });
  });
}

function prepare_coconut_lychee(done) {
  get_bowl_from_cupboard(function(err, bowl) {
    put_lychees_in_bowl(bowl, function(err, bowl) {
      put_coconut_milk_in_bowl(bowl, function(err, bowl) {
        garnish_bowl_with(bowl, 'Peanut butter', done);
      });
    });
  });
}

prepare_peking_duck(function(err) {
  console.log('Peking duck is ready');
});

prepare_coconut_lychee(function(err) {
  console.log('Coconut lychee is ready');
});

This runs without errors. However, it produces its output in the wrong order – this is what it spits onto the console:

Coconut lychee is ready
Peking duck is ready

This output is possible because, with the code in its current state, the execution of both of Kev's preparation routines – the Peking duck preparation, and the coconut lychee preparation – are sent off to run as non-blocking routines; and whichever one finishes executing first gets its callback fired before the other. And, as mentioned, the Peking duck can take a while to prepare (although utilising a cloud-based grid service for the feather plucking can boost performance).

Now, as we already know, eating the coconut lychee before the Peking duck causes you to fart a Szechuan Stinker, which is classified under international law as a chemical weapon. And Kev would rather not be guilty of war crimes, simply on account of a small culinary technical hiccup.

This final execution-ordering issue can be fixed easily enough, by converting one remaining spot to use a nested callback pattern:

prepare_peking_duck(function(err) {
  console.log('Peking duck is ready');
  prepare_coconut_lychee(function(err) {
    console.log('Coconut lychee is ready');
  });
});

Finally, Kev can have his lychee and eat it, too.

I/O vs non-I/O

I/O stands for Input/Output. I know this because I spent four years studying Computer Science at university.

Actually, that's a lie. I already knew what I/O stood for when I was about ten years old.

But you know what I did learn at university? I learnt more about I/O than what the letters stood for. I learnt that the technical definition of a computer program, is: an executable that accepts some discrete input, that performs some processing, and that finishes off with some discrete output.

Actually, that's a lie too. I already knew that from high school computer classes.

You know what else is a lie? (OK, not exactly a lie, but at the very least it's confusing and incomplete). The description that Node.js folks give you for "what I/O means". Have a look at any old source (yes, pretty much anywhere will do). Wherever you look, the answer will roughly be: I/O is working with files, doing database queries, and making web requests from your app.

As I said, that's not exactly a lie. However, that's not what I/O is. That's a set of examples of what I/O is. If you want to know what the definition of I/O actually is, let me tell you: it's any interaction that your program makes with anything external to itself. That's it.

I/O usually involves your program reading a piece of data from an external source, and making it available as a variable within your code; or conversely, taking a piece of data that's stored as a variable within your code, and writing it to an external source. However, it doesn't always involve reading or writing data; and (as I'm trying to emphasise), it doesn't need to involve that, in order to fall within the definition of I/O for your program.

At a basic technical level, I/O is nothing more than any instance of your program invoking another program on the same machine. The simplest example of this, is executing another program via a command-line statement from your program. Node.js provides the non-blocking I/O function child_process.exec() for this purpose; running shell commands with it is pretty easy.

The most common and the most obvious example of I/O, reading and writing files, involves (under the hood) your program invoking the various utility programs provided by all OSes for interacting with files. open is another program somewhere on your system. read, write, close, stat, rename, unlink – all individual utility programs living on your box.

From this perspective, a DBMS is just one more utility program living on your system. (At least, the client utility lives on your system – where the server lives, and how to access it, is the client utility's problem, not yours). When you open a connection to a DB, perform some queries (regardless of them being read or write queries), and then close the connection, the only really significant point (for our purposes) is that you're making various invocations to a program that's external to your program.

Similarly, all network communication performed by your program is nothing more than a bunch of invocations to external utility programs. Although these utility programs provide the illusion (both to the programmer and to the end-user) that your program is interacting directly with remote sources, in reality the direct interaction is only with the utilities on your machine for opening a socket, port mapping, TCP / UDP packet management, IP addressing, DNS lookup, and all the other gory details.

And, of course, working with HTTP is simply dealing with one extra layer of utility programs, on top of all the general networking utility programs. So, when you consider it from this point of view, making a JSON API request to an online payment broker over SSL, is really no different to executing the pwd shell command. It's all I/O!

I hope I've made it crystal-clear by now, what constitutes I/O. So, conversely, you should also now have a clearer idea of exactly what constitutes non-I/O. In a nutshell: any code that does not invoke any external programs, any code that is completely insular and that performs all processing internally, is non-I/O code.

The philosophy behind Node.js, is that most database-driven web apps – what with their being database-driven, and web-based, and all – don't actually have a whole lot of non-I/O code. In most such apps, the non-I/O code consists of little more than bits 'n' pieces that happen in between the I/O bits: some calculations after retrieving data from the database; some rendering work after performing the business logic; some parsing and validation upon receiving incoming API calls or form submissions. It's rare for web apps to perform any particularly intensive tasks, without the help of other external utilities.

Some programs do contain a lot of non-I/O code. Typically, these are programs that perform more heavy processing based on the direct input that they receive. For example, a program that performs an expensive mathematical computation, such as finding all Fibonacci numbers up to a given value, may take a long time to execute, even though it only contains non-I/O code (by the way, please don't write a Fibonacci number app in Node.js). Similarly, image processing utility programs are generally non-I/O, as they perform a specialised task using exactly the image data provided, without outside help.

Putting it all together

We should now all be on the same page, regarding blocking vs non-blocking code, and regarding I/O vs non-I/O code. Now, back to the point of this article, which is to better explain the key feature of Node.js: its non-blocking I/O model.

As others have explained, in Node.js everything runs in parallel, except your code. What this means is that all I/O code that you write in Node.js is non-blocking, while (conversely) all non-I/O code that you write in Node.js is blocking.

So, as Node.js experts are quick to point out: if you write a Node.js web app with non-I/O code that blocks execution for a long time, your app will be completely unresponsive until that code finishes running. As I said: please, no Fibonacci in Node.js.

When I started writing in Node.js, I was under the impression that the V8 engine it uses automagically makes your code non-blocking, each time you make a function call. So I thought that, for example, changing a long-running while loop to a recursive loop would make my (completely non-I/O) code non-blocking. Wrong! (As it turns out, if you'd like a language that automagically makes your code non-blocking, apparently Erlang can do it for you – however, I've never used Erlang, so can't comment on this).

In fact, the secret to non-blocking code in Node.js is not magic. It's a bag of rather dirty tricks, the most prominent (and the dirtiest) of which is the process.nextTick() function.

As others have explained, if you need to write truly non-blocking processor-intensive code, then the correct way to do it is to implement it as a separate program, and to then invoke that external program from your Node.js code. Remember:

Not in your Node.js code == I/O == non-blocking

I hope this article has cleared up more confusion than it's created. I don't think I've explained anything totally new here, but I believe I've explained a number of concepts from a perspective that others haven't considered very thoroughly, and with some new and refreshing examples. As I said, I'm still brand new to Node.js myself. Anyway, happy coding, and feel free to add your two cents below.

]]>